DBA1-17 Tantor: PostgreSQL 17 Administration. Practices |
DBA1-17 Tantor: PostgreSQL 17 Administration. Practices |
Table of contents
chapter | page |
3 | |
31 | |
36 | |
Chapter 2 c . Routine Maintenance | 43 |
50 | |
54 | |
60 | |
78 | |
89 | |
112 | |
115 | |
Chapter 7a. Physical backup | 124 |
Chapter 7b. Logical backup | 140 |
148 | |
181 | |
Chapter 10. Tantor Postgres 17.5 New features | 199 |
Copyright
The textbook, practical assignments, presentations (hereinafter referred to as documents) are intended for educational purposes.
The documents are protected by copyright and intellectual property laws.
You may copy and print documents for personal use for self-study purposes, as well as when studying at training centers and educational institutions authorized by Tantor Labs LLC. Training centers and educational institutions authorized by Tantor Labs LLC may create training courses based on the documents and use the documents in training programs with the written permission of Tantor Labs LLC.
You may not use the documents for paid training of employees or other persons without permission from Tantor Labs LLC. You may not license, commercially use the documents in whole or in part without permission from Tantor Labs LLC.
For non-commercial use (presentations, reports, articles, books) of information from documents (text, images, commands), keep a link to the documents.
The text of the documents cannot be changed in any way.
The information contained in the documents may be changed without prior notice and we do not guarantee its accuracy. If you find errors, copyright infringement, please inform us about it.
Disclaimer for content, products and services of third parties:
Tantor Labs, LLC and its affiliates are not responsible for and expressly disclaim any warranties of any kind, including loss of income, whether direct or indirect, special or incidental, arising from the use of the document. Tantor Labs, LLC and its affiliates are not responsible for any losses, costs or damages arising from the use of the information contained in the document or the use of third-party links, products or services.
Copyright © 2025, Tantor Labs LLC
Author : Oleg Ivanov
! | Created: 25 June 2025 |
Part 1. Creating a cluster
1) Open a terminal with root rights:
astra@tantor:~$ sudo bash
2) See how many processor cores are available in the virtual machine (the result may differ from the values given as an example):
root@tantor:/home/astra# cat /proc/cpuinfo | grep cores
CPU cores: 2
CPU cores: 2
Number of lines by number of processors. If you run the command without " | grep cores " you will see that detailed data is given for each processor core.
How much RAM is there:
root @ tantor : / home / astra # cat / proc / meminfo | grep Mem
MemTotal: 2981180 kB
MemFree: 1306840 kB
MemAvailable: 2168596 kB
3) Tantor DBMS software is installed in the /opt/tantor/db directory
Directory with cluster files: /var/lib/postgresql
These directories may have separate mount points, but in our operating system these directories are mounted in the root "/" . Check how much free space is left:
root@tantor:/home/astra# df -HT | grep /$
/dev/sda1 ext4 50G 17G 31G 36% /
31 GB free.
For industrial use, it is recommended to have 4 cores.
RAM: at least 4 GB.
Free space on the storage system ("disk"): 40 GB.
4) Download the installer:
root @ tantor :/ home / astra # wget https :// public . tantorlabs . ru / db_installer . sh
https :// public . tantorlabs . ru / db_installer . sh
Resolving public.tantorlabs.ru (public.tantorlabs.ru)... 84.201.157.208
Connecting to public.tantorlabs.ru (public.tantorlabs.ru)|84.201.157.208|:443... connected.
HTTP request sent, awaiting response... 200 OK
Length: 18312 (18K) [application/octet-stream]
Saving to: 'db_installer.sh'
db_installer.sh 100%[================================================>] 17.88K --.-KB/s in 0s
'db_installer.sh' saved [18312/18312]
5) Check the permissions for executing the installation script:
root@tantor:/home/astra# ls -al db_installer.sh
-rw-r--r-- 1 root root 18353 db_installer.sh
6) If there are no permissions to execute the file, then grant execution rights:
root@tantor:/home/astra# chmod +x db_installer.sh
7) Check the installer version and familiarize yourself with the parameters:
root@tantor:/home/astra# ./db_installer.sh --help
====================
Usage: db_installer.sh [OPTIONS]
Installer version: 25.01.29
This script will perform installation of the Tantor DB on current host.
If the Tantor DB is already installed, no actions will be taken.
Available options:
--help Show this help message.
-------------------------------------------
--edition= Set edition (be, se, se-1c, se-certified). "se" is default.
--major-version= Set major version (14, 15)
--maintenance-version= Set maintenance version (15.2.4).
By default latest version will be installed.
--do-initdb After installation run initdb with checksums.
--package= Set specific package (all, client, libpq5).
"all" is default.
-------------------------------------------
--from-file= Install package from local file (rpm, deb)
May be used with --do-initdb option
====================
Example for commercial use
====================
export NEXUS_USER="user_name"
export NEXUS_USER_PASSWORD="user_password"
export NEXUS_URL="nexus.tantorlabs.ru"
./db_installer.sh \
--do-initdb \
--major-version=15 \
--edition=se
====================
Example for evaluation use (without login and password)
Only for Basic Edition
====================
export NEXUS_URL="nexus-public.tantorlabs.ru"
./db_installer.sh \
--do-initdb \
--major-version=15 \
--edition=be
====================
Examples how to install from file
====================
./db_installer.sh \
--from-file=./packages/tantor-be-server-15_15.4.1.jammy_amd64.deb
./db_installer.sh \
--do-initdb \ --from-file=/tmp/tantor-be-server-15_15.4.1.jammy_amd64.deb
When creating a cluster, the installer enables the calculation of checksums for data blocks .
8) Reset the password for the postgres user . Use the postgres password:
root@tantor:/home/astra# passwd postgres
New password: postgres
Retype new password: postgres
passwd: password updated successfully
9 ) Check that path To executable files was added V file profiles user postgres . Switch to the postgres user , which is created by the installer to run cluster instances. The "-" parameter forces the execution of the profile files of the user you are switching to.
root@tantor:/home/astra# su - postgres
postgres@tantor:~$ cat .bash_profile
export PATH=/opt/tantor/db/17/bin:$PATH
export PGDATA=/var/lib/postgresql/tantor-se-17/data
#export LC_MESSAGES=ru_RU.utf8
#unset LANGUAGE
10) Perform this step only if the PGDATA environment variable is missing in the . bash_profile file .
If the variable is missing, then add the path to the cluster files to the environment variable, so that in the future you do not have to specify it each time with the parameter named "-D" to the utilities. The command should be entered in one line, using two angle brackets:
postgres @ tantor :~$
echo "export PGDATA=/var/lib/postgresql/tantor-se-17/data" >> .bash_profile
Please check that you have successfully and correctly added PGDATA to the end of the profile file.
postgres@tantor:~$ cat .bash_profile
export PATH=/opt/tantor/db/17/bin:$PATH
#export LC_MESSAGES=ru_RU.utf8
#unset LANGUAGE
export PGDATA=/var/lib/postgresql/tantor-se-17/data
Re-read the profile file that you changed:
postgres@tantor:~$ source .bash_profile
Part 2. Creating a cluster using the initdb utility
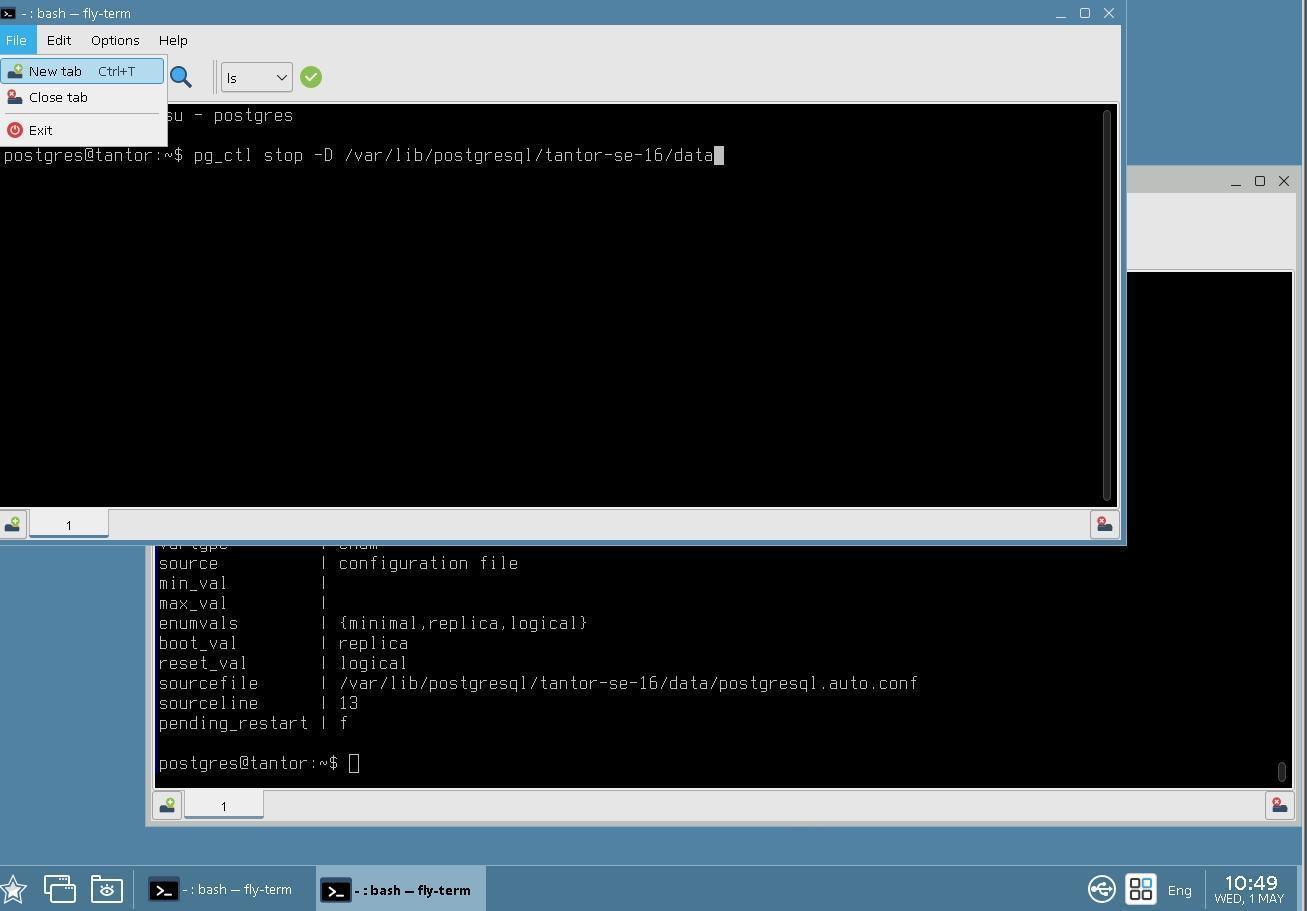
1) Stop two cluster instances. Use the pg_ctl utility :
postgres@tantor:~$ pg_ctl stop
waiting for server to shut down.... done
server stopped
postgres@tantor:~$
/usr/lib/postgresql/15/bin/pg_ctl stop -D /var/lib/postgresql/15/main
waiting for server to shut down.... done
server stopped
root@tantor:~# sudo systemctl stop postgresql
sudo systemctl disable postgresql
Synchronizing state of postgresql.service with SysV service script with /lib/systemd/systemd-sysv-install.
Executing: /lib/systemd/systemd-sysv-install disable postgresql
Removed "/etc/systemd/system/multi-user.target.wants/postgresql.service".
You have stopped the Astralinux instance. PostgreSQL 15. Systemctl Service Stop Command stop postgresql did not return a result, even though the instance was already stopped. You could use the command to manage services started by the systemd infrastructure : sudo systemctl stop tantor - se - server -17 , but there is no guarantee that after the prompt returns all processes are stopped.
When launched by the command systemctl first checks that the PGDATA directory is "similar" to the cluster directory using the postgresql -check-db-dir utility , and then pg_ctl start is used.
/usr/lib/systemd/system/tantor-se-server-17.service with a text editor you are familiar with ( kate or mcedit ) , or, if you are not familiar, use the cat command and find the lines, find the lines where the utilities are specified that are called when starting, stopping or updating (reloading) the service:
postgres@tantor:~$
cat /usr/lib/systemd/system/tantor-se-server-17.service | grep /opt
ExecStartPre=/opt/tantor/db/17/bin/ postgresql-check-db-dir ${PGDATA}
ExecStart=/opt/tantor/db/17/bin/ pg_ctl start -D ${PGDATA} -s -w -t ${PGSTARTTIMEOUT}
ExecStop=/opt/tantor/db/17/bin/ pg_ctl stop -D ${PGDATA} -s -m fast
ExecReload=/opt/tantor/db/17/bin/ pg_ctl reload -D ${PGDATA} -s
To start, stop, reread the configuration, use the pg_ctl utility . Reload is not a reboot.
Default stop mode - fast .
If the instance was started with the pg_ctl utility , and not via systemd , then systemctl will not stop the instance. However, pg_ctl stops the instance started in any way. Therefore, it is recommended to stop the instance with the pg_ctl utility .
to start an instance via systemctl . When starting an instance via a network connection (connected via ssh) using the pg_ctl utility , the instance will be forcibly stopped after the network connection (via ssh) is closed . Also, when starting via pg_ctl, you need to configure the output of the message log to a file, and not to the terminal screen.
3) Run the command to stop the instance again. If the instance is running, it stops, if it is not running, the utility will report this:
postgres@tantor:~$ pg_ctl stop
pg_ctl: PID file "/var/lib/postgresql/tantor-se-17/data/postmaster.pid" does not exist
Is the server running?
4) Save the cluster directory by running three commands:
postgres@tantor:~$ mkdir $PGDATA/../data.SAVE
mv $PGDATA/* $PGDATA/../data.SAVE
chmod 750 $PGDATA/../data.SAVE
5) Create a new cluster. To create a cluster, use the initdb utility . The utility is passed parameters and responds to environment variables, in particular those related to localization (but not only). Run the utility without parameters (with default values):
postgres@tantor:~$ initdb
The files belonging to this database system will be owned by user "postgres".
This user must also own the server process.
The database cluster will be initialized with locale "en_US.UTF-8" .
The default database encoding has accordingly been set to "UTF8".
The default text search configuration will be set to "english".
Data page checksums are disabled.
fixing permissions on existing directory /var/lib/postgresql/tantor-se-17/data ... ok
creating subdirectories ... ok
selecting dynamic shared memory implementation ... posix
selecting default max_connections ... 100
selecting default shared_buffers ... 128MB
selecting default time zone ... Europe/Moscow
creating configuration files ... ok
running bootstrap script ... ok
performing post-bootstrap initialization ... ok
syncing data to disk ... ok
initdb: warning: enabling "trust" authentication for local connections
initdb: hint: You can change this by editing pg_hba.conf or using the option -A, or --auth-local and --auth-host, the next time you run initdb.
Success. You can now start the database server using:
pg_ctl -D /var/lib/postgresql/tantor-se-17/data -l logfile start
6) Read the result. To do this, you can use the keys on the keyboard <Shift+PgUp> <Shift+PgDown>. Please note that up to version 18 of PostgreSQL, the calculation of checksums is not enabled by default .
The localization parameters with which the cluster was created are also provided.
7) Check with the pg_controldata utility that checksum calculation is not enabled:
postgres@tantor:~$ pg_controldata
pg_control version number: 1300
Catalog version number: 202307071
Database system identifier: 7340951136757174317
Database cluster state: shut down
pg_control last modified: 12:19:38
Latest checkpoint location: 0/1514AB0
Latest checkpoint's REDO location: 0/1514AB0
Latest checkpoint's REDO WAL file: 000000010000000000000001
Latest checkpoint's TimeLineID: 1
Latest checkpoint's PrevTimeLineID:1
Latest checkpoint's full_page_writes: on
Latest checkpoint's NextXID: 731
Latest checkpoint's NextOID: 13602
Latest checkpoint's NextMultiXactId: 1
Latest checkpoint's NextMultiOffset: 0
Latest checkpoint's oldestXID: 723
Latest checkpoint's oldestXID's DB: 1
Latest checkpoint's oldestActiveXID: 0
Latest checkpoint's oldestMultiXid: 1
Latest checkpoint's oldestMulti's DB: 1
Latest checkpoint's oldestCommitTsXid:0
Latest checkpoint's newestCommitTsXid:0
Time of latest checkpoint: 12:19:38
Fake LSN counter for unlogged rels: 0/3E8
Minimum recovery ending location: 0/0
Min recovery ending loc's timeline: 0
Backup start location: 0/0
Backup end location: 0/0
End-of-backup record required: no
wal_level setting: replica
wal_log_hints setting: off
max_connections setting: 100
max_worker_processes setting: 8
max_wal_senders setting: 10
max_prepared_xacts setting: 0
max_locks_per_xact setting: 64
track_commit_timestamp setting: off
Maximum data alignment: 8
Database block size: 8192
Blocks per segment of large relation: 131072
WAL block size: 8192
Bytes per WAL segment: 16777216
Maximum length of identifiers: 64
Maximum columns in an index: 32
Maximum size of a TOAST chunk: 1996
Size of a large-object chunk: 2048
Date/time type storage: 64-bit integers
Float8 argument passing: by value
Data page checksum version: 0
Mock authentication nonce: 0d18c599c7876e965a894cd059b60c1307f5e1a959703351495b0193f729174a
8) Find the information in the results that the cluster instance was not started or shut down correctly. This is the line:
Database cluster state: shut down
9) Look at the command line parameters of the pg_checksum utility :
postgres@tantor:~$ pg_checksums --help
pg_checksums enables, disables, or verifies data checksums in a PostgreSQL database cluster.
Usage:
pg_checksums [OPTION]... [DATADIR]
Options:
[-D, --pgdata=]DATADIR data directory
-c, --check check data checksums (default)
-d, --disable disable data checksums
-e, --enable enable data checksums
-f, --filenode=FILENODE check only relation with specified filenode
-N, --no-sync do not wait for changes to be written safely to disk
-P, --progress show progress information
-v, --verbose output verbose messages
-V, --version output version information, then exit
-?, --help show this help, then exit
If no data directory (DATADIR) is specified, the environment variable PGDATA
is used.
The utility can include the calculation of checksums on clusters.
10) Enable checksum calculation. You shouldn't use the -v parameter , as it will list all the files in the cluster, and there are a lot of them.
postgres@tantor:~$ pg_checksums -e
Checksum operation completed
Files scanned: 948
Blocks scanned: 2817
Files written: 780
Blocks written: 2817
pg_checksums: syncing data directory
pg_checksums: updating control file
Checksums enabled in cluster
11) The -c option checks blocks in existing data files against the checksums stored in their blocks.
Check the integrity of the cluster data files:
postgres@tantor:~$ pg_checksums -c
Checksum operation completed
Files scanned: 948
Blocks scanned: 2817
Bad checksums: 0
Data checksum version : 1
This command can be used to check if there are any bad blocks. The only drawback is that the instance must be stopped.
12) Start the cluster instance:
postgres@tantor:~$ pg_ctl start
waiting for server to start....
LOG: starting PostgreSQL 17.5 on x86_64-pc-linux-gnu, compiled by gcc (Astra 12.2.0-14.astra3) 12.2.0, 64-bit
LOG: listening on IPv4 address " 127.0.0.1 ", port 5432
LOG: listening on Unix socket "/var/run/postgresql/ .s.PGSQL.5432 "
LOG: database system was shut down at 13:25:56 MSK
LOG: database system is ready to accept connections
done
server started
The instance uses port 5432 for Unix sockets and on the local network interface.
13) The instance can also be started with the command sudo systemctl start tantor-se-server-17 . And it is better to use the start with systemctl . When started with the command pg_ctl start , which we used, messages are printed to the error output stream , which by default is directed to the terminal of the postgres operating system user .
Check it out This :
postgres@tantor:~$ psql -c "\dconfig log_destination"
List of configuration parameters
Parameter | Value
-----------------+--------
log_destination | std err
(1 row)
When running with systemd, the parameter value is the same ( log_destination=stderr ), but the error output stream is directed to the operating system log or the syslog process (the text file /var/log/syslog, where all messages from operating system processes are collected).
During industrial operation, large volumes of text may be transferred to the log, and it is better to use the logger message collection process (enabled by the logging_collector= on configuration parameter ), which operates in asynchronous mode and does not cause delays in the operation of processes. Configuring the message log is covered in a separate chapter of the course.
Part 3. Single User Mode
1) Let's look at the use of single user mode. It is used in rare cases.
Stop the cluster instance:
postgres@tantor:~$ pg_ctl stop
waiting for server to shut down.... done
server stopped
the utility's stop messages pg_ctl will display messages on the screen that are usually output to the diagnostic log .
2) Start one process that will accept our commands in one session:
postgres@tantor:~$ postgres --single
PostgreSQL stand-alone backend 17.5
3) A prompt will appear. SELECT type commands do not return the result in the usual form, but with diagnostic data. Also, commands do not necessarily have to be completed and sent for execution with the ";" symbol .
Issue the SELECT command:
backend> select tantor_version()
1: tantor_version (typeid = 25, len = -1, typmod = -1, byval = f)
----
1: tantor_version = " Tantor Special Edition 17.5.0 " (typeid = 25, len = -1, typmod = -1, byval = f)
----
4) Give command reindex system :
backend> reindex system
5) To exit the session, type the key combination <Ctrl+D> on the keyboard . psql commands (starting with a backslash, for example, the psql exit command "\q") and their synonyms (quit, exit which are synonyms for \q) do not work, since we are not working in the psql utility .
Disconnect from the cluster by typing <Ctrl+D> :
backend> <Ctrl+D> LOG: checkpoint starting: shutdown immediate
LOG: checkpoint complete: wrote 145 buffers (0.9%); 0 WAL file(s) added, 0 removed, 1 recycled; write=0.007 s, sync=0.070 s, total=0.086 s; sync files=283, longest=0.012 s, average=0.001 s; distance=5719 kB, estimate=5719 kB; lsn=0/208C110, redo lsn=0/208C110
postgres@tantor:~$
Note: If you accidentally typed <Ctrl+z> instead of <Ctrl+D> (EOF), you suspended the process and sent it to the background. You can return the process to foreground mode and get the opportunity to terminate the process properly by using the fg postgres command . Example :
postgres@tantor:~$ postgres --single
PostgreSQL stand-alone backend 17.5
backend> ^Z
[1]+ Stopped postgres --single
postgres@tantor:~$ fg postgres
postgres --single
<ENTER>
backend> <Ctrl+D>
MESSAGE: Checkpoint started: shutdown immediate
Note: The text in the "shutdown immediate" message refers to the checkpoint properties, not to the instance's shutdown mode. Stopping an instance in immediate mode ( pg_ctl stop -m immediate command) does not perform a checkpoint.
Text in checkpoint messages (after LOG: checkpoint starting :) means:
shutdown : The checkpoint is caused by stopping the instance.
immediate : Execute the checkpoint at maximum speed, ignoring the value of the checkpoint_completion_target parameter.
force : perform a checkpoint even if nothing has been written to the WAL since the previous checkpoint (there was no activity in the cluster), this happens if the instance is shut down or at the end-of-recovery.
wait : Wait for the checkpoint to complete before returning control to the process that called the checkpoint (without wait , the process will run the checkpoint and continue running).
end-of-recovery : checkpoint at the end of log rolling (WAL recovery).
xlog : checkpoint caused by max_wal_size being reached ("by size").
time : checkpoint caused by reaching checkpoint_timeout ("by time").
6) Run the instance as root:
postgres@tantor:~$ su -
Password: root
root@tantor:~# systemctl start tantor-se-server-17
root@tantor:~#
7) Exit the root terminal (instead of exit , you can type the key combination <Ctrl+D> ) :
root@tantor:~# exit
logout
postgres@tantor:~$
8) Stop the instance. Regardless of how it was started, it can be stopped using the pg_ctl utility :
postgres@tantor:~$ pg_ctl stop
waiting for server to shut down.... done
server stopped
Part 4. Passing parameters to an instance on the command line
1) Let's see how to pass configuration parameters to launch an instance on the command line. Let's set the work_mem parameter to 8 megabytes. Some configuration parameters can only be set by passing them on the command line.
Run the following command:
postgres@tantor:~$ pg_ctl start -o "--work_mem=8MB" -l logfile.log
waiting for server to start....
[19479] LOG: starting PostgreSQL 17.5 on x86_64-pc-linux-gnu, compiled by gcc (Astra 12.2.0-14.astra3) 12.2.0, 64-bit
[19479] LOG: listening on IPv6 address "::1", port 5432
[19479] LOG: listening on Unix socket "/var/run/postgresql/.s.PGSQL.5432"
[19482] LOG: database system was shut down at 13:59:08 MSK
[19479] LOG: database system is ready to accept connections
2) Check that the parameter is installed:
postgres@tantor:~$ psql -c "show work_mem"
work_mem
----------
8MB
(1 row)
Part 5. Localization
1) After creating the cluster, let's check whether the sorting works satisfactorily:
postgres=# SELECT n FROM unnest(ARRAY[' а ', ' е ', ' ё ', ' І ', ' а ', ' І ',' Е ']) n ORDER BY n;
n
---
a
e
E
no
No
J
or
(7 rows)
postgres=# SELECT n FROM unnest(ARRAY[' a ', ' e ', ' e ', ' F ', ' i ', ' E ', ' E ']) n ORDER BY n COLLATE "ru-x- icu ";
n
---
A
e
E
yo
Yo
AND
I
(7 rows)
2) Let's see what types of sorting the operating system supported when creating the cluster:
postgres=# select collname from pg_collation where collname like '%ru%RU%';
collname
-------------
ru_RU
ru_RU.cp1251
ru_RU.iso88595
ru_RU.utf8
ru_RU
ru_RU
ru-RU-x-icu
(7 rows)
Part 6. Single-byte encodings
The commands given below in this section do not need to be executed, but can be viewed:
1) postgres=# select collname from pg_collation where collname like '%ru%RU%';
collname
----------------
ru_RU
ru_RU.cp1251
ru_RU.iso88595
ru_RU.utf8
ru_RU
ru_RU
ru-RU-x-icu
(7 rows)
2) Creating a database with a different collation type:
postgres=# create database lab01iso88595 LC_COLLATE = ' ru_RU.iso88595 ';
ERROR: encoding "UTF8" does not match locale "ru_RU.iso88595"
DETAIL: The chosen LC_COLLATE setting requires encoding "ISO_8859_5".
The error indicates that the sorting is related to the encoding.
3) Let us indicate encoding :
postgres=# create database lab01iso88595 LC_COLLATE = 'ru_RU.iso88595' ENCODING='ISO_8859_5';
ERROR: encoding "ISO_8859_5" does not match locale "en_US.UTF-8"
DETAIL: The chosen LC_CTYPE setting requires encoding "UTF8".
The error indicates that ctype is also related to encoding.
4) Let's try more :
postgres=# create database lab01iso88595 LC_COLLATE = 'ru_RU.iso88595' LC_CTYPE='ru_RU.iso88595';
ERROR: encoding "UTF8" does not match locale "ru_RU.iso88595"
DETAIL: The chosen LC_CTYPE setting requires encoding "ISO_8859_5".
Make sure that the selected ctype requires specifying the encoding for the database being created.
5) Укажем все три параметра:
postgres=# create database lab01iso88595 LC_COLLATE = 'ru_RU.iso88595' LC_CTYPE='ru_RU.iso88595' ENCODING='ISO_8859_5';
ERROR: new encoding (ISO_8859_5) is incompatible with the encoding of the template database (UTF8)
HINT: Use the same encoding as in the template database, or use template0 as template.
The error indicates that the template1 database cannot be used, the only template that can be used is template0 .
6) Let us indicate Name template :
postgres=# create database lab01iso88595 LC_COLLATE = 'ru_RU.iso88595' LC_CTYPE='ru_RU.iso88595' ENCODING='ISO_8859_5' TEMPLATE= template0;
CREATE DATABASE
When creating a database with a non-default encoding, all four parameters had to be specified for the cluster.
7) Let's connect to the new database and check if the sorting with single-byte encoding works correctly. Let's set it explicitly, but it was possible not to specify it, since for this database, this sorting value is used by default:
postgres=# \c lab01iso88595
You are now connected to database "lab01iso88595" as user "postgres".
lab01iso88595=# SELECT n FROM unnest(ARRAY[' a ', ' e ', ' e ', ' F ', ' i ', ' E ', ' E ']) n ORDER BY n COLLATE " ru_RU.iso88595 " ;
n
---
A
e
E
yo
Yo
AND
I
(7 rows)
Works correctly, just like with UTF-8 encoding.
Part 7. Using Management Utilities
Let's get acquainted with command line utilities, which are shells of SQL commands. Perhaps they will be convenient to use.
1) Look at the parameters of the database creation utility. Linux command line utilities usually have a parameter (key) called --help or -h with a brief description of the parameters.
postgres@tantor:~$ createdb --help
Create a database named lab01database :
postgres@tantor:~$ createdb lab01database
No error was displayed, which means the database has been created.
2) View the list of cluster databases and their default tablespaces using the oid2name utility. Check that the lab01database database is in the list:
postgres@tantor:~$ oid2name
All databases:
OID Database Name Tablespace
----------------------------------
16798 lab01database pg_default
16797 lab01iso88595 pg_default
5 postgres pg_default
4 template0 pg_default
1 template 1 pg_default
3) Create a user named lab01user , with the same password and with attributes that allow connecting to the cluster databases, and the superuser attribute:
postgres@tantor:~$ createuser lab01user --login --superuser -P
Enter password for new role: lab01user
Enter it again: lab01user
postgres@tantor:~$
4) Run the utility for unloading data from the cluster and in the global objects unloading mode: Global objects are common objects for all cluster databases. By default, the utility outputs the created commands to stdout (on the terminal screen).
postgres@tantor:~$ pg_dumpall -g
--
-- PostgreSQL database cluster dump
--
SET default_transaction_read_only = off;
SET client_encoding = 'UTF8';
SET standard_conforming_strings = on;
--
-- Roles
--
CREATE ROLE lab01user;
ALTER ROLE lab01user WITH SUPERUSER INHERIT CREATEROLE CREATEDB LOGIN NOREPLICATION NOBYPASSRLS PASSWORD 'SCRAM-SHA-256$4096:..';
CREATE ROLE postgres;
ALTER ROLE postgres WITH SUPERUSER INHERIT CREATEROLE CREATEDB LOGIN REPLICATION BYPASSRLS;
issued will include a command to recreate the user that was just created.
5) Vacuum all databases and freeze rows:
postgres@tantor:~$ vacuumdb -a -F
vacuumdb: vacuuming database "lab01database"
vacuumdb: vacuuming database "lab01iso88595"
vacuumdb: vacuuming database "postgres"
vacuumdb: vacuuming database "template1"
6) Check that the cluster is running and accepting connections
postgres@tantor:~$ pg_isready
/var/run/postgresql:5432 - accepting connections
Part 8. Setting up the psql terminal client
1) Verify that you are in the postgres user terminal by looking at the command line terminal prompt:
postgres @tantor:~$
2) Run psql and exit the interactive mode of the utility. To exit, you can use the \q command, or the <Ctrl+D> key combination, or quit , or exit .
postgres@tantor:~$ psql
psql (17.5)
Type "help" for help.
postgres=# \q
postgres@tantor:~$
psql and terminal prompts , they are different. This will be useful to avoid entering SQL commands in the operating system terminal and vice versa.
3) Configure the editor that will be called when editing procedures, functions, views in the terminal client psql .
Run the command to write the line to .psqlrc located in the user's home directory (tilde ~):
postgres@tantor:~$ echo "\setenv PAGER 'less -XS'" > ~/.psqlrc
postgres@tantor:~$ echo "\setenv PSQL_EDITOR /usr/bin/mcedit" > > ~/.psqlrc
4) Check that the line you inserted in the previous step has appeared in the file:
postgres@tantor:~$ cat ~/.psqlrc
\setenv PAGER 'less -XS'
\setenv PSQL_EDITOR /usr/bin/mcedit
postgres@tantor:~$
It is also possible to use graphical editors. AstraLinux comes with the kate graphical editor installed by default . However, if you use the su utility to switch the terminal to another operating system user, the graphical editor will not start. In this case, you can use the commands below instead of su . The commands in this section are provided for reference and do not need to be executed.
postgres@tantor:~$ exit
logout
root@tantor:/home/astra# exit
exit
astra@tantor:~$ ssh -X postgres@localhost
The authenticity of host 'localhost (::1)' can't be established.
ECDSA key fingerprint is SHA256:12VsUcC5hw5I1zr015AJ8C+xsN0m5h+IlU2M/xdNg6o.
Are you sure you want to continue connecting (yes/no/[fingerprint])? yes
Warning: Permanently added 'localhost' (ECDSA) to the list of known hosts.
postgres@localhost's password: postgres
/usr/bin/xauth: file /var/lib/postgresql/.Xauthority does not exist
postgres@tantor:~$ export PSQL_EDITOR=kate
postgres@tantor:~$ pg_ctl stop
postgres@tantor:~$ sudo systemctl start tantor-se-server-17
Put away from ~/.psqlrc line \setenv PSQL_EDITOR /usr/bin/mcedit
5) Run psql :
postgres@tantor:~$ psql
psql (17.5)
Type "help" for help.
postgres=#
When connecting via ssh, you should not start the instance with the pg_ctl start utility , since after closing the ssh connection, the instance will stop . The reason is that the parent process that started the postgres process stops. When connecting via ssh, you should start the instance with the command sudo systemctl start tantor-se-server-17.
psql command prompt by typing the command \? , and scroll down to the Query Buffer subsection by pressing the <Enter> key on your keyboard:
postgres=# \?
...
Query Buffer
\e [FILE] [LINE] edit the query buffer (or file) with external editor
\ef [FUNCNAME [LINE]] edit function definition with external editor
\ev [VIEWNAME [LINE]] edit view definition with external editor
\p show the contents of the query buffer
\r reset (clear) the query buffer
\s [FILE] display history or save it to file
\w FILE write query buffer to file
You can use the keys z - scroll the screen up, b - scroll the screen down, q - exit.
You can also scroll the terminal buffer using the <Shift+PgUp> <Shift+PgDn> keys.
7) If it is more convenient to read the hint in Russian, set the environment variable LC_MESSAGES , which sets the language of utility messages. This can be done at the terminal level, the setting will be valid until you close the terminal.
Press the <Ctrl+D> key combination on your keyboard (or type \q and press <Enter>). It is convenient to use <Ctrl+D>, as it is universal and is faster to type.
Dial command :
postgres@tantor:~$ export LC_MESSAGES=ru_RU.utf8
unset LANGUAGE
8) If you want the setting to be in effect permanently, then enter the commands:
postgres@tantor:~$ cp .bash_profile .bash_profile.OLD
echo "export LC_MESSAGES=ru_RU. utf8 " > > ~/.bash_profile
echo " unset LANGUAGE " > > ~ / .bash_profile
9) If you type ">" instead of ">>" , the contents of the file will be erased. A double symbol adds a line to the end of the file. The home directory may contain a file .profile. This file is inconvenient because if there is a file in the home directory .bash_profile or .bash_login , then the .profile file does not work.
Run psql and repeat the \? command . The command history is saved and you can select commands from the history by typing the up or down arrow on the keyboard, and repeat them by pressing <Enter>.
postgres@tantor:~$ psql
psql (17.5)
Type "help" to get help.
postgres=# \?
Request Buffer
\e [FILE] [LINE] edit query buffer (or file) in external editor
\ef [ FUNCTION [LINE]] edit function definition in external editor
\ev [ VIEW NAME [LINE]] edit view definition in external editor
\p output the contents of the query buffer
\r clear request buffer
\s [FILE] output history or save it to file
\w FILE write request buffer to file
: q
If you want to stop displaying the hint, press the " q " key.
10) Read the highlighted text. The \p \r commands are commonly forgotten or not known about, but they are useful.
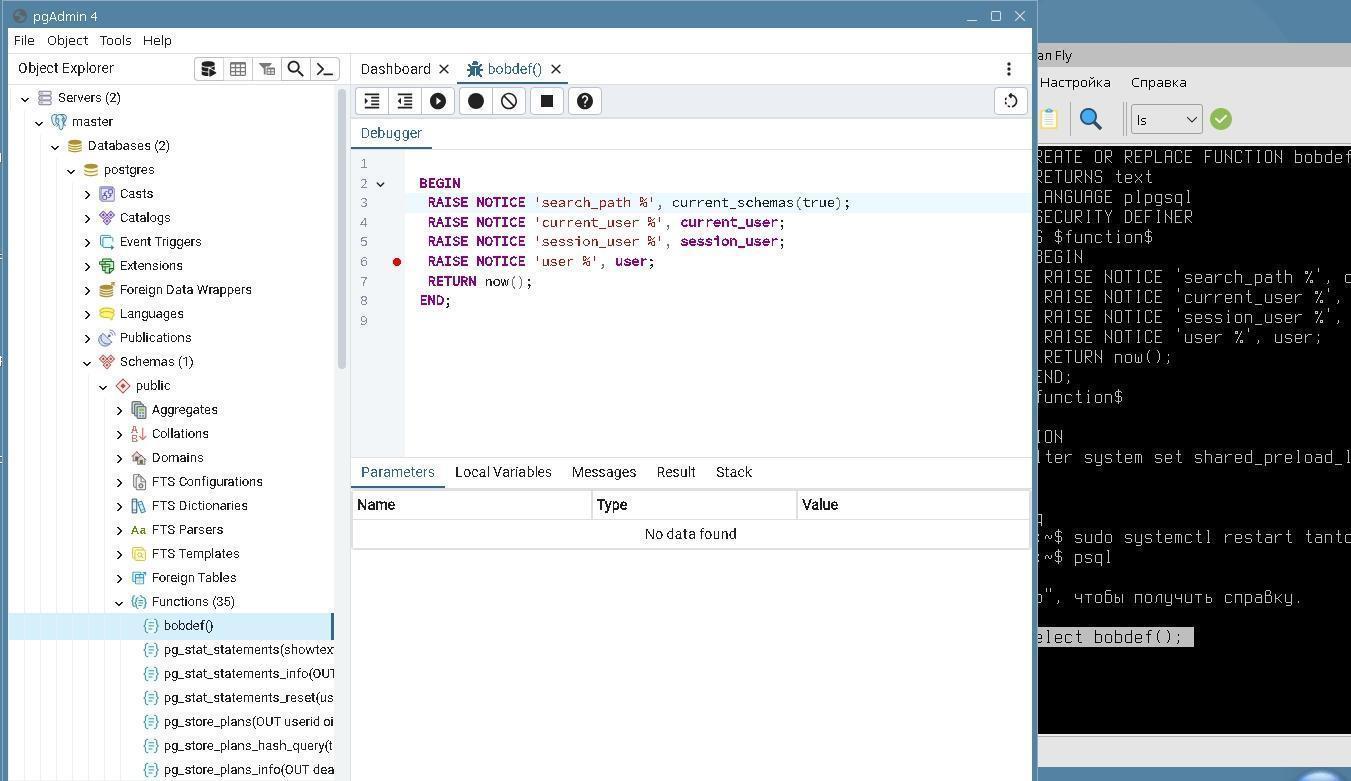
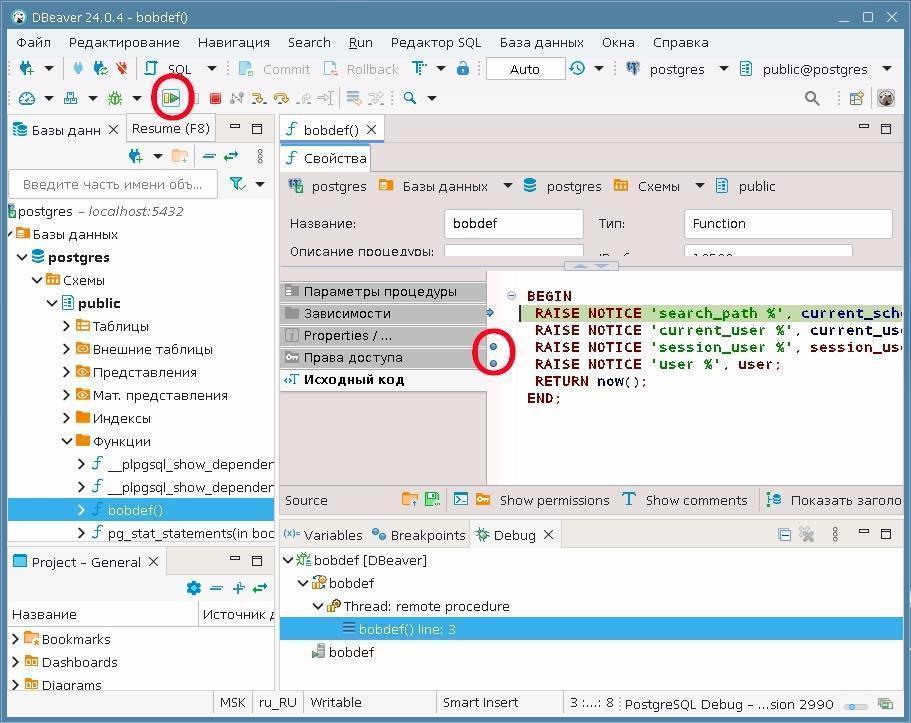
How does psql interact with the editor program? When you type the commands \e \ef \ev the editor is launched and psql passes it the text of what you want to edit and the path to the temporary file, which you usually don't see. In the example below, the file name is displayed on the first line of the image as /tmp/psql/edit.6652.sql
Then you edit the text using the editor and click "save" edited and "close" the editor in the editor. The editor saves the text to a file and psql receives a notification that the editor is closed. Hidden from you, psql opens the file and loads it into the buffer, just as if you had typed the contents of the file on the keyboard.
Nuance: if at the end of the command, when you were in the editor, you did not put a semicolon and a transition to a new line at the end of the typed or edited command, or when you were already in psql you did not type it, then the command will not be sent for execution and you will continue to fill the buffer. This nuance can make it difficult to use the \e \ef commands And \ev , encouraging the use of graphical tools such as pgAdmin.
11) Call the view creation editor with the \ev command type the command as shown below, press F2 (save) F10 (exit). If desired, you can choose the editor that is more convenient for you. In the kate editor, which can be used in AstraLinux, hotkeys are: <Ctrl+S> - save, <Ctrl+Q> - exit the editor.
postgres=# \ev
CREATE VIEW
12) Team \p look at the last command. The command was received by psql from the editor.
After sending commands for execution:
postgres=# \p
CREATE VIEW lab01view AS
SELECT now();
13) You can also look at the definition of a view or subroutine (routines, which include procedures and functions):
\sf[+] FUNCTION_NAME show function definition
\sv[+] PRESENT_NAME show view definition
Type :
\sv l<TAB><ENTER>
Where <TAB> is the tab key, <ENTER> is also a key on the keyboard.
After pressing the <TAB> key, psql will complete the view name. If there are many views starting with the letter "l" (or none at all), it will not complete them. In this case, pressing the <TAB> key a second time will display a list of candidates. You can type a few more characters and press <TAB> again, and then send what you typed for execution by pressing the <ENTER> key.
postgres=# \sv lab01view
CREATE OR REPLACE VIEW public.lab01view AS
SELECT now() AS now
postgres=#
Note that there is no semicolon at the end of the command. It will not appear when you open the editor either. After " now " you need to insert ; and a carriage return.
We have considered the details of the most non-obvious functionality of psql - interaction with the editor. The rest of the information is much simpler.
Part 9. Using the psql terminal client
1) Run the commands:
postgres=# BEGIN TRANSACTION;
BEGIN
2) We started transaction . Note that the prompt has changed - an asterisk has appeared. In psql with the default prompt, you can see if there is an open transaction to decide whether to commit it.
Next, we type a command in several lines.
Type SELECT :
postgres = * # select
3) Note that the prompt has changed again: a dash has appeared instead of the equals symbol. Complete the command and end the command with a semicolon:
postgres - * # tantor_version();
tantor_version
-------------------------------
Tantor Special Edition 17.5.0
(1 row)
4) Note that the prompt has changed again: the equals symbol has returned instead of the dash symbol. This means that there is no unfinished command in the buffer, and you will be typing the first line of the command.
Type the erroneous command and send it for execution with a semicolon:
postgres= * # ffff;
ERROR: syntax error at or near "ffff"
LINE 1:ffff;
A syntax error occurred. Note that instead of the asterisk, which denotes an open transaction, an exclamation mark has appeared. This means that the transaction is still open, but it has entered a failure state, and in this state, the transaction cannot commit, but can only be rolled back. Transactions rarely enter a failure state, but only after certain errors that are considered so serious that it is impossible to commit the statements accumulated in the transaction. For example, access serialization errors. What is dangerous about the "ffff" command ? The server process receives it and sees that this is something completely wild, a programmer cannot write such a command. The server process expects that it is given commands by an application written and tested by a programmer. Therefore, it believes that it is necessary to transfer the transaction to a failure state.
5) Let's check that if we send the correct command for execution. Type :
postgres=!# select 1;
ERROR: current transaction is aborted, commands ignored until end of transaction block
An error is returned that the command failed, and any commands will be ignored by the server process until the client "voluntarily" completes the transaction.
6) Complete the transaction with one of two transaction completion commands:
postgres= ! # COMMIT;
ROLLBACK
Note that a transaction that is put into a failed state cannot commit, only roll back completely or to a savepoint if one was set. The server process returns "transaction completed by rollback" to the COMMIT command.
There is a parameter ON_ERROR_ROLLBACK , it allows not to lose the results of executed commands. This parameter makes psql set a savepoint (SAVEPOINT) after each command, which is undesirable, as it increases the use of the transaction counter (xid). If you set it, it is better to set it to INTERACTIVE , then savepoints will be set if you work in psql interactively.
7) Install this parameter :
postgres=# \set ON_ERROR_ROLLBACK INTERACTIVE
8) Repeat the commands from the previous example:
postgres=# BEGIN;
BEGIN
postgres=*# select 1;
?column?
----------
1
(1 line )
postgres=*# ffff;
ERROR: syntax error at or near "ffff"
LINE 1: ffff;
^
postgres=*# COMMIT;
COMMIT
The transaction was closed by commit, not rollback.
9) Let's see how psql processes its commands - what it sends to the server process to output a nice result. Let's see what roles are in the cluster. In English, this would sound like "describe user", abbreviations for the first letters of the words "du". Let's add a backslash - the common beginning of all psql utility commands . If there is no backslash, this is an SQL command and is sent to the server process for execution as text. To send for execution, a semicolon ";" is used - otherwise, how will psql know that you have finished typing the command.
Type:
postgres=# \du
List of roles
Role Name | Attributes
-----------+-----------------------------------------------
lab01user | Superuser, Creates roles, Creates database
postgres | Superuser, Creates Roles, Creates DB, Replication, Skip RLS
10) Set the psql parameter, which will show us what command psql itself generates and sends for execution:
postgres=# \set ECHO_HIDDEN on
11) Repeat command :
postgres=# \du
********* REQUEST *********
SELECT r.rolname, r.rolsuper, r.rolinherit,
r.rolcreaterole, r.rolcreatedb, r.rolcanlogin,
r.rolconnlimit, r.rolvaliduntil
, r.rolreplication
, r.rolbypassrls
FROM pg_catalog.pg_roles r
WHERE r.rolname !~ '^pg_'
ORDER BY 1;
****************************
List of roles
Role Name | Attributes
-----------+-----------------------------------------------
lab01user | Superuser, Creates roles, Creates database
postgres | Superuser, Creates Roles, Creates DB, Replication, Skip RLS
12) Copy and paste the command text. To do this, you can use the keyboard shortcuts <Ctrl+Shift+c> <Ctrl+Shift+v>
postgres=# SELECT r.rolname, r.rolsuper, r.rolinherit, r.rolcreaterole, r.rolcreatedb, r.rolcanlogin, r.rolconnlimit, r.rolvaliduntil, r.rolreplication, r.rolbypassrls
FROM pg_catalog.pg_roles r
WHERE r.rolname !~ '^pg_'
ORDER BY 1;
rolname | rolsuper | rolinherit | rolcreaterole | rolcreatedb | rolcanlogin | rolconnlimit | rolvaliduntil | rolreplication | rolbypassrls
-----------+----------+------------+---------------+-------------+-------------+--------------+---------------+----------------+--------------
lab01user | t | t | t | t | t | -1 | | f | f
postgres | t | t | t | t | t | -1 | | t | t
(2 строки)
psql receives and compare it with how it intelligently displays it: psql did not display the INHERIT and LOGIN attributes . Why? Because these are the default values when creating a role. Default values are not displayed. Their inverse values will be displayed: "Not inherited, Login denied". This feature is not intuitively clear, so we dwell on it in detail.
13) Use the \? command to view help for the \connect command (a shortened version of the \с command )
Compound:
\c[onnect] {[ DB |- USER |- SERVER |- PORT |-] | conninfo}
connect to another database
(current: "postgres")
\conninfo information about the current connection
14) Try different connection combinations. The tab key allows you to end a parameter, since psql has access to the list of database and user names in the current connection. The purpose of this connection sequence is to remember the order of the \c command parameters: database user host port . If you want to leave some parameter the same, replace it with a dash. <TAB><ENTER> - tab and carriage return (new line) keys on the keyboard.
postgres=# \c la <TAB><ENTER>
You are connected to the database "lab01database" as user "postgres".
lab01database=# \c - la <TAB><ENTER>
You are connected to the database "lab01database" as user "lab01user".
lab01database=# \c - - localhost
You are now connected to the database "lab01database" as user "lab01user" (server "localhost": address "127.0.0.1", port "5432").
lab01database=# \c - - - 5432
You are connected to the database "lab01database" as user "lab01user".
lab01database=# \c postgres p <TAB><ENTER>
You are connected to the database "postgres" as user "postgres".
15) Let's see how to get the result of the selection in the format of a web page and view it in a browser. Open a new terminal window ( astra operating system user ).
16) Run psql:
astra@tantor : ~ $ psql
psql (17.5)
Type "help" for help.
17) Install format HTML output :
postgres=# \pset format html
The output format is html.
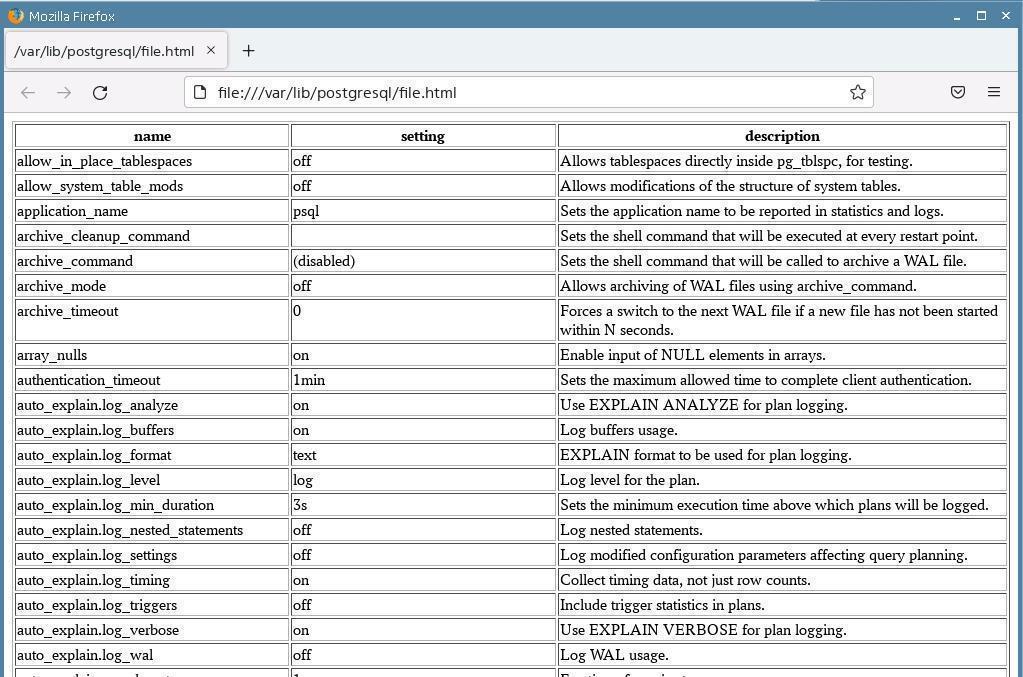
18) Redirect the output to a file called file.html :
postgres=# \o file.html
19) Give any command, the result of which is inconvenient to read in the terminal:
postgres=# show all;
20) Disable output to file:
postgres=# \o
21) Launch a browser window while exiting psql :
postgres=# \! xdg-open file.html
22) Wait until the browser window starts. Close psql :
postgres=# \q
23) Close the terminal window:
postgres@tantor:~$ <CTRL+d>
24) Close the browser window and return to the psql window . Let's see what other output formats there are. Type V psql :
postgres=# \pset format aaa
\pset: allowed formats are aligned, asciidoc, csv, html, latex, latex-longtable, troff-ms, unaligned, wrapped
25) Select the aligned format , it is used by default:
postgres=# \pset format aligned
Output format is aligned.
26) Run the command:
postgres=# SHOW ALL;
zzbq keys on your keyboard and see the effect.
z - next page, b - previous, q - finish output and return prompt.
27) Complete command :
postgres=# \pset format wrapped
Output format is wrapped.
28) Complete command :
postgres=# SHOW ALL;
zzb h on the keyboard . Read the description of the available keys. Reinforce the skills of scrolling the result.
29) Compare the differences. Perhaps the wrapped format (word wrapping) will be more convenient than aligned .
30) Let's check how to execute operating system commands without exiting psql . The Linux command "pwd" shows the current directory.
Run the "pwd" or "ls" command (lists files) without exiting psql:
postgres =# \! pwd
/ var / lib / postgresql
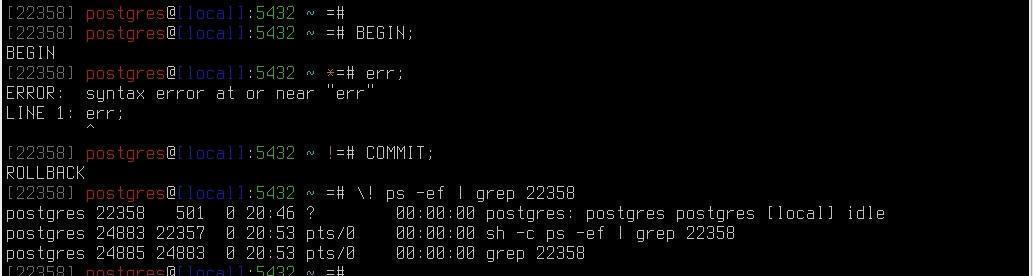
31) Set a color prompt that will display the number (pid) of the server process in gray:
\set PROMPT1 '%[%033[0;90m%][%p]%[%033[0m%] %[%033[0;31m%]%n%[%033[0m%]@%[%033[0;34m%]%m%[%033[0m%]:%[%033[0;32m%]%>%[%033[0m%] %[%033[0;36m%]%~%[%033[0m%] %[%033[0;33m%]%[%033[5m%]%x%[%033[0m%]%[%033[0m%]%R%# '
\set PROMPT2 ' %[%033[0;90m%] [%l] %[%033[0m%] %[%033[0;31m%] %n %[%033[0m%] @ %[%033[0;34m%] %m %[%033[0m%] : %[%033[0;32m%] %> %[%033[0m%] %[%033[0;36m%] %~ %[%033[0m%] %[%033[0;33m%]%[%033[5m%] %x %[%033[0m%] %[%033[0m%] %R%# '
* and ! symbols to attract attention.
Help, what do the symbols mean if you want to create your own prompt:
%p server process number
%n role. (can be changed during a session with the SET SESSION AUTHORIZATION command; )
%m host name or [local] if the connection is made via a Unix socket
%> instance port number
%/ database name
%~ database name. If this is the default database, ~ is displayed instead of the name.
%# for the superuser - the # symbol , for other roles - the >%l symbol is the line number in the input buffer.
%R for PROMPT1 displays = if the session is in an inactive branch of a conditional block @ in single-line input mode ^ if the session is disconnected from the database - !
for PROMPT2 if the command is not completed –
if there is an unclosed comment * if there is an unclosed quote, then '
if there is an unterminated double quote, then "
if there is a started but unfinished $line$ (usually when typing functions), then $
if there is a left parenthesis and the right parenthesis is not entered, then (
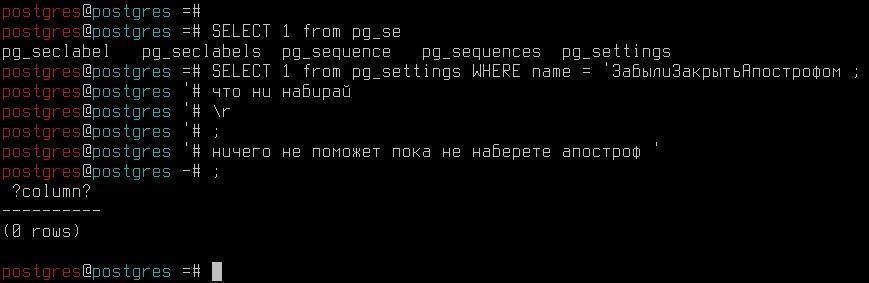
Symbols that it displays PROMPT2 are important because if you forget to type the closing apostrophe, don't type <ENTER> or \r, there will be no reaction until you type the apostrophe:
If you need to display the role and base:
\set PROMPT1 '%[%033[0;31m%] %n %[%033[0m%] @ %[%033[0;36m%] %/ %[%033[0m%] %[%033[0;33m%]%[%033[5m%] %x %[%033[0m%] %[%033[0m%] %R%# '
\set PROMPT2 '%[%033[0;31m%] %n %[%033[0m%] @ %[%033[0;36m%] %/ %[%033[0m%] %[%033[0;33m%]%[%033[5m%] %x %[%033[0m%] %[%033[0m%] %R%# '
32) See how the query result is displayed:
postgres=# select * from pg_user;
usename | usesysid | usecreatedb | usesuper | userepl |
------------+----------+-------------+------------+----------+----------+
postgres | 10 | t | t | t |
(1 line )
33) Set the line drawing style to unicode characters :
postgres=# \pset linestyle unicode
Line style set to unicode.
Let's repeat the request (press the up arrow on the keyboard twice and then the <ENTER> key)
postgres=# select * from pg_user;
usename │ usesysid │ usecreatedb │ usesuper │ userepl │
───────────┼──────────┼────────────────┼───────────┼──────────┼
postgres │ 10 │ t │ t │ t │
(1 line )
34) Change the border display style :
ostgres =# \ pset border 0
Border Style: 0.
35) Repeat the request:
postgres =# select * from pg_user ;
usename usesysid usecreatedb usesuper userepl
───────── ──────── ─────────── ───────── ───────
postgres 10 ttt
(1 line )
The display has become more compact.
36) Change the border display style:
postgres=# \pset border 2
Style borders : 2.
postgres=# select * from pg_user;
│ usename │ usesysid │ usecreatedb │ usesuper │ userepl │ usebypassrls │ passwd │ valuntil │ useconfig │
├───────────┼──────────┼────────────────┼──────────┼────── ────┼───────────────┼──────────┼─────────────────┤
│ postgres │ 10 │ t │ t │ t │ t │ ******** │ │ │
└─
(3 lines )
You you can choose most comfortable For myself style output results selections . To make it permanent, you can edit the ~/.psqlrc file and add the commands we've covered to that file.
Part 10. Restoring a saved cluster
In point 4 of part 2 we saved the previous cluster before creating a new cluster. Let's put the cluster back in place.
1) Stop the instance:
postgres@tantor:~$ pg_ctl stop
2) Do it commands :
postgres@tantor:~$ mkdir $PGDATA/../data.afterLAB1
postgres@tantor:~$ mv $PGDATA/* $PGDATA/../data.afterLAB1
postgres@tantor:~$ mv $PGDATA/../data.SAVE/* $PGDATA
3) Launch instance :
postgres@tantor:~$ sudo systemctl start tantor-se-server-17
4) Check performance instance :
postgres@tantor:~$ psql -c "select datname from pg_database;"
datname
-----------
postgres
template1
template0
(3 lines )
Part 1. Transaction in psql
1) Open the Fly terminal on your desktop:
astra@tantor:~$ psql
psql (17.5)
Type "help" for help.
2) Введем "help", чтобы получить справку:
postgres=# help
You are using psql, the command-line interface to PostgreSQL.
Type: \copyright for distribution terms
\h for help with SQL commands
\? for help with psql commands
\g or terminate with semicolon to execute query
\q to quit
3) Создадим произвольную таблицу:
postgres=# CREATE TABLE a(id integer);
CREATE TABLE
4) Let's see what happened:
postgres=# \dt a
List of Relationships
Schema | Name | Type | Owner
-------+-----+---------+----------
public | a | table | postgres
5) Open a transaction:
postgres=# begin ;
BEGIN
6) Insert the first line. Note that you can use tabs to add keywords and even complex constructions.
postgres= * # INSERT INTO a VALUES (1);
INSERT 0 1
Note the appearance of an asterisk in the line - this means that a transaction is in progress.
7) Let's try to see the first line of the table in the second terminal. Let's open the second terminal:
8) Run psql .
astra@tantor:~$ psql
psql (17.5)
Type "help" to get help.
postgres=#
9) Let's turn To table :
postgres=# SELECT * FROM a;
id
----
(0 lines)
We are convinced - we do not see the first line yet. Only the recorded data is visible. Dirty reading is not allowed.
10) In the first terminal we will record the transaction.
postgres=*# COMMIT;
COMMIT
11) In the second terminal, let's look at the table again.
postgres=# SELECT * FROM a;
id
----
1
(1 line)
Now the table changes are committed.
Conclusion - only those changes that have been successfully committed are visible.
Part 2. List of background processes
1) Let's see where the PGDATA directory is located , where the DB cluster files are located.
postgres=# SHOW data_directory;
data_directory
---------------------------------------
/var/lib/postgresql/tantor-se-17/data
(1 line)
2) Exit psql in the first terminal .
postgres=# \q
3) To view the list of processes, use the ps utility:
astra@tantor:~$
sudo -u postgres cat /var/lib/postgresql/tantor-se-17/data/postmaster.pid
466
/var/lib/postgresql/tantor-se-17/data
1713847705
5432
/var/run/postgresql
*
1048641 0
ready
4) Let's take PID = 466
astra@tantor:~$ sudo ps -o command --ppid 466
COMMAND
postgres: checkpointer
postgres: background writer
postgres: walwriter
postgres: autovacuum launcher
postgres: logical replication launcher
postgres: postgres postgres [local] idle
The colors show system background processes, the rest are server processes.
The list of processes can also be seen through the pg_stat_activity view.
5) Do it in second terminal :
postgres=# SELECT pid, backend_type, backend_start FROM pg_stat_activity;
pid | backend_type | backend_start
-------+-------------------------------+--------------------------------
527 | autovacuum launcher | 2035-07-25 07:48:25.435889+03
528 | logical replication launcher | 2035-07-25 07:48:25.441432+03
540 | client backend | 2035-07-25 07:48:51.242631+03
520 | background writer | 2035-07-25 07:48:25.403365+03
519 | checkpointer | 2035-07-25 07:48:25.402941+03
526 | walwriter | 2035-07-25 07:48:25.425135+03
(8 lines )
Part 3. Buffer cache , command EXPLAIN
1) In the second terminal, add rows to table "a":
postgres=# INSERT INTO a SELECT id FROM generate_series(1,10000) AS id;
INSERT 0 10000
2) In the first terminal, reboot the server:
astra@tantor:~$ sudo systemctl restart tantor-se-server-17
3) In the second terminal, reconnect:
postgres=# \c
You are connected to the database "postgres" as user "postgres".
4) Use the EXPLAIN command to see where the information comes from:
postgres=# EXPLAIN (analyze, buffers) SELECT * FROM a;
QUERY PLAN
----------------------------------------------
Seq Scan on a (cost=0.00..145.00 rows=10000 width=4) (actual time=0.035..1.952 rows=10000 loops=1)
Buffers: shared read=45
Planning:
Buffers: shared hit=16 read=6 dirtied=3
Planning Time: 0.428 ms
Execution Time: 2.948 ms
(6 lines)
Note the Buffers line . The information was taken from disk or from the operating system page cache.
5) Do it experiment more once :
postgres=# EXPLAIN (analyze, buffers) SELECT * FROM a;
QUERY PLAN
----------------------------------
Seq Scan on a (cost=0.00..145.00 rows=10000 width=4) (actual time=0.016..1.383 rows=10000 loops=1)
Buffers: shared hit=45
Planning Time: 0.063 ms
Execution Time: 2.355 ms
(4 lines)
Information has changed. Information is now found in the buffer cache.
Part 4. Pre-record log. Where is it stored?
In the first terminal, run the command:
astra@tantor:~$ sudo ls -l /var/lib/postgresql/tantor-se-17/data/pg_wal
total 360452
-rw------- 1 postgres postgres 16777216 Jun 26 14:00 0000000100000000000000002
-rw------- 1 postgres postgres 16777216 Jun 26 12:10 000000010000000000000003
drwx------ 2 postgres postgres 4096 Jun 26 10:54 archive_status
drwx------ 2 postgres postgres 4096 Jun 26 10:54 summaries
The write-ahead log files are located in the pg_wal directory in 16 megabyte segments.
Part 5. Checkpoint
1) The checkpoint is performed periodically, let's see in the second terminal what interval is set.
postgres=# SHOW checkpoint_timeout;
checkpoint_timeout
--------------------
5min
(1 line)
2) The checkpoint can be started manually.
postgres=# CHECKPOINT;
CHECKPOINT
Part 6. Recovery after failure
1) Add new lines in the second terminal:
postgres=# INSERT INTO a SELECT id FROM generate_series(1,10000) AS id;
INSERT 0 10000
2) Stop the DB cluster in system failure mode. First, determine the PID of the postmaster process.
astra@tantor:~$ sudo cat /var/lib/postgresql/tantor-se-17/data/postmaster.pid
12563
/var/lib/postgresql/tantor-se-17/data
1713849023
5432
/var/run/postgresql
*
1048641 24
ready
astra@tantor:~$ sudo kill -SIGQUIT 12563
3) Let's launch instance servers .
astra@tantor:~$ sudo systemctl start tantor-se-server-17
Restoration is underway.
4) In the second window, let's see if the inserted lines have been saved.
postgres=# \c
You are connected to the database "postgres" as user "postgres".
postgres=# SELECT count(*) FROM a;
count
-------
20001
(1 line)
5) Clear the objects in the second terminal.
postgres=# DROP TABLE a;
DROP TABLE
postgres=# \dt
No tables found.
Part 1. Inserting, updating and deleting a row
1) Run psql :
astra@tantor:~$ psql
psql (17.5)
Type "help" to get help.
postgres=#
2) Let's create arbitrary table .
postgres=# CREATE TABLE a(id integer);
CREATE TABLE
3) Let's see what happened.
postgres=# \dt a
List of Relationships
Schema | Name | Type | Owner
--------+-----+---------+----------
public | a | table | postgres
(1 line )
4) Insert the first row into the table.
postgres=# INSERT INTO a VALUES(100);
INSERT 0 1
5) Let's see what the transaction number is xmin .
postgres=# SELECT xmin, xmax, * FROM a;
xmin | xmax | id
------+------+-----
1567 | 0 | 100
(1 line)
The result is 1567 - this is the transaction number in which the first version of the row was created.
6) Let's start an explicit transaction.
postgres=# BEGIN ;
BEGIN
7) Update the first line .
postgres=*# UPDATE a SET id = 200;
UPDATE 1
8) Let's turn back and see what happened.
postgres=*# SELECT xmin, xmax, * FROM a;
xmin | xmax | id
------+------+-----
1569 | 0 | 200
(1 line)
9) We made sure that the transaction sees its changes.
What do you think will happen if you access it in a parallel transaction?
id=100 or 200?
In the second terminal, access the table.
10) Run psql .
astra@tantor:~$ psql
psql (17.5)
Type "help" to get help.
postgres=#
postgres=# SELECT xmin, xmax, * FROM a;
xmin | xmax | id
------+------+-----
1568 | 1569 | 100
(1 line)
Note that xmax has changed - this means that there is already a second version of the row, but it is not committed yet.
11) In the first terminal we record the transaction:
postgres=*# COMMIT;
COMMIT
12) In the second terminal we now see the second line.
postgres=# SELECT xmin, xmax, * FROM a;
xmin | xmax | id
------+------+-----
1569 | 0 | 200
(1 line)
13) Now let's see what deletion looks like. Let's open a transaction in the first terminal:
postgres=# BEGIN ;
BEGIN
14) Delete line .
postgres=*# DELETE FROM a;
DELETE 1
postgres=*# SELECT xmin, xmax, * FROM a;
xmin | xmax | id
------+------+----
(0 rows)
The first transaction does not see the line, it is deleted, but the change is not yet committed.
15) In second terminal :
postgres=# SELECT xmin, xmax, * FROM a;
xmin | xmax | id
------+------+-----
1569 | 1570 | 200
(1 line)
The line is still visible, but xmax has changed again.
16) In the first terminal we record the transaction:
postgres=*# COMMIT ;
COMMIT
17) In the second terminal we now see a change:
postgres=# SELECT xmin, xmax, * FROM a;
xmin | xmax | id
------+------+----
(0 rows)
Part 2. Row version visibility at different isolation levels
1) Open the first transaction and insert the line:
postgres=# BEGIN;
BEGIN
2) Let's look at the insulation level:
postgres=*# SHOW transaction_isolation;
transaction_isolation
-----------------------
read committed
(1 line )
postgres=*# INSERT INTO a VALUES(100);
INSERT 0 1
postgres=*# SELECT xmin, xmax, * FROM a;
xmin | xmax | id
------+------+-----
1571 | 0 | 100
(1 line)
3) Let's start the second transaction in the second terminal and refer to the table:
postgres=# BEGIN;
BEGIN
postgres=*# SELECT xmin, xmax, * FROM a ;
xmin | xmax | id
------+------+----
(0 lines )
4) Let's see level isolation :
postgres=*# SHOW transaction_isolation;
transaction_isolation
-----------------------
read committed
(1 line )
5) While the new line is not visible, let's commit the first transaction:
postgres=*# COMMIT ;
COMMIT
6) In the second window, we will again refer to the table. What shall we see ?
postgres=*# SELECT xmin, xmax, * FROM a;
xmin | xmax | id
------+------+-----
1571 | 0 | 100
(1 line )
7) Let's fix it the second transaction :
postgres=*# COMMIT;
COMMIT
The changes became visible. This is the anomaly of non-repeating reading.
Now in the first window we will start a transaction at the repeatable read level.
8) Insert more one line :
postgres=# BEGIN ISOLATION LEVEL REPEATABLE READ;
BEGIN
postgres=*# INSERT INTO a VALUES(200);
INSERT 0 1
postgres=*# SELECT xmin, xmax, * FROM a;
xmin | xmax | id
------+------+-----
1571 | 0 | 100
1572 | 0 | 200
(2 lines)
9) In the second transaction, we will access the table in a new transaction at the same level.
postgres=# BEGIN ISOLATION LEVEL REPEATABLE READ;
BEGIN
postgres=*# SELECT xmin, xmax, * FROM a;
xmin | xmax | id
------+------+-----
1571 | 0 | 100
(1 line)
10) Now we commit the first transaction:
postgres=*# COMMIT;
COMMIT
11) Let's look at the second transaction again:
postgres=*# SELECT xmin, xmax, * FROM a;
xmin | xmax | id
-----+------+-----
1571 | 0 | 100
(1 line)
Changes are not visible. At this level, transaction operators work with only one snapshot of the data.
12) Let's commit the second transaction:
postgres=*# COMMIT;
COMMIT
Part 3. Transaction state by CLOG
1) Let's open the first transaction and look at the state after insertion:
postgres=# BEGIN;
BEGIN
postgres=*# INSERT INTO a VALUES(300);
INSERT 0 1
postgres=*# SELECT xmin, xmax, * FROM a;
xmin | xmax | id
------+------+-----
1571 | 0 | 100
1572 | 0 | 200
1573 | 0 | 300
(3 lines)
2) We see the insertion of the third line. Let's take a look status transactions :
postgres=*# SELECT pg_xact_status( '1573' );
pg_xact_status
----------------
in progress
(1 line )
3) Let's commit the transaction and check the status:
postgres=*# COMMIT;
COMMIT
postgres=# SELECT pg_xact_status( '1573' );
pg_xact_status
----------------
committed
(1 line )
CLOG behaves when a transaction is rolled back:
postgres=# BEGIN;
BEGIN
postgres=*# INSERT INTO a VALUES(400);
INSERT 0 1
postgres=*# SELECT xmin, xmax, * FROM a;
xmin | xmax | id
------+------+-----
1571 | 0 | 100
1572 | 0 | 200
1573 | 0 | 300
1574 | 0 | 400
(4 строки)
postgres=*# SELECT pg_xact_status('1574');
pg_xact_status
----------------
in progress
(1 строка)
postgres=*# ROLLBACK;
ROLLBACK
postgres=# SELECT pg_xact_status('1574');
pg_xact_status
----------------
aborted
(1 line )
postgres=*# SELECT xmin, xmax, * FROM a;
xmin | xmax | id
------+------+-----
1571 | 0 | 100
1572 | 0 | 200
1573 | 0 | 300
(3 lines )
Part 4. Table Locks
1) In the first transaction, we insert a new row and look at the locks using pg_locks , for this we need the pid of the service process:
postgres=# SELECT pg_backend_pid();
pg_backend_pid
----------------
12193
(1 line)
2) Open the transaction and refer to the table:
postgres=# BEGIN ;
BEGIN
postgres=*# UPDATE a SET id = id + 1;
UPDATE 3
postgres=*# SELECT locktype, transactionid, mode, relation::regclass as obj FROM pg_locks where pid = 12193;
locktype | transactionid | mode | obj
---------------+---------------+------------------+----------
relation | | AccessShareLock | pg_locks
relation | | RowExclusiveLock | a
virtualxid | | ExclusiveLock |
transactionid | 1577 | ExclusiveLock |
(4 строки)
A table-level lock , RowExclusiveLock, has appeared - is imposed in case of updating rows.
3) In the second window, we will build an index on the table, first we will look at the pid of the process.
postgres=# SELECT pg_backend_pid();
pg_backend_pid
----------------
17210
(1 line )
postgres=# CREATE INDEX ON a (id);
4) The transaction is hanging. In the first terminal, let's see what's happening in the second process.
postgres=*# SELECT locktype, transactionid, mode, relation::regclass as obj FROM pg_locks where pid = 17210 ;
locktype | transactionid | mode | obj
------------+---------------+----------------+-------------+-----
virtualxid | | ExclusiveLock |
relation | | ShareLock | a
(2 lines )
Appeared blocking ShareLock , she Not compatible With RowExclusiveLock , arose blocking situation .
5) Let's fix it the first transaction :
postgres=*# COMMIT;
COMMIT
6) The command in the second window is immediately triggered:
CREATE INDEX
Part 5. Row locking
1) Let's start the first transaction:
postgres=# BEGIN ;
BEGIN
postgres=*# UPDATE a SET id = id + 1 WHERE id=101;
UPDATE 1
2) Let's begin the second transaction :
postgres=# BEGIN ;
BEGIN
postgres=*# UPDATE a SET id = id + 1 WHERE id=101;
The transaction is stuck and a lock has been triggered.
3) Let's commit the first transaction:
postgres=*# COMMIT;
COMMIT
The second one comes into play immediately.
UPDATE 0
postgres=*# COMMIT;
COMMIT
Please note that the update did not occur, now there is no such version of the line to update.
4) In the first terminal, let's look at the table:
postgres=# SELECT xmin, xmax, * FROM a;
xmin | xmax | id
------+------+-----
1577 | 0 | 201
1577 | 0 | 301
1579 | 1580 | 102
(3 lines )
5) Delete table :
postgres=# DROP TABLE a;
DROP TABLE
Part 1. Regular table cleaning
1) Run psql:
astra@tantor:~$ psql
psql (17.5)
Type "help" to get help.
postgres=#
2) Let's create arbitrary table :
postgres=# CREATE TABLE a (id integer primary key generated always as identity, t char(2000)) WITH (autovacuum_enabled = off);
CREATE TABLE
postgres=# INSERT INTO a(t) SELECT to_char(generate_series(1,10000),'9999');
INSERT 0 10000
3) Let's see what happened:
postgres=# \da
Table "public.a"
Column | Type | Collation | Nullable | Default
--------+-----------------+------------+----------+------------------------------
id | integer | | not null | generated always as identity
t | character(2000) | | |
Indexes:
"a_pkey" PRIMARY KEY, btree (id)
Note: A primary key and index have been created.
4) Find out the size of the table and index in bytes:
postgres=# SELECT pg_table_size('a');
pg_table_size
---------------
20512768
(1 line )
postgres=# SELECT pg_table_size(' a_pkey ');
pg_table_size
---------------
245760
(1 line)
5) Update 50% of the rows:
postgres=# UPDATE a set t= t || 'a' where id > 5000;
UPDATE 5000
6) Let's see dimensions objects :
postgres=# SELECT pg_table_size('a');
pg_table_size
---------------
30752768
(1 line )
postgres=# SELECT pg_table_size('a_pkey');
pg_table_size
---------------
360448
(1 line)
7) They also increased. Let's clear the table and index:
postgres=# VACUUM a;
VACUUM
postgres=# SELECT pg_table_size('a') ; SELECT pg_table_size('a_pkey');
pg_table_size
---------------
30760960
(1 line )
pg_table_size
---------------
360448
(1 line)
8) The size remains the same. More once let's update lines :
postgres=# UPDATE a set t= t || 'a' where id > 5000;
UPDATE 5000
postgres=# SELECT pg_table_size('a'); SELECT pg_table_size('a_pkey');
pg_table_size
---------------
30760960
(1 line )
pg_table_size
---------------
360448
(1 line)
Again, the size did not change. This happened because the cleared space was used.
9) For example, let's assume that a cleaning cycle is missed:
postgres=# UPDATE a set t= t || 'a' where id > 5000;
UPDATE 5000
postgres=# UPDATE a set t= t || 'a' where id > 5000;
UPDATE 5000
postgres=# SELECT pg_table_size('a');
SELECT pg_table_size('a_pkey');
pg_table_size
---------------
51249152
(1 line )
pg_table_size
---------------
466944
(1 line)
10) The size of objects has increased again:
postgres=# VACUUM a;
VACUUM
postgres=# SELECT pg_table_size('a'); SELECT pg_table_size('a_pkey');
pg_table_size
---------------
51249152
(1 line )
pg_table_size
---------------
466944
(1 line)
Even after cleaning, the size does not decrease.
Part 2. Table Analysis
1) Since there have been several update cycles, let's see how relevant the statistics are. First, let's look at the system catalog:
postgres=# SELECT reltuples FROM pg_class WHERE relname='a';
reltuples
-----------
8333
(1 line)
We got that our table contains 8333 rows.
2) Now let's turn to To table :
postgres=# SELECT count(*) FROM a;
count
-------
10000
(1 line)
3) It turned out that there are more lines. Statistics are always approximate. Let's call the second phase of analysis:
postgres=# ANALYZE a;
ANALYZE
4) Now the statistics have become more accurate:
postgres=# SELECT reltuples FROM pg_class WHERE relname='a';
reltuples
-----------
10000
(1 line)
Part 3. Rebuilding the index
1) Let's see what size the objects are:
postgres=# SELECT pg_table_size('a'); SELECT pg_table_size('a_pkey');
pg_table_size
---------------
51249152
(1 line )
pg_table_size
---------------
466944
(1 line)
2) Now the table has only one index. Let's rebuild it. his :
postgres=# REINDEX TABLE a;
REINDEX
postgres=# SELECT pg_table_size('a'); SELECT pg_table_size('a_pkey');
pg_table_size
---------------
51249152
(1 line )
pg_table_size
---------------
245760
(1 line)
3) The index size has decreased, the table size has remained unchanged.
Part 4. Complete cleaning
postgres=# VACUUM FULL a;
VACUUM
1) Let's see size objects :
postgres=# SELECT pg_table_size('a');
SELECT pg_table_size('a_pkey');
pg_table_size
---------------
20488192
(1 line )
pg_table_size
---------------
245760
(1 line)
The table size has been reduced.
2) Delete the table:
postgres=# DROP TABLE a;
DROP TABLE
The task is completed.
Part 5. HypoPG expansion
1) Install the hypopg extension :
postgres=# CREATE EXTENSION hypopg;
CREATE EXTENSION
2) Create a table with test data:
postgres=# CREATE TABLE hypo AS SELECT id, 'line ' || id AS val FROM generate_series(1,10000) id;
SELECT 10000
3) The execution plan for selecting one row is sequential scanning ( Seq Scan ). There are no index access methods, since there are no indexes:
postgres=# EXPLAIN SELECT * FROM hypo WHERE id = 1;
QUERY PLAN
--------------------------------------------------------
Seq Scan on hypo (cost=0.00..165.60 rows= 41 width=36)
Filter: (id = 1)
(2 lines)
Why is the expected number of rows 41 and not 1? No statistics.
4) Collect statistics:
postgres=# vacuum analyze hypo;
VACUUM
postgres=# EXPLAIN SELECT * FROM hypo WHERE id = 1;
QUERY PLAN
-------------------------------------------------------
Seq Scan on hypo (cost=0.00..180.00 rows= 1 width=13)
Filter: (id = 1)
(2 lines)
Expected number of terms 1.
The task is to optimize the execution of this query. We assume that an index on the id column will speed up the execution of the query. We need to make sure that the planner will use the index. If the planner does not use the index, then the assumption is incorrect and there is no need to create the index. Creating an index is labor-intensive and takes time, it takes up space. Before creating the index, we want to test the hypothesis that the planner will use it when executing the optimized query.
5) To test the hypothesis, create a hypothetical index:
postgres=# SELECT * FROM hypopg_create_index('CREATE INDEX hypo_idx ON hypo (id)');
indexrelid | indexname
------------+----------------------
13495 | <13495>btree_hypo_id
(1 line )
The name of the hypothetical index is generated automatically, this is normal.
No real index is created, the command is executed instantly.
6) Look at the list of hypothetical indices:
postgres=# SELECT * FROM hypopg_list_indexes;
indexrelid | index_name | schema_name | table_name | am_name
------------+----------------------+-------------+-------------+-----------
13495 | <13495>btree_hypo_id | public | hypo | btree
(1 line)
What is the implementation plan now?
7) Perform command :
postgres=# EXPLAIN SELECT * FROM hypo WHERE id = 1;
QUERY PLAN
---------------------------------
Index Scan using "<13495>btree_hypo_id" on hypo (cost=0.04..8.05 rows=1 width=13)
Index Cond: (id = 1)
(2 lines)
The plan shows that the index will be used.
There is no real index, so the real execution plan uses a table scan:
postgres=# EXPLAIN ( analyze ) SELECT * FROM hypo WHERE id = 1;
QUERY PLAN
-----------------------------------
Seq Scan on hypo (cost=0.00..180.00 rows=1 width=13) (actual time=0.025..0.875 rows=1 loops=1)
Filter: (id = 1)
Rows Removed by Filter: 9999
Planning Time: 0.077 ms
Execution Time: 1.074 ms
(5 lines )
8) Create real index :
postgres=# CREATE UNIQUE INDEX hypo_id ON hypo(id);
CREATE INDEX
The implementation plan remains the same:
postgres=# EXPLAIN SELECT * FROM hypo WHERE id = 1;
QUERY PLAN
-----------------------------------------------
Index Scan using "<13495>btree_hypo_id" on hypo (cost=0.04..8.05 rows=1 width=13)
Index Cond: (id = 1)
(2 lines)
9) Remove side effects:
postgres=# SELECT hypopg_reset() ;
hypopg_reset
--------------
(1 line)
The planner started using the created index:
postgres=# EXPLAIN SELECT * FROM hypo WHERE id = 1;
QUERY PLAN
--------------------------------------------
Index Scan using hypo_id on hypo (cost=0.29..8.30 rows=1 width=13)
Index Cond: (id = 1)
(2 lines)
The extension allows you to hide real indexes from the scheduler:
postgres=# SELECT hypopg_hide_index('hypo_id'::regclass);
hypopg_hide_index
-------------------
t
(1 line )
Hiding is only effective within a session and does not affect the operation of other sessions.
Hypothetical indices also exist only within a session.
The hypothetical indices disappear:
postgres=# SELECT * FROM hypopg_list_indexes;
indexrelid | index_name | schema_name | table_name | am_name
------------+------------+--------------+--------------+------------+----------
(0 lines)
The execution plan will use sequential scanning:
postgres=# EXPLAIN SELECT * FROM hypo WHERE id = 1;
QUERY PLAN
-------------------------------------------------------
Seq Scan on hypo (cost=0.00..180.00 rows=1 width=13)
Filter: (id = 1)
(2 lines)
There is a view with a list of indexes hidden in this session:
postgres=# SELECT * FROM hypopg_hidden_indexes;
indexrelid | index_name | schema_name | table_name | am_name | is_hypo
------------+------------+-------------+-------------+------------+----------+---------
17402 | hypo_id | public | hypo | btree | f
(1 line)
10) Make sure that hidden indexes and hypothetical indexes exist only within the session:
postgres=# SELECT * FROM hypopg_create_index('CREATE INDEX hypo_idx ON hypo (id)');
indexrelid | indexname
------------+----------------------
13495 | <13495>btree_hypo_id
(1 line )
postgres=# SELECT * FROM hypopg_list_indexes;
indexrelid | index_name | schema_name | table_name | am_name
------------+----------------------+-------------+-------------+-----------
13495 | <13495>btree_hypo_id | public | hypo | btree
(1 line )
postgres=# \q
postgres@tantor:~$ psql
psql (17.5)
11) Type "help" to get help:
postgres=# SELECT * FROM hypopg_list_indexes;
indexrelid | index_name | schema_name | table_name | am_name
------------+------------+--------------+--------------+------------+----------
(0 lines )
postgres=# SELECT * FROM hypopg_hidden_indexes;
indexrelid | index_name | schema_name | table_name | am_name | is_hypo
------------+------------+-------------+-------------+------------+----------+---------
(0 lines)
Part 1. Creating objects for queries
1) Run psql :
astra@tantor:~$ psql
psql (17.5)
Type "help" to get help.
postgres=#
2) Create a new table and fill it with data:
postgres=# CREATE TABLE test (col1 integer, col2 integer, name text);
CREATE TABLE
postgres=# INSERT INTO test VALUES (1,2,'test1');
INSERT 0 1
postgres=# INSERT INTO test VALUES (3,4,'test2');
INSERT 0 1
3) Let's create a view over the table:
postgres=# CREATE VIEW v_table AS
SELECT * FROM test;
CREATE VIEW
postgres=# SELECT col1, col2 FROM v_table WHERE name='test1'::text ;
col1 | col2
------+------
1 | 2
(1 line)
Part 2. Sequential reading of table blocks ( Seq Scan )
1) Using the Explain command , we will look at the query execution plan:
postgres=# EXPLAIN SELECT col1, col2 FROM v_table WHERE name='test1'::text
QUERY PLAN
-----------------------------------------------------
Seq Scan on test (cost=0.00..25.00 rows=6 width=8)
Filter: (name = 'test1'::text)
(2 lines )
We see that sequential reading of the test table was used . That is, the view was expanded, and the data was extracted directly from the table.
2) Apply the parameters analyze and buffers . They show that the request was actually executed and how many pages were affected.
postgres=# EXPLAIN( analyze, buffers, costs off, timing off)
SELECT col1, col2 FROM v_table WHERE name='test1'::text ;
QUERY PLAN
------------------------------------------
Seq Scan on test (actual rows=1 loops=1)
Filter: (name = 'test1'::text)
Rows Removed by Filter: 1
Buffers: shared read=1
Planning Time: 0.063 ms
Execution Time: 9.569 ms
(6 lines )
Part 3. Returning data by index
1) Let's create an index on column col1 :
postgres=# CREATE INDEX ON test (col1);
CREATE INDEX
postgres=# \d test
Table "public.test"
Column | Type | Sort Rule | NULLable | Default
---------+---------+--------------------+-------------------+--------------
col1 | integer | | |
col2 | integer | | |
name | text | | |
Indexes :
"test_col1_idx" btree(col1)
2) You can make sure that the index name is generated automatically,
let's add information To table :
postgres=# INSERT INTO test(col1,col2)
SELECT generate_series(3,1003), generate_series(4,1004);
INSERT 0 1001
3) Let's see what happens if we select a small number of rows. That is, the case when there will be high selectivity and low cardinality:
postgres=# EXPLAIN( analyze, buffers, costs off, timing off )
SELECT col1, col2 FROM test WHERE col1<20;
QUERY PLAN
-------------------------------------
Index Scan using test_col1_idx on test (actual rows=19 loops=1)
Index Cond: (col1 < 20)
Buffers: shared hit=3
Planning:
Buffers: shared hit=17
Planning Time: 0.179 ms
Execution Time: 0.117 ms
(7 lines)
We made sure that index access is used.
Part 4. Low selectivity
Now let's select a large number of lines:
postgres=# SELECT count(*) FROM test;
count
-------
1003
(1 line )
Total lines 1003
postgres=# EXPLAIN( analyze, buffers, costs off, timing off )
SELECT col1, col2 FROM test WHERE col1>20;
QUERY PLAN
--------------------------------------------
Seq Scan on test ( actual rows=983 loops=1)
Filter: (col1 > 20)
Rows Removed by Filter: 20
Buffers: shared hit=5
Planning:
Buffers: shared hit=3
Planning Time: 0.157 ms
Execution Time: 0.201 ms
(8 lines)
983 rows were selected, which means low selectivity and high cardinality.
We were convinced that in this case index access becomes expensive, and the DBMS switches to sequential access.
Part 5. Using statistics
For example, when filling the test table , the third column was not filled. Let's see what percentage will have the NULL value
Let's recollect the statistics:
postgres=# ANALYZE test;
ANALYZE
postgres=# SELECT stanulfrac FROM pg_statistic WHERE starelid = 'test'::regclass AND staattnum = 3;
stanullfrac
-------------
0.9981884
(1 row)
NULL value in more than 99% of rows.
Part 6. pg_stat_statements view
1) Make sure the view is installed:
postgres=# \dx pg_stat_statements
List of installed extensions
Name | Version | Scheme | Description
--------------------+--------+--------+--------------------------------------------
pg_stat_statements| 1.10 | public | track planning and execution statistics of all SQL statements executed
(1 line)
2) Let's see what columns are in the view.
postgres=# \d pg_stat_statements
View "public.pg_stat_statements"
Column | Type | Sort Rule | NULLable |
------------------------+------------------+--------------------+-------------------+-
userid | oid | | |
dbid | oid | | |
toplevel | boolean | | |
queryid | bigint | | |
query | text | | |
plans | bigint | | |
total_plan_time | double precision | | |
min_plan_time | double precision | | |
max_plan_time | double precision | | |
mean_plan_time | double precision | | |
stddev_plan_time | double precision | | |
calls | bigint | | |
total_exec_time | double precision | | |
min_exec_time | double precision | | |
max_exec_time | double precision | | |
mean_exec_time | double precision | | |
stddev_exec_time | double precision | | |
rows | bigint | | |
shared_blks_hit | bigint | | |
shared_blks_read | bigint | | |
shared_blks_dirtied | bigint | | |
shared_blks_written | bigint | | |
local_blks_hit | bigint | | |
local_blks_read | bigint | | |
local_blks_dirtied | bigint | | |
local_blks_written | bigint | | |
temp_blks_read | bigint | | |
temp_blks_written | bigint | | |
blk_read_time | double precision | | |
blk_write_time | double precision | | |
temp_blk_read_time | double precision | | |
temp_blk_write_time | double precision | | |
wal_records | bigint | | |
wal_fpi | bigint | | |
wal_bytes | numeric | | |
jit_functions | bigint | | |
jit_generation_time | double precision | | |
jit_inlining_count | bigint | | |
jit_inlining_time | double precision | | |
jit_optimization_count | bigint | | |
jit_optimization_time | double precision | | |
jit_emission_count | bigint | | |
jit_emission_time | double precision | | |
3) Reset the statistics that the extension collects:
postgres=# SELECT pg_stat_statements_reset();
pg_stat_statements_reset
--------------------------
(1 line )
4) Обратимся к таблице test:
postgres=# EXPLAIN (analyze)
SELECT col1, col2 FROM test WHERE col1>20;
QUERY PLAN
-------------------------------------------
Seq Scan on test (cost=0.00..17.54 rows=984 width=8) (actual time=0.022..0.132 rows=983 loops=1)
Filter: (col1 > 20)
Rows Removed by Filter: 20
Planning Time: 0.190 ms
Execution Time: 0.234 ms
(5 строк)
5) Using the pg_stat_statements view , we can see how long the query took to execute and how many pages were used:
postgres=# SELECT queryid, substring(query FOR 100) as query, total_exec_time as ms, shared_blks_hit as blocks
from pg_stat_statements
WHERE query LIKE '%col1, col2%';
queryid | query | ms | blocks
----------------------+--------------------------------------------+----------+--------
-3250261183448805182 | EXPLAIN (analyze) +| 0.491265 | 11
| SELECT col1, col2 FROM test WHERE col1>$1 | |
(1 line)
Part 1. Defining the directory with extension files
1) Let's go to the postgres user :
astra@tantor:~$ sudo su - postgres
2) In the command line, use the pg_config utility :
postgres@education:~$ pg_config --sharedir
/opt/tantor/db/17/share/postgresql
3) Remove the snowflakes extension :
postgres@education:~$ ls -l /opt/tantor/db/17/share/postgresql/extension/
Page
-rw-r--r-- 1 root root 274 Apr 18 2023 adminpack--1.0--1.1.sql
-rw-r--r-- 1 root root 1535 Apr 18 2023 adminpack--1.0.sql
-rw-r--r-- 1 root root 1682 Apr 18 2023 adminpack--1.1--2.0.sql
-rw-r--r-- 1 root root 595 Apr 18 2023 adminpack--2.0--2.1.sql
-rw-r--r-- 1 root root 176 Apr 18 2023 adminpack.control
...
4) psql description :
postgres @ tantor :~$ psql
psql (17.5)
Type "help" to get help.
postgres=#
5) Let's define the extension path using the pg_config() function :
postgres=# SELECT setting FROM pg_config()
where name = 'SHAREDIR';
setting
------------------------------------
/opt/tantor/db/17/share/postgresql
(1 row)
Part 2. Viewing installed extensions
postgres=# \dx
List of installed extensions
Name | Version | Scheme | Description
--------------------+--------+------------+-----------------------------------------
pg_stat_statements | 1.10 | public | track planning and execution statistics of all SQL
pg_store_plans | 1.6.4 | public | track plan statistics of all SQL statements executed
plpgsql | 1.0 | pg_catalog | PL/pgSQL procedural language
(3 lines)
Part 3. Viewing available extensions
Let's use the extension pg_available_extensions :
postgres=# SELECT * from pg_available_extensions;
name | default_version | installed_version | comment
--------------------+-----------------+-------------------+------------------------
plpgsql | 1.0 | 1.0 | PL/pgSQL procedural language
page_repair | 1.0 | | Individual page reparing
pg_hint_plan | 1.6.0 | |
dblink | 1.2 | | connect to other PostgreSQL databases from within a database
tcn | 1.0 | | Triggered change notifications
pg_trgm | 1.6 | | text similarity measurement and index searching based on trigrams
pg_buffercache | 1.4 | | examine the shared buffer cache
dict_xsyn | 1.0 | | text search dictionary template for extended synonym processing
pg_variables | 1.2 | | session variables with various types
old_snapshot | 1.0 | | utilities in support of old_snapshot_threshold
pgcrypto | 1.3 | | cryptographic functions
file_fdw | 1.0 | | foreign-data wrapper for flat file access
amcheck | 1.3 | | functions for verifying relation integrity
seg | 1.4 | | data type for representing line segments or floating-point intervals
pg_background | 1.2 | | Run SQL queries in the background
...
(91 lines)
There are 91 extensions available in the example.
Part 4. Installing and removing custom update
1) For example, let's install the pg_surgery extension :
postgres=# CREATE EXTENSION pg_surgery;
CREATE EXTENSION
postgres=# \dx
List of installed extensions
Name | Version | Scheme | Description
--------------------+--------+------------+---------------------------------
pg_stat_statements | 1.10 | public | track planning and execution statistics of all SQL
pg_store_plans | 1.6.4 | public | track plan statistics of all SQL statements executed
pg_surgery | 1.0 | public | extension to perform surgery on a damaged relation
plpgsql | 1.0 | pg_catalog | PL/pgSQL procedural language
(4 lines)
2) Let's look at the contents of the extension:
postgres=# \dx+ pg_surgery
Objects in the "pg_surgery" extension
Description of the object
-------------------------------------------
function heap_force_freeze(regclass,tid[])
function heap_force_kill(regclass,tid[])
(2 lines )
3) Delete extension :
postgres=# DROP EXTENSION pg_surgery;
DROP EXTENSION
Part 5. Viewing available extension versions. Updating to the latest version
1) Let's use the representation pg_available_extension_versions :
postgres=# SELECT name, version FROM pg_available_extension_versions WHERE name = 'adminpack';
name | version
-----------+---------
adminpack | 1.0
adminpack | 1.1
adminpack | 2.0
adminpack | 2.1
(4 lines)
2) First, let's install version 1.0:
postgres=# CREATE EXTENSION adminpack VERSION ' 1.0 ';
CREATE EXTENSION
postgres=# \dxadminpack
List established extensions
Name | Version | Scheme | Description
-----------+--------+-------------+-------------------------------------------
adminpack | 1.0 | pg_catalog | administrative functions for PostgreSQL
(1 line)
3) Let's look at the contents of the extension:
postgres=# \dx+ adminpack
Objects in the "adminpack" extension
Description of the object
------------------------------------------
function pg_file_length(text)
function pg_file_read(text,bigint,bigint)
function pg_file_rename(text,text)
function pg_file_rename(text,text,text)
function pg_file_unlink(text)
function pg_file_write(text,text,boolean)
pg_logdir_ls() function
pg_logfile_rotate() function
(8 lines)
4) Let's see if the extension can be updated to version 2.1. Let's use function pg_extension_update_paths :
postgres=# SELECT * FROM pg_extension_update_paths('adminpack');
source | target | path
--------+--------+--------------------
1.0 | 1.1 | 1.0--1.1
1.0 | 2.0 | 1.0--1.1--2.0
1.0 | 2.1 | 1.0--1.1--2.0--2.1
1.1 | 1.0 |
1.1 | 2.0 | 1.1--2.0
1.1 | 2.1 | 1.1--2.0--2.1
2.0 | 1.0 |
2.0 | 1.1 |
2.0 | 2.1 | 2.0--2.1
2.1 | 1.0 |
2.1 | 1.1 |
2.1 | 2.0 |
(12 lines )
5) Update extension to version 2.1:
postgres=# ALTER EXTENSION adminpack UPDATE;
ALTER EXTENSION
postgres=# \dxadminpack
List established extensions
Name | Version | Scheme | Description
-----------+--------+------------+------------------------------------------
adminpack | 2.1 | pg_catalog | administrative functions for PostgreSQL
(1 line )
postgres=# \dx+ adminpack
Objects V extension "adminpack"
Description object
------------------------------------------
function pg_file_rename(text,text)
function pg_file_rename(text,text,text)
function pg_file_sync(text)
function pg_file_unlink(text)
function pg_file_write(text,text,boolean)
pg_logdir_ls() function
(6 lines )
As you can see, the contents of the extension have changed.
6) Delete extension .
postgres=# DROP EXTENSION adminpack;
DROP EXTENSION
Part 6. External data wrappers
1) Let's see what external data wrappers (FDW) there are:
postgres=# SELECT * FROM pg_available_extensions
WHERE name LIKE '%fdw%';
name | default_version | installed_version | comment
--------------+-----------------+-------------------+-------------------------------------------
postgres_fdw | 1.1 | | foreign-data wrapper for remote PostgreSQL servers
file_fdw | 1.0 | | foreign-data wrapper for flat file access
(2 lines)
2) Let's use an external data wrapper to connect to the PostgreSQL DBMS :
postgres=# CREATE EXTENSION postgres_fdw;
CREATE EXTENSION
postgres=# \dx postgres_fdw
List of installed extensions
Name | Version | Scheme | Description
--------------+--------+---------+---------+-------------------------------------------
postgres_fdw | 1.1 | public | foreign-data wrapper for remote PostgreSQL servers
(1 line)
3) Let's see what databases there are:
postgres=# \l
List of databases
Name | Owner | Encoding | Locale Provider | LC_COLLATE | LC_CTYPE | ICU Locale | ICU Rules | Permissions
-----------+----------+-----------+------------------+-------------+-------------+------------+-------------+------------------
postgres | postgres | UTF8 | libc | ru_RU.UTF-8 | ru_RU.UTF-8 | | |
template0 | postgres | UTF8 | libc | ru_RU.UTF-8 | ru_RU.UTF-8 | | | =c/postgres +
| | | | | | | postgres=CTc/postgres
template1 | postgres | UTF8 | libc | ru_RU.UTF-8 | ru_RU.UTF-8 | | | =c/postgres +
| | | | | | | postgres=CTc/postgres
test_db | postgres | UTF8 | libc | ru_RU.UTF-8 | ru_RU.UTF-8 | | |
(4 lines)
4) Let's connect and return information from the test_db database. First, let's create a remote server object:
postgres=# CREATE SERVER test FOREIGN DATA WRAPPER postgres_fdw OPTIONS (host 'localhost', port '5432', dbname 'test_db');
CREATE SERVER
postgres=# \des
List of third party servers
Name | Owner | Third-Party Data Wrapper
------+----------+--------------------------
test | postgres | postgres_fdw
(1 line )
5) After that, we will create a user under which the connection will occur. There can be several mappings to a user:
postgres=# CREATE USER MAPPING FOR postgres SERVER test
OPTIONS ( user 'postgres', password 'postgres' );
CREATE USER MAPPING
postgres=# \deu
User Mapping List
Server | Username
--------+------------------
test | postgres
(1 line)
6) Then we will create a table to which we can connect:
postgres=# CREATE FOREIGN TABLE order_remote
( id bigint, name varchar(32))
server test
OPTIONS ( schema_name 'public', table_name 'order_items_1'
);
CREATE FOREIGN TABLE
postgres=# \det
List third party tables
Scheme | Table | Server
--------+--------------+--------
public | order_remote | test
(1 line)
7) We access this table as a normal table:
postgres=# SELECT * FROM order_remote LIMIT 10;
id | name
----+------
0 |
1 |
2 |
3 |
4 |
5 |
6 |
7 |
8 |
9 |
(10 lines)
8) The description of a remote table can be obtained as usual:
postgres=# \d order_remote
Third party table "public.order_remote"
Column | Type | Sort Rule | NULLable | Default |
---------+-----------------------+--------------------+-------------------+--------------+
id | bigint | | | |
name | character varying(32) | | | |
Server : test
Parameter OSD : (schema_name 'public', table_name 'order_items_1')
9) Let's see where it comes from come data :
postgres=# EXPLAIN SELECT * FROM order_remote LIMIT 10;
QUERY PLAN
---------------------------------------------
Foreign Scan on order_remote (cost=100.00..100.42 rows=10 width=90)
(1 line )
10) Let's clean it up base data :
postgres=# DROP FOREIGN TABLE order_remote;
DROP FOREIGN TABLE
postgres=# DROP USER MAPPING FOR postgres server test;
DROP USER MAPPING
postgres=# DROP SERVER test;
DROP SERVER
postgres=# DROP EXTENSION postgres_fdw;
DROP EXTENSION
Part 1. Overview of configuration parameters
1) How many configuration options are there?
postgres=# select count(*) from pg_settings;
count
-------
392
(1 line)
2) How many system parameters are there? Run request :
postgres=# select count(name) from pg_settings where name not like '% . %';
count
-------
392
(1 line)
Parameters with a dot in their name refer to extensions, libraries, applications (customized options, non-system parameters, user settings) and there can be any number of them. Loaded modules can register their configuration parameters.
To load libraries, you need to specify them in the configuration parameter. Run command :
postgres=#
alter system set shared_preload_libraries = pg_store_plans, pg_stat_statements, auto_explain ;
ALTER SYSTEM
A space after the comma is required.
Changing this parameter requires restarting the instance. Stop the instance with the pg_ctl utility and start it again as a service:
postgres=# \q
postgres@tantor:~$ pg_ctl stop
waiting for server to shut down.... done
server stopped
postgres@tantor:~$ sudo systemctl start tantor-se-server-17
postgres@tantor:~$ psql
3) What libraries were loaded ?
postgres=# show shared_ pre load _libraries;
shared_preload_libraries
------------------------------------------------
pg_store_plans,pg_stat_statements,auto_explain
(1 line)
Three libraries were loaded .
4) How many parameters of modules (libraries) and applications are there? There is a dot in the name of such parameters . Do the following: request :
postgres=# select distinct split_part(name,' . ', 1), count(name) from pg_settings where name like '% . %' group by split_part(name,' . ', 1) order by 1;
split_part | count
--------------------+-------
auto_explain | 13
pg_stat_statements | 5
pg_store_plans | 15
(3 lines)
5) What are the maximum values of the parameters? It is interesting to compare the name of the parameter type with its dimension ( how many byte takes up value ). Perform request :
postgres=# select vartype, min_val, max_val, count(name) from pg_settings group by vartype, min_val, max_val order by length(max_val) desc, vartype;
vartype | min_val | max_val | count
---------+-------------+---------------------+-------
bool | | | 122
enum | | | 44
string | | | 68
int64 | 10000 | 9223372036854775807 | 1
int64 | 100000 | 9223372036854775807 | 1
int64 | 0 | 9223372036854775807 | 4
real | -1 | 1.79769e+308 | 3
real | 0 | 1.79769e+308 | 7
int64 | 0 | 2100000000 | 2
integer | 100 | 1073741823 | 2
integer | -1 | 2147483647 | 13
integer | 1 | 2147483647 | 6
integer | -2147483648 | 2147483647 | 1
integer | -1 | 1073741823 | 2
...
To continue output, you can press the <z> key :
The maximum value of a type called int 64 is 9223372036854775807 = 2 to the power of 63 minus 1, which is the maximum for a 64- bit signed integer type .
For types named integer, the maximum value is 2147483647, which is the maximum for a 32-bit signed integer type.
6) A context specifies whether the value of a parameter can be changed, and if so, in what way . What parameter contexts are there and how many parameters are in each context?
postgres=# select context , count(name) from pg_settings where name not like '%.%' group by context order by 1;
context | count
-------------------+-------
backend | 2
internal | 19
postmaster | 67
sighup | 100
superuser | 47
superuser-backend | 4
user | 153
(7 строк)
Most context parameters user . Changes to context parameters postmaster will require an instance restart. Context parameters internal are read-only (cannot be changed by SET, ALTER SYSTEM commands , by setting the value in configuration parameter files) and there is no point in specifying them in configuration parameter files. Can the values of context parameters change? internal ? They can. The method of changing depends on the parameter. For example, the value of the wal_segment_size parameter can be changed by the pg_resetwal utility, parameter data_checksums - the pg_checksums utility .
7) Посмотрите, какие категории параметров есть:
postgres=# select category, count(*) from pg_settings group by category order by 2 desc;
category | count
------------------------------------------+-------
Customized Options | 36
Client Connection Defaults / Statement Behavior | 33
Developer Options | 26
Resource Usage / Memory | 27
Query Tuning / Planner Method Configuration | 25
Reporting and Logging / What to Log | 21
Preset Options | 19
Write-Ahead Log / Settings | 15
Connections and Authentication / SSL | 14
Query Tuning / Planner Cost Constants | 13
Reporting and Logging / Where to Log | 13
Autovacuum | 13
Client Connection Defaults / Locale and Formatting | 12
Connections and Authentication / Connection Settings | 11
Replication / Standby Servers | 11
Resource Usage / Asynchronous Behavior | 9
Write-Ahead Log / Recovery Target | 8
Query Tuning / Other Planner Options | 8
Statistics / Cumulative Query and Index Statistics | 7
Query Tuning / Genetic Query Optimizer | 7
Reporting and Logging / When to Log | 7
Connections and Authentication / Authentication | 7
Version and Platform Compatibility / Previous PostgreSQL Versions | 7
Replication / Sending Servers | 6
Write-Ahead Log / Checkpoints | 6
Lock Management | 5
Statistics / Monitoring | 5
File Locations | 5
Connections and Authentication / TCP Settings | 5
Resource Usage / Cost-Based Vacuum Delay | 5
Error Handling | 4
Client Connection Defaults / Shared Library Preloading | 4
Resource Usage / Background Writer | 4
Write-Ahead Log / Archiving | 4
Client Connection Defaults / Other Defaults | 3
Write-Ahead Log / Archive Recovery | 3
Replication / Subscribers | 3
Write-Ahead Log / Recovery | 2
Reporting and Logging / Process Title | 2
Version and Platform Compatibility / Other Platforms and Clients | 1
Resource Usage / Kernel Resources | 1
Replication / Primary Server | 1
Resource Usage / Disk | 1
(43 строки)
To continue the output (instead of the prompt, the command shows a colon), press the <z><q> keys on the keyboard in sequence .
Customized Options category contains options for extensions and applications.
8) How many parameters are set in the configuration parameter files?
postgres=# select sourcefile, count(*) from pg_settings group by sourcefile;
sourcefile | count
---------------------------------------------------------------------+------
/var/lib/postgresql/tantor-se-17-replica/data1/ postgresql.conf | 14
/var/lib/postgresql/tantor-se-17-replica/data1/ postgresql.auto.conf | 6
(3 lines)
The configuration parameter files contain 14 +6=20 parameters.
9) In the postgresql.conf file a large number of parameters are commented and uncommented. Comments are short, high-quality, convenient (at hand) help.
What configuration parameters were read from the main parameter file when the instance was started?
postgres=# select name, setting, sourceline from pg_settings where sourcefile like ' %l.conf ' order by sourceline ;
name | setting | sourceline
----------------------------+------------------------------------------------+------------
max_connections | 100 | 65
shared_buffers | 16384 | 131
dynamic_shared_memory_type | posix | 154
min_wal_size | 80 | 258
log_timezone | Europe/Moscow | 613
DateStyle | ISO, DMY | 727
TimeZone | Europe/Moscow | 729
lc_messages | ru_RU.UTF-8 | 743
lc_monetary | ru_RU.UTF-8 | 745
lc_numeric | ru_RU.UTF-8 | 746
lc_time | ru_RU.UTF-8 | 747
default_text_search_config | pg_catalog.russian | 753
shared_preload_libraries | pg_stat_statements,pg_store_plans,auto_explain | 834
logging_collector | on | 835
(14 строк)
sourceline - number lines from beginning file . The line number is convenient for finding the parameter and editing it.
The same information can be viewed in the pg_file_settings view .
10) Complete command :
postgres=# select name, setting, sourceline, applied from pg_file_settings where sourcefile like ' %l.conf ';
name | setting | sourceline | applied
----------------------------+------------------------------------------------+------------+--
max_connections | 100 | 65 | t
shared_buffers | 128MB | 131 | t
dynamic_shared_memory_type | posix | 154 | t
max_wal_size | 1GB | 257 | f
min_wal_size | 80MB | 258 | t
log_timezone | Europe/Moscow | 613 | t
datestyle | iso, dmy | 727 | t
timezone | Europe/Moscow | 729 | t
lc_messages | ru_RU.UTF-8 | 743 | t
lc_monetary | ru_RU.UTF-8 | 745 | t
lc_numeric | ru_RU.UTF-8 | 746 | t
lc_time | ru_RU.UTF-8 | 747 | t
default_text_search_config | pg_catalog.russian | 753 | t
listen_addresses | * | 833 | f
shared_preload_libraries | pg_stat_statements,pg_store_plans,auto_explain | 834 | t
logging_collector | on | 835 | t
( 15 rows)
What could be the reason for the discrepancy in the number of lines in the given example 14 and 15 ?
IN pg_file_settings has the max_wal_size parameter . You may not have a discrepancy, or they may be in other parameters. The parameter in the example is set in the postgresql.auto.conf file .
11) Example of file contents:
postgres=# \! cat $PGDATA/postgresql.conf | grep max_wal_size
max_wal_size = 1GB
postgres=# \! cat $PGDATA/postgresql.auto.conf
# Do not edit this file manually!
# It will be overwritten by the ALTER SYSTEM command.
listen_addresses = '*'
max_wal_size = '512MB'
max_slot_wal_keep_size = '1024MB'
Both files contain the max_wal_size parameter . The pg_file_settings view displays all uncommented parameters from all files. In the applied column for line 257 there is " f ". This means that this line is overridden by a subsequent line with the same parameter name (or a line in the postgresql.auto.conf file, the contents of which override the values from postgresql.conf ) . In the example, line 257 was overridden by line 4 from the postgresql.auto.conf file . In queries, we did not display the contents of this ( postgresql.auto.conf ) file ( sourcefile predicate like ' %l.conf ' ).
12) Sometimes there are many columns in views, and when outputting them line by line, they do not fit in the terminal. You can use the extended output mode. Run the commands:
postgres=# select * from pg_settings where name = 'max_wal_size' \gx
-[ RECORD 1 ]---+----------------------------------------------------------------
name | max_wall_size
setting | 512
unit | MB
category | Write-Ahead Log/Checkpoints
short_desc | Sets the WAL size that triggers a checkpoint.
extra_desc |
context | sighup
vartype | integer
source | configuration file
min_val | 2
max_val | 2147483647
enumvals |
boot_val | 1024
reset_val | 512
sourcefile | /var/lib/postgresql/tantor-se-17/data/postgresql.auto.conf
sourceline | 4
pending_restart | f
In this example, all the details of the parameter are visible: category, short description, context.
The parameter value was applied from line 4 of the postgresql.auto.conf file .
13) Example of outputting values without a predicate (filter):
postgres=# select name, setting, substring(sourcefile, 39) file, sourceline, applied from pg_file_settings where name='max_wal_size';
name | setting | file | sourceline | applied
--------------+---------+----------------------+-------------+----------
max_wal_size | 1GB | postgresql.conf | 257 | f
max_wal_size | 512MB | postgresql.auto.conf | 4 | t
(2 lines)
pg_file_settings view shows all the lines in the configuration parameter files where the values of the parameters are set (non-commented and non-empty lines). For each parameter, there may be multiple lines where the values of that parameter are set; this is not an error, although it should be avoided (to avoid ambiguity).
When an instance is started (and files are re-read if the parameter value can be changed without restarting the instance), the value from the postgresql.auto.conf file is applied. which is the very last one. There may also be repetitions in this file, they appear when editing the file manually, as well as as a result of the work of utilities (for example, pg_basebackup ), which simply add lines to the end of the file, knowing that what is set to the end of the file will prevail.
If in the postgresql.auto.conf file If the parameter is missing, the value that is closer to the end of the postgresql.conf file is applied .
pg_settings view shows one line for each parameter, i.e. the one that is applied or can be applied.
In the column pending_restart meaning "t" will appear if the parameter value was changed in the configuration parameter file, the files were reread ( without rereading the contents of pg_settings does not change ), and after rereading, a restart of the instance is required (that is, for the parameter context=postmaster ). In all other cases, the value pending_restart= "f" .
Unlike pg_settings performance pg_file_settings shows the current contents of the parameter files, and in the error column you can see if there are any errors after editing the files that would prevent the instance from starting.
14) There are no errors in these two configuration parameter files if the query is like
select sourcefile, sourceline , error from pg_file_settings where error is not null will not produce a single line .
If the query returns one row, it does not mean that the error is only in one row, there may be many errors. After fixing the error, you need to repeat the query, ensuring that the query does not return a single row. In many cases, the presence of an error will lead to the impossibility of starting the instance after it is stopped.
Examples (you don't need to execute the commands in this section):
Error in parameter value:
postgres=# \! cat $PGDATA/postgresql.auto.conf | grep max_wal
max_wal_size = '512 m B'
postgres=# select substring(sourcefile, 39) file, sourceline, error from pg_file_settings where error is not null;
file | sourceline | error
----------------------+------------+------------------------------
postgresql.auto.conf | 4 | setting could not be applied
(1 line)
Without fixing the previous error, an error was added to the parameter name:
postgres=# \! cat $PGDATA/postgresql.conf | grep 512MB
max_w o l_size = 512MB
postgres=# select substring(sourcefile, 39) file, sourceline, error from pg_file_settings where error is not null;
file | sourceline | error
-----------------+-------------+--------------------------------------
postgresql.conf | 836 | unrecognized configuration parameter
(1 line)
Without fixing the previous errors, an error was added to the syntax of the line:
postgres=# \! cat $PGDATA/postgresql.conf | grep max_wol
max_vol_size = 512MB
max_vol_size - 512MB
postgres=# select substring(sourcefile, 39) file, sourceline, error from pg_file_settings where error is not null;
file | sourceline | error
-----------------+-------------+---------------
postgresql.conf | 837 | syntax error
(1 line)
If any of the listed errors are present, the instance will fail to start after stopping or during restart:
postgres@tantor:~$ sudo systemctl restart tantor-se-server-17
Job for tantor-se-server-17.service failed because the control process exited with error code.
See "systemctl status tantor-se-server-17.service" and "journalctl -xe" for details.
"setting could not be applied" errors does not always mean that the instance cannot be launched.
Part 2. Configuration parameters with units of measurement
1) Let's see how to change the value of parameters with a unit of measurement.
View the properties of the parameter shared_buffers :
postgres=# select * from pg_settings where name = 'shared_buffers' \gx
-[ RECORD 1 ]---+-----------------------------------------------------
name | shared_buffers
setting | 16384
unit | 8kB
category | Resource Usage / Memory
short_desc | Sets the number of shared memory buffers used by the server.
extra_desc |
context | postmaster
vartype | integer
source | configuration file
min_val | 16
max_val | 1073741823
enumvals |
boot_val | 16384
reset_val | 16384
sourcefile | /var/lib/postgresql/tantor-se-17/data/postgresql.conf
sourceline | 131
pending_restart | f
The value is measured in 8 KB blocks . The parameter is integer .
2) Set the value for this parameter to 12800:
postgres=# alter system set shared_buffers = 12800;
ALTER SYSTEM
3) Check what was written to the parameters file:
postgres=# \! cat $PGDATA/postgresql.auto.conf
# Do not edit this file manually!
# It will be overwritten by the ALTER SYSTEM command.
...
shared_buffers = ' 12800 '
The value was entered without apostrophes, in the file it was set with apostrophes .
4) Check if there are any errors in the set parameter value:
postgres=# select substring(sourcefile, 39) file, sourceline, error from pg_file_settings where error is not null;
file | sourceline | error
----------------------+------------+------------------------------
postgresql.auto.conf | 6 | setting could not be applied
(1 line)
The error means that it is better to use values with units of measurement, for example '100MB' .
The instance will then restart successfully and the error will disappear.
4) The parameter has a postmaster context , which means that changing the value requires restarting the instance. Restart instance :
postgres=# \q
postgres@tantor:~$ sudo systemctl restart tantor-se-server-17
[sudo] password for postgres: postgres
postgres@tantor:~$ psql
5) Look at the value of the parameter after restarting the instance:
postgres=# show shared_buffers;
shared_buffers
----------------
100MB
(1 line)
The value is given in megabytes. The parameter file is set to '12800'.
12800 * 8192 (8 KB) = 104857600. 104857600 / 1024 / 1024 = 100. 12800 blocks is exactly 100 MB.
6) Without units of measurement, this parameter is measured in blocks.
Let's set the value in megabytes. Run the command:
postgres=# alter system set shared_buffers = 100mb ;
ERROR: trailing junk after numeric literal at or near "100m"
LINE 1: alter system set shared_buffers = 100mb;
^
It doesn't work. Units are case sensitive. Try this command :
postgres=# alter system set shared_buffers = 100MB ;
ERROR: trailing junk after numeric literal at or near "100M"
LINE 1: alter system set shared_buffers = 100MB;
^
Not it turns out . Put it apostrophes :
postgres=# alter system set shared_buffers = '100MB' ;
ALTER SYSTEM
It worked.
You have executed the command several times to better remember the peculiarity of entering parameter values with units of measurement: the register of units of measurement is important and apostrophes are necessary. Without remembering this, people often try to enter a number for this parameter, intuitively believing that the value is specified in bytes (but it is in blocks) and get a lack of memory when restarting the instance.
There can be spaces between the number and the unit of measurement and this will not cause errors. For example ( do Not need to ):
postgres=# alter system set shared_buffers = '100 MB' ;
postgres=# \! cat $PGDATA/postgresql.auto.conf
# Do not edit this file manually!
# It will be overwritten by the ALTER SYSTEM command.
listen_addresses = '*'
max_wal_size = '512MB'
max_slot_wal_keep_size = '1024MB'
shared_buffers = '100 MB'
Spaces worsen readability .
7) Look at what was written to the file when entering a value with a unit of measurement and in apostrophes:
postgres=# \! cat $PGDATA/postgresql.auto.conf
# Do not edit this file manually!
# It will be overwritten by the ALTER SYSTEM command.
..
shared_buffers = '100MB'
8) Remove from postgresql.auto.conf parameter shared_buffers :
postgres=# alter system reset shared_buffers;
ALTER SYSTEM
postgres=# \! cat $PGDATA/postgresql.auto.conf
# Do not edit this file manually!
# It will be overwritten by the ALTER SYSTEM command.
The lines (if there were several, which can happen when editing the file manually) with the shared_buffers parameter will disappear.
In this section we learned how to remove parameters from postgresql.auto.conf.
Part 3. Configuration parameters of the logical type
1) Посмотрим параметр логического типа (bool):
postgres=# select * from pg_settings where name = 'hot_standby_feedback'\gx
-[ RECORD 1 ]---+--------------------------------
name | hot_standby_feedback
setting | off
unit |
category | Replication / Standby Servers
short_desc | Allows feedback from a hot standby to the primary that will avoid query conflicts.
extra_desc |
context | sighup
vartype | bool
source | default
min_val |
max_val |
enumvals |
boot_val | off
reset_val | off
sourcefile |
sourceline |
pending_restart | f
sighup context means that to apply the new value, it is enough to re-read the configuration files.
2) "Turn on" the parameter, that is, set the value to true :
postgres=# alter system set hot_standby_feedback = o ;
ERROR: parameter "hot_standby_feedback" requires a Boolean value
The error means that the value cannot be reduced because there is an ambiguity. quality meanings are allowed o n And o ff:
postgres=# alter system set hot_standby_feedback = on ;
ALTER SYSTEM
The value on is valid for Boolean parameters. Check that other values are valid as well:
postgres=# alter system set hot_standby_feedback = 1 ;
ALTER SYSTEM
postgres=# alter system set hot_standby_feedback = '1' ;
ALTER SYSTEM
One is also acceptable:
postgres=# alter system set hot_standby_feedback = tr ;
ALTER SYSTEM
Abbreviations of values are allowed, but only if there is no ambiguity.
The ambiguity was with the reduction to one letter " o ".
3) Look at what was written to the parameters file:
postgres=# \! cat $PGDATA/postgresql.auto.conf
# Do not edit this file manually!
# It will be overwritten by the ALTER SYSTEM command.
..
hot_standby_feedback = 'tr'
The abbreviated meaning was written in apostrophes.
Abbreviations are not convenient to read. For logical parameters it is better to use canonical values on, off .
4) Reread the parameter files for the new value to take effect:
postgres=# select pg_reload_conf() ;
pg_reload_conf
----------------
t
(1 line )
postgres=# show hot_standby_feedback;
hot_standby_feedback
----------------------
on
(1 line )
The value has been set correctly.
Part 4. Configuration parameters
"Configuration parameters" (settings) and "Configuration parameters" (config) are consonant. In this part of the practice we will consider "Configuration parameters".
There are three ways to view configuration parameters: the pg_config command-line utility , the pg_config view , and the pg_config() function .
1) See what configuration parameters exist using the utility pg_config :
postgres@tantor:~$ pg_config --help
pg_config provides information about the installed PostgreSQL version.
Usage:
pg_config [PARAMETER]...
Parameters:
--bindir show location of executable files
--docdir show the location of the documentation files
--htmldir show location of HTML documentation files
--includedir show the location of the header (.h) files for
client interfaces in C language
--pkgincludedir show locations of other header (.h) files
--includedir-server show the location of header (.h) files for the server
--libdir show location of object code libraries
--pkglibdir show location of dynamically loaded modules
--localedir show location of locale description files
--mandir show man page locations
--sharedir show location of platform independent files
--sysconfdir show location of system wide configuration files
--pgxs show makefile location for extensions
--configure show the "configure" script parameters that
PostgreSQL was compiled
--cc show what CC value PostgreSQL was compiled with
--cppflags show what CPPFLAGS value PostgreSQL was compiled with
--cflags show which C flags PostgreSQL was compiled with
--cflags_sl show what CFLAGS_SL value PostgreSQL was built with
--ldflags show what LDFLAGS value PostgreSQL was built with
--ldflags_ex show what LDFLAGS_EX value PostgreSQL was compiled with
--ldflags_sl show what LDFLAGS_SL value PostgreSQL was built with
--libs show what LIBS value PostgreSQL was built with
--version show PostgreSQL version
-?, --help show this help and exit
When run without arguments, all known values are printed.
These parameters are set when assembling Tantor DBMS and do not change. They are the same for assemblies BE, SE, SE1C . Since the directory names are long and difficult to remember, the benefit of the pg_config utility is that, knowing the name of the utility and the name of the directory type, you can get the path in the file system to the desired directory.
2) Run the utility without parameters, the utility will display the values of all parameters:
postgres@tantor:~$ pg_config
BINDIR = /opt/tantor/db/17/bin
DOCDIR = /opt/tantor/db/17/share/doc/postgresql
HTMLDIR = /opt/tantor/db/17/share/doc/postgresql
INCLUDEDIR = /opt/tantor/db/17/include
PKGINCLUDEDIR = /opt/tantor/db/17/include/postgresql
INCLUDEDIR-SERVER = /opt/tantor/db/17/include/postgresql/server
LIBDIR = /opt/tantor/db/17/lib
PKGLIBDIR = /opt/tantor/db/17/lib/postgresql
LOCALEDIR = /opt/tantor/db/17/share/locale
MANDIR = /opt/tantor/db/17/share/man
SHAREDIR = /opt/tantor/db/17/share/postgresql
SYSCONFDIR = /opt/tantor/db/17/etc/postgresql
PGXS = /opt/tantor/db/17/lib/postgresql/pgxs/src/makefiles/pgxs.mk
CONFIGURE = '--prefix=/opt/tantor/db/16' '--enable-tap-tests' '--enable-nls=en ru' '--with-python' '--with-icu' '--with-lz4' '--with-zstd' '--with-ssl=openssl' '--with-ldap' '--with-pam' '--with-uuid=e2fs' '--with-libxml' '--with-libxslt' '--with-gssapi' '--with-selinux' '--with-systemd' '--with-llvm' 'CFLAGS=-O2 -pipe -Wno-missing-braces' 'LLVM_CONFIG=/usr/bin/llvm-config-11' 'CLANG=/usr/bin/clang-11' 'PYTHON=/usr/bin/python3'
CC = gcc
CPPFLAGS = -D_GNU_SOURCE -I/usr/include/libxml2
CFLAGS = -Wall -Wmissing-prototypes -Wpointer-arith -Wdeclaration-after-statement -Werror=vla -Wendif-labels -Wmissing-format-attribute -Wimplicit-fallthrough=3 -Wcast-function-type -Wshadow=compatible-local -Wformat-security -fno-strict-aliasing -fwrapv -fexcess-precision=standard -Wno-format-truncation -Wno-stringop-truncation -O2 -pipe -Wno-missing-braces
CFLAGS_SL = -fPIC
LDFLAGS = -L/usr/lib/llvm-11/lib -Wl,--as-needed -Wl,-rpath,'/opt/tantor/db/17/lib',--enable-new-dtags
LDFLAGS_EX =
LDFLAGS_SL =
LIBS = -lpgcommon -lpgport -lselinux -lzstd -llz4 -lxslt -lxml2 -lpam -lssl -lcrypto -lgssapi_krb5 -lz -lreadline -lpthread -lrt -ldl -lm
VERSION = PostgreSQL 17.5
The location of the directory with external libraries (loadable modules, PKGLIBDIR ) is shown by the parameter --pkglibdir .
3) Libraries are loaded when the instance is started using the shared_preload_libraries configuration parameter or, if the library can be loaded not only when the instance is started but also dynamically by the server process, using the LOAD 'library_name' command ;
See what libraries are available:
postgres@tantor:~$ ls $(pg_config --pkglibdir)
adminpack.so latin_and_mic.so pg_visibility.so
amcheck.so libpqwalreceiver.so pg_wait_sampling.so
auth_delay.so llvmjit.so pg_walinspect.so
auto_explain.so llvmjit_types.bc pgxml.so
autoinc.so lo.so pgxs
basebackup_to_shell.so ltree_plpython3.so plpgsql.so
basic_archive.so ltree.so plpython3.so
bitcode moddatetime.so postgres_fdw.so
bloom.so old_snapshot.so refint.so
btree_gin.so orafce.so seg.so
btree_gist.so pageinspect.so sepgsql.so
citext.so page_repair.so sslinfo.so
credcheck.so passwordcheck.so tablefunc.so
cube.so pgauditlogtofile.so tcn.so
cyrillic_and_mic.so pgaudit.so test_decoding.so
dblink.so pg_background.so tsm_system_rows.so
dict_int.so pg_buffercache.so tsm_system_time.so
dict_snowball.so pg_columnar.so unaccent.so
dict_xsyn.so pg_cron.so utf8_and_big5.so
earthdistance.so pgcrypto.so utf8_and_cyrillic.so
euc2004_sjis2004.so pg_freespacemap.so utf8_and_euc2004.so
euc_cn_and_mic.so pg_hint_plan.so utf8_and_euc_cn.so
euc_jp_and_sjis.so pgoutput.so utf8_and_euc_jp.so
euc_kr_and_mic.so pg_partman_bgw.so utf8_and_euc_kr.so
euc_tw_and_big5.so pg_prewarm.so utf8_and_euc_tw.so
file_fdw.so pgq_lowlevel.so utf8_and_gb18030.so
fuzzystrmatch.so pgq_triggers.so utf8_and_gbk.so
hstore_plpython3.so pg_qualstats.so utf8_and_iso8859_1.so
hstore.so pg_repack.so utf8_and_iso8859.so
http.so pgrowlocks.so utf8_and_johab.so
hypopg.so pg_stat_statements.so utf8_and_sjis2004.so
insert_username.so pgstattuple.so utf8_and_sjis.so
_int.so pg_store_plans.so utf8_and_uhc.so
isn.so pg_surgery.so utf8_and_win.so
jsonb_plpython3.so pg_trgm.so uuid-ossp.so
latin2_and_win1250.so pg_variables.so
4) Let's check that some shared libraries can be loaded dynamically. Load module pg_hint_plan :
postgres=# show pg_hint_plan.enable_hint;
ERROR: unrecognized configuration parameter "pg_hint_plan.enable_hint"
The server process does not know about this parameter because the module was not loaded either by the server process or at the instance level. Load the module into the memory of the server process servicing the current session:
postgres=# LOAD 'pg_hint_plan';
LOAD
The library has been loaded into the memory of the server process servicing the session in which the command was issued. The module's functionality can be used in this session.
5) In particular, module configuration parameters are now available in the session. When typing, you can use the tab key on the keyboard <TAB>, psql will continue typing for you if there are no other variations, and when you press the key twice, it will show a list of possible values.
Dial show pg_hint<TAB>.<TAB> :
postgres=# show pg_hint_plan.enable_hint ;
pg_hint_plan.enable_hint
--------------------------
on
(1 line)
6) Let's use another option for viewing configuration parameters:
postgres=# \dconfig pg_hint_plan.*
List of configuration parameters
Parameter | Value
--------------------------------+----------
pg_hint_plan.debug_print | off
pg_hint_plan.enable_hint | on
pg_hint_plan.enable_hint_table | off
pg_hint_plan.hints_anywhere | off
pg_hint_plan.message_level | log
pg_hint_plan.parse_messages | info
(6 lines)
When installing extensions, dynamically linked libraries ( *.so ) are copied to the PKGLIBDIR directory if the extension contains shared libraries.
The second directory that is useful when administering extensions is SHAREDIR . This is the directory where extension files are copied and then installed with the CREATE EXTENSION command .
7) Extensions are not a shared cluster object and are installed at the database level.
See which extensions are ready to be installed into your databases:
postgres@tantor:~$ ls $(pg_config --sharedir)/extension | grep .control
adminpack.control
amcheck.control
...
xml2.control
8) The list of the same extensions can be viewed in the pg_available_extensions view :
postgres=# select count(*) from pg_available_extensions;
count
-------
69
9) Look at the definition of the view:
postgres=# \sv pg_available_extensions
CREATE OR REPLACE VIEW pg_catalog.pg_available_extensions AS
SELECT e.name,
e.default_version,
x.extversion AS installed_version,
e.comment
FROM pg_available_extensions() e(name, default_version, comment)
LEFT JOIN pg_extension x ON e.name = x.extname
The view uses the function pg_available_extensions(), which reads the contents of files *.control in the SHAREDIR directory .
9) Look at the function definition:
postgres=# \sf pg_available_extensions()
CREATE OR REPLACE FUNCTION pg_catalog.pg_available_extensions(OUT name name, OUT default_version text, OUT comment text)
RETURNS SETOF record
LANGUAGE internal
STABLE PARALLEL SAFE STRICT COST 10 ROWS 100
AS $function$pg_available_extensions$function$
By the team \sv - you can view the texts of the performances.
By the team \sf - texts of subroutines, including the system catalog.
Part 5. Services file
If you have difficulty copying a file due to privileges at the operating system level or editing files, you can skip this part of the practice and look at the examples below.
1) Look at which directory the SYSCONFDIR parameter points to . This directory contains the default files.
postgres@tantor:~$ pg_config --sysconfdir
/opt/tantor/db/17/etc/postgresql
2) Create a directory:
postgres@tantor:~$ sudo mkdir /opt/tantor/db/17/etc
postgres@tantor:~$ sudo chown postgres.postgres /opt/tantor/db/17/etc
postgres@tantor:~$ mkdir /opt/tantor/db/17/etc/postgresql
3) Copy the example file to this directory ( command one line ):
postgres@tantor:~$ cp $(pg_config --sharedir)/pg_service.conf.sample $(pg_config --sysconfdir)/pg_service.conf
4) Look content file services :
postgres@tantor:~$ cat $(pg_config --sysconfdir)/pg_service.conf
#
# Connection configuration file
#
# A service is a set of named connection parameters. You may specify
# multiple services in this file. Each starts with a service name in
# brackets. Subsequent lines have connection configuration parameters of
# the pattern "param=value" or LDAP URLs starting with "ldap://"
# to look up such parameters. A sample configuration for postgres is
# included in this file. Lines beginning with '#' are comments.
#
# Copy this to your sysconf directory (typically /usr/local/pgsql/etc) and
# rename it pg_service.conf.
#
#
#[postgres]
#dbname=postgres
#user=postgres
5) Edit file /opt/tantor/db/17/etc/postgresql/pg_service.conf :
postgres@tantor:~$ mcedit /opt/tantor/db/17/etc/postgresql/pg_service.conf
6) Insert the following lines into the file:
[ postgres ]
dbname=postgres
user=postgres
host= /var/run/postgresql
port= 5432
Now there is a definition of a service called "postgres". You can specify multiple services in this file. In the parameter host You can specify an IP address or a host name. When specifying a directory, a local connection via a Unix socket is used.
7) Let's use this service name to connect to the database. Run the command:
postgres@tantor:~$ psql service= postgres
psql (17.5)
Type "help" to get help.
postgres=# \conninfo
You are connected to the database "postgres" as user "postgres" through a socket in " /var/run/postgresql ", port " 5432 "
If you make a mistake in the services file, for example, specify the port as 5435 , then an error will be displayed:
postgres@tantor:~$ psql service = postgres
psql: error: connect to server via socket " /var/run/postgresql/.s.PGSQL. 5435 " failed: No such file or directory
Is the server actually running locally and accepting connections through this socket?
8) The services file can also be located in the home directory of the operating system user ( ~/ . pg_service.conf ). The dot at the beginning of the file name is necessary.
Directory SYSCONFDIR is also used for a file named " psqlrc " . When launched without a parameter -X psql utility , after connecting to the database, reads and executes commands from " psqlrc " and then from the file ~/.psqlrc (if these files exist). These files can be used to configure psql session properties .
Part 1. Setting configuration parameters at different levels
The purpose of this section is to learn how to set configuration parameters at different levels and which levels take precedence.
1) Set a prompt that will show the user and database the session was created with (text after \set entered in one line):
postgres=# \set PROMPT1 '%[%033[0;31m%]%n%[%033[0m%]@%[%033[0;36m%]%/%[%033[0m%] %[%033[0;33m%]%[%033[5m%]%x%[%033[0m%]%[%033[0m%]%R%# '
postgres=# \set PROMPT2 '%[%033[0;31m%]%n%[%033[0m%]@%[%033[0;36m%]%/%[%033[0m%] %[%033[0;33m%]%[%033[5m%]%x%[%033[0m%]%[%033[0m%]%R%# '
2) Add to the end of the postgresql.conf file parameter:
postgres=# \! echo " my.level = 'Pgconf' " >> $PGDATA/postgresql.conf
Be sure to check that you are using two angle brackets >> and not just one , otherwise you will overwrite the contents of the file.
Parameter my.level - this is an "application parameter" whose name we came up with ourselves. The name must contain a period, otherwise the instance will not start.
If you do not add the parameter to postgresql.conf and do not re-read the parameter file, then the command ALTER SYSTEM SET my.level = 'string'; will return an error:
ERROR: unrecognized configuration parameter " my.level "
This error is returned if a shared library that would register the configuration parameters has not been loaded since the instance was started. Loading is done by the shared_preload_libraries parameter or the LOAD command .
3) Check that the line has been added:
postgres=# \! tail -n 1 $PGDATA/postgresql.conf
my.level = 'Pgconf'
5) Reread the parameter files:
postgres=# select pg_reload_conf();
pg_reload_conf
----------------
t
(1 line )
6) Look at what types (context) of parameters there are:
postgres=# select distinct context from pg_settings;
context
-------------------
postmaster
superuser-backend
user
internal
backend
sighup
superuser
(7 lines)
Most parameters of the " user " type can be set at all levels. However, there may be nuances. For example, the application_name parameter sets the client application after the session is created. For the psql utility This is the psql value . Therefore, setting the value of this parameter at the cluster, database, role, or role in the database level is pointless, since setting it at the session level overrides these values. It can be set at the session, transaction, or function level.
Parameter temp_tablespaces can be set at any level, but it has a special feature: when creating a routine in the plpgsql language (this language has a "wrapper" function that checks the body of the routine at the time of creation), the presence of tablespaces is checked, and if they are not there, the routine is not created.
Type parameters internal do not change.
Postmaster type parameters change with instance restart and can be changed with the ALTER SYSTEM command.
Parameters of the sighup type are changed by the ALTER SYSTEM command, but require rereading the parameter files.
7) Create objects with the following commands:
drop database IF EXISTS bob;
drop ROLE IF EXISTS bob;
drop database IF EXISTS rob;
drop user IF EXISTS rob;
CREATE USER bob SUPERUSER LOGIN;
CREATE ROLE rob SUPERUSER LOGIN;
CREATE DATABASE bob OWNER bob STRATEGY WAL_LOG;
CREATE DATABASE rob OWNER rob STRATEGY FILE_COPY;
\c bob bob
CREATE SCHEMA IF NOT EXISTS bob AUTHORIZATION bob;
CREATE SCHEMA IF NOT EXISTS rob AUTHORIZATION rob;
\dconfig my.level
alter system set my.level = 'System';
select pg_reload_conf();
alter database bob set my.level = 'Database';
alter role bob set my.level = 'Role';
alter role bob in database bob set my.level = 'RoleInDatabase';
CREATE OR REPLACE FUNCTION bob.bob()
RETURNS text
LANGUAGE plpgsql
SET my.level TO 'Function'
AS $function$
BEGIN
RAISE NOTICE 'my.level %', current_setting('my.level');
RAISE NOTICE 'search_path %', current_schemas(true);
RETURN current_setting('my.level');
END;
$function$
;
CREATE OR REPLACE FUNCTION bob.bobdef()
RETURNS text
LANGUAGE plpgsql
SECURITY DEFINER
AS $function$
BEGIN
RAISE NOTICE 'my.level %', current_setting('my.level');
RAISE NOTICE 'search_path %', current_schemas(true);
RAISE NOTICE 'current_user %', current_user;
RAISE NOTICE 'session_user %', session_user;
RAISE NOTICE 'user %', user;
RETURN current_setting('my.level');
END;
$function$
;
Using these objects we will check from which level the configuration parameters will be taken.
The function level overlaps all levels.
The next level, which overrides the others (except the function) , is the SET LOCAL transaction level .
The next level is sessions. If you call functions SECURITY DEFINER , which operate with the owner's permissions, then the caller's session level will override the owner's session values.
And if you don't set a value in a session, whose value will be in effect - the owner role ( DEFINER )?
No, the parameter value set at the session level of the one calling the function will be in effect. If the parameter was set to "role in the database", then it will be set in the session. If it was not set, then it will be set "to the role". Then "to the database". It is important to know this. For functions and procedures, the value of the search_path parameter is especially important, which will be in effect in the body of the function or procedure. Functions and procedures in Postgres are called subroutines.
The second problem: The default value for search_path="$user", public.
The value of $user in the body of the subroutine in SECURITY DEFINER - the name of the owner role. Therefore, with the value $user, the search path for subroutines with DEFINER and INVOKER are different. In this case, the caller of the subroutine can set search_path in its session without $user. The search path will be different in the body of the subroutine.
That's why with SECURITY DEFINER subroutines, it is better not to rely on the search path, but always set the search path in the subroutine definition . It would be possible to use a schema name prefix before each object in the body of the subroutine, but then you would have to put the prefix in the body of all the subroutines it calls, including the system catalog subroutine. Otherwise, the caller could set search_path = myschema, public, pg_catalog and replace any system catalog routine with your own in the myschema schema . Also, the caller can create a temporary table and it will overlap any tables, so when creating a SECURITY DEFINER routine, you must not forget about pg_temp and in the definition of the subroutine always specify it explicitly and last , for example: search_path = pg_catalog , owner_schema, pg_temp .
Does the text seem difficult to understand? Architectural vulnerabilities are often not understood by software system architects, otherwise they would not allow them. The above example of creating the bobdef() function with creator rights contains a vulnerability. Before calling bobdef(), you can create the function schema.current_setting(text). Before calling bobdef, give the command set search_path=schema, public, pg_catalog and bobdef() will call the created function with the rights of the owner bobdef.
8) Look at the values that were set by the above set of commands:
postgres=# \drds
List of parameters
Role | DB | Parameters
------+-----+------------------------
bob | bob | my.level=RoleInDatabase
bob | | my.level=Role
| bob | my.level=Database
(3 lines )
If you plan to pay attention to security or change settings at different levels, then it is worth remembering the \drds command .
9) The changes will only take effect when a new session is created. When reconnecting, let's see what level of parameters are in effect in the session. Let's connect under the user rob to the bob database :
bob@ bob =# \c bob rob
You are connected to the database " bob " as user " rob ".
10) Function bob() in the bob schema was created with the parameter set to Function . Regardless of how the function is called, and regardless of whether it is an INVOKER or a DEFINER, in her body will act what is established in her definition:
rob @ bob =# SELECT bob.bob() as "my.level";
NOTICE: my.level Function
NOTICE: search_path {pg_catalog, rob ,public}
my.level
----------
Function
(1 line)
The search path in the function body is that of the user calling it ( rob ), since the function is of type INVOKER .
11) Let's call function DEFINER :
rob @ bob =# SELECT bob.bobdef() as "my.level";
NOTICE: my.level Database
NOTICE: search_path {pg_catalog, bob ,public}
NOTICE: current_user bob
NOTICE: session_user rob
NOTICE: user bob
my.level
----------
Database
(1 line)
Think about it, why Database level ?
Asking questions is useful because it activates memory. We learn simple rules, but they have many combinations. Similar statements are hard to remember, and simply reading the task and following the commands without thinking is not interesting.
12) To answer the question, you can check what value is set in the current session:
rob @ bob =# SHOW my.level;
my.level
----------
Database
(1 line)
Database level is set , so the value from this level is also applied in the function body.
We answered the previous question, but a new one arose. Why is the parameter taken from the base level?
Because we did not set the parameter values for the user rob (in point 7 you can see the commands that were used to make the settings) neither at the role level nor at the role level in the database. We did this for the user bob .
But we also set the parameter at the base level. The base level overrides the cluster level (the value " System ").
13) Let's change the value in the current session and repeat the function call:
rob @ bob =# SET my.level = ' Session ';
SET
rob@ bob =# SELECT bob.bobdef() as "my.level";
NOTICE: my.level Session
NOTICE: search_path {pg_catalog, bob ,public}
NOTICE: current_user bob
NOTICE: session_user rob
NOTICE: user bob
my.level
----------
Session
(1 line)
The function uses a parameter that is valid in the session.
The search path of the DEFINER function is its owner, due to search_path = ' $user , public' set by default at the cluster level.
Function current_user also gives for DEFINER the owner of the function. A session_user - the caller. When writing the function code, it can get the name of the role that calls it and use this knowledge.
14) Let's check function bob.bob() :
rob @ bob =# SELECT bob.bob() as "my.level";
NOTICE: my.level Function
NOTICE: search_path {pg_catalog, rob ,public}
my.level
----------
Function
(1 line)
Nothing has changed for her, she always uses the level Function .
15) What if calling this function changed the value of Function at the session level and did not return it back? Let's check :
rob @ bob =# SHOW my.level;
my.level
----------
Session
(1 line )
The fact that the parameter in the function body had a different value did not affect the session.
16) Let's check function current_setting :
rob @ bob =# SELECT current_setting('my.level');
current_setting
-----------------
Session
(1 line)
The result is the same.
17) Let's check if setting a parameter at the transaction level will affect a parameter set at the function level:
rob @ bob =# BEGIN TRANSACTION;
BEGIN
rob@ bob *=# SET LOCAL my.level = ' Transaction ';
SET
rob @ bob *=# SELECT bob.bob() as "my.level";
NOTICE: my.level Function
NOTICE: search_path {pg_catalog,rob,public}
my.level
----------
Function
(1 line)
It will not affect. The parameter set at the function level prevails.
18) For functions where there is no installation at their level, it will act:
rob @ bob *=# SELECT bob.bobdef() as "my.level";
NOTICE: my.level Transaction
NOTICE: search_path {pg_catalog,bob,public}
NOTICE: current_user bob
NOTICE: session_user rob
NOTICE: user bob
my.level
-------------
Transaction
(1 line)
19) Let's complete the transaction and check the parameter value:
rob @ bob *=# END;
COMMIT
rob @ bob =# SHOW my.level;
my.level
----------
Session
(1 line)
The value returned to Session, that is, the value that was before the change at the transaction level ( SET LOCAL ).
20) Let's connect as user bob to the postgres database . We didn't change the parameter at the level of this database. Where will the value come from?
rob @ bob =# \c postgres bob
You are connected to the database "postgres" as user " bob ".
bob@postgres =# SHOW my.level;
my.level
----------
Role
(1 line)
The value is taken from the one set for the bob role .
postgres database .
21) Remove the parameter setting for the role bob :
bob @ postgres =# ALTER ROLE bob RESET my.level;
ALTER ROLE
If you reconnect, the parameter will be taken from the cluster level, the value is System. We will not check this.
22) Let's connect to the bob database . Where will the parameter be taken from?
bob @ postgres =# \c bob bob
You are now connected to database "bob" as user " bob ".
bob @ bob =#SHOW my.level;
my.level
----------------
RoleInDatabase
(1 line)
The parameter is set both for the base and for the role in the base. The more detailed one prevails.
23) Let's connect to the rob database :
bob @ bob =# \c rob bob
You are now connected to database "rob" as user " bob ".
bob @ rob =# SHOW my.level;
my.level
----------
System
(1 line)
on the rob base , and for the bob user we removed the setting with the value " Role " a little earlier (item 21) .
24) Remove the installation for the role in the database:
bob @ rob =# ALTER ROLE bob IN DATABASE bob RESET my.level;
ALTER ROLE
bob @ rob =# SHOW my.level;
my.level
----------
System
(1 line)
In this base, even without removal, it would be the same.
25) And in the database bob ? Let's check:
bob @ rob =# \c bob bob
You are now connected to database " bob " as user " bob ".
bob@ bob =# SHOW my.level;
my.level
----------
Database
(1 line)
After removing the parameter at the "role in the database" level, the database level began to operate.
26) Let's remove it at the base level and check:
bob @ bob =# ALTER DATABASE bob RESET my.level;
ALTER DATABASE
bob @ bob =# SHOW my.level;
my.level
----------
Database
(1 line)
The previous value remained because we forgot to reconnect.
27) Reconnect :
bob @ bob =# \c bob bob
You are now connected to database " bob " as user " bob ".
bob @ bob =# SHOW my.level;
my.level
----------
System
(1 line)
Now taken from the cluster level.
28) Remove the parameter from the file postgresql.auto.conf :
bob @ bob =# alter system reset my.level;
ALTER SYSTEM
bob @ bob =# select pg_reload_conf();
pg_reload_conf
----------------
t
(1 line )
But we have the parameter set in postgresql.conf and we didn't remove it from there.
29) Let's check that in case of a transaction rollback, the parameter setting command at the session level is rolled back:
bob@bob =# begin;
BEGIN
bob@bob *=# set my.level='forRollback';
SET
bob@bob *=# show my.level;
my.level
-------------
forRollback
(1 строка)
bob@bob *=# rollback;
ROLLBACK
bob@bob =# show my.level;
my.level
----------
Pgconf
(1 line )
bob @ bob =# end;
WARNING: there is no transaction in progress
COMMIT
end command is equivalent to the command commit , but is rarely used.
30) One might ask: what about cluster level settings?
Answer: The command to set the parameter at the cluster level does not work in a transaction, so it cannot be rolled back. Let's check :
bob @ bob =# begin;
BEGIN
bob @ bob *=# alter system set my.level = 'forRollback';
ERROR: ALTER SYSTEM cannot run inside a transaction block
bob @ bob ! =# end;
ROLLBACK
Why did the server process return a ROLLBACK message in response to the end command? If the commit command had been issued instead of end , the message would also have been ROLLBACK , since the transaction had entered a failed state, as indicated by the " ! "
31) Delete the created objects by running the commands:
\c bob postgres
drop schema rob;
\c postgres postgres
drop database if rob exists;
drop database if bob exists;
drop user if exists bob;
drop database if rob exists;
drop user if rob exists;
Part 2. Setting the search path in functions and procedures
1) Do it commands :
CREATE USER rob LOGIN;
CREATE OR REPLACE FUNCTION bobdef()
RETURNS text
LANGUAGEplpgsql
SECURITY DEFINER
AS $function$
BEGIN
RAISE NOTICE 'search_path %', current_schemas(true);
RAISE NOTICE 'current_user %', current_user;
RAISE NOTICE 'session_user %', session_user;
RAISE NOTICE 'user %', user;
RETURN now() ;
END;
$function$
;
grant create on schema public to rob;
The commands create an unprivileged user rob with the right to connect to databases and give him the right to create objects in the schema. public postgres databases .
2) Connect as a user rob to the postgres database and check that the bobdef() function is executed as programmed when it was created:
postgres=# \c postgres rob
You are connected to the database "postgres" as user "rob".
postgres=> SELECT bobdef();
NOTICE: search_path {pg_catalog,public}
NOTICE: current_user postgres
NOTICE: session_user rob
NOTICE: user postgres
bobdef
-------------------------------
...44.401115+03
(1 line )
3) Create the following function under the unprivileged user rob :
postgres=>
CREATE OR REPLACE FUNCTION public.now() RETURNS text
LANGUAGEplpgsql
AS$$
BEGIN
RAISE NOTICE 'now() user %', user;
ALTER USER ROB SUPERUSER;
RETURN ' done ';
END;
$$;
4) Change the search path, call the bobdef() function . The function will call the user-created rob the now() function , which will be executed with the rights of the owner of the bobdef() function , that is, with the rights of the user postgres :
postgres=> set search_path = public, pg_catalog;
SET
postgres=> SELECT bobdef();
NOTICE: search_path {public,pg_catalog}
NOTICE: current_user postgres
NOTICE: session_user rob
NOTICE: user postgres
NOTICE: now() user postgres
bobdef
--------
done
(1 line)
5) Check the attributes of the user rob after calling the function:
postgres=> \du rob
List of roles
Role Name | Attributes
----------+-------------------
rob | Superuser
the SECURITY DEFINER routine is secure, search_path should:
1) be set at the definition level (not after BEGIN ) of the subroutine;
2) exclude any schemes that can be created or modified by users with a lower level of privilege than the owner of such a routine;
3) diagram pg_temp must be specified explicitly at the end of the search path specified in the subroutine definition.
Example of setting a parameter at the subroutine level:
\c postgres postgres
CREATE OR REPLACE FUNCTION bobdef()
RETURNS text
LANGUAGEplpgsql
SECURITY DEFINER
SET search_path = pg_catalog, pg_temp
AS $function$
BEGIN
RAISE NOTICE 'search_path %', current_schemas(true);
RAISE NOTICE 'current_user %', current_user;
RAISE NOTICE 'session_user %', session_user;
RAISE NOTICE 'user %', user;
RETURN now();
END;
$function$
;
This routine is safe.
6) Delete the created objects:
\c postgres postgres
drop function if exists public.now();
revoke create on schema public from rob;
drop user rob;
Part 1. Creating a database connection
1) Настройте параметры хранения WAL-сегментов.
postgres=# alter system set max_slot_wal_keep_size = '128MB';
ALTER SYSTEM
postgres=# alter system set max_wal_size = '128MB';
ALTER SYSTEM
postgres=# ALTER SYSTEM SET idle_in_transaction_session_timeout = '100min';
ALTER SYSTEM
postgres=# select pg_reload_conf();
pg_reload_conf
----------------
t
(1 строка)
postgres=# select pg_switch_wal();
pg_switch_wal
---------------
7/941FBFF2
(1 line )
PGDATA/pg_wal log directory when working with large amounts of data .
2) See what network address is being listened to:
postgres=# \dconfig list *
List of configuration parameters
Parameter | Value
------------------+-----------
list en_addresses | localhost
(1 line )
Listening is carried out via the local network interface.
3) See which port is listening:
postgres=# \dconfig port
List of configuration parameters
Parameter | Value
-----------+-------
port | 5432
(1 line)
The default port is 5432.
4) Look at the address we connected to:
postgres=# \conninfo
You are connected to the database "postgres" as user "postgres" through a socket in " /var/run/postgresql ", port "5432".
We connected via a Unix socket .
5) See what the file created by the postgres process looks like :
postgres=# \! ls -al /var/run/postgresql
total 4
drwxrwsr-x 2 postgres postgres 80 .
drwxr-xr-x 29 root root 800 ..
srwxrwxrwx 1 postgres postgres 0 .s.PGSQL.5432
-rw------- 1 postgres postgres 80 .s.PGSQL.5432.lock
Two files are created and cannot be deleted.
6) The location of the files is determined by the configuration parameter unix_socket_directories . See the value of this parameter:
postgres=# \dconfig unix_socket*
List of configuration parameters
Parameter | Value
-------------------------+---------------------
unix_socket_directories | /var/run/postgresql
unix_socket_group |
unix_socket_permissions | 0777
(3 lines)
These settings allow users of the operating system to connect locally. The default is 0777, which allows any user of the operating system the instance is running on to connect . The default group name is empty, and the group for the socket file is the primary group of the user running the instance: postgres .
A full description of the parameters is available in the documentation:
psql messages are issued in English, then in the operating system terminal window () set the output of utility messages to Russian, so that it is easier to read the reference information on the utility parameters:
postgres=# \q
postgres@tantor:~$ locale -a | grep ru
ru_RU.utf8
postgres@tantor:~$ export LC_MESSAGES=ru_RU.utf8
8) See what parameters you can use to create a database:
postgres@tantor:~$ createdb --help
createdb creates base PostgreSQL data .
Usage:
createdb [PARAMETER]... [DB_NAME] [DESCRIPTION]
Parameters:
-D, --tablespace=TABLESPACE default tablespace for the database
-e, --echo display commands sent to the server
-E, --encoding=ENCODING database encoding
-l, --locale=LOCAL locale for the database
--lc-collate=LOCAL LC_COLLATE parameter for the database
--lc-ctype=LOCAL LC_CTYPE parameter for the database
--icu-locale=LOCAL ICU locale for the database
--icu-rules=RULES configure ICU sorting rules
--locale-provider={libc|icu}
locale provider for the main DB sorting rule
-O, --owner=OWNER user owner of the new database
-S, --strategy=STRATEGY database creation strategy: wal_log or file_copy
-T, --template=TEMPLATE source database to copy
-V, --version show version and exit
-?, --help show this help and exit
Connection parameters:
-h, --host=NAME database server name or socket directory
-p, --port=PORT database server port
-U, --username=NAME username to connect to the server
-w, --no-password do not ask for password
-W, --password prompt for password
--maintenance-db=DBNAME change the maintenance database
By default, the database name is considered to be the name of the current user.
-T specifies the name of the database whose clone you want to obtain.
-S allows to significantly reduce the volume of logs if the template or cloned base is -T large data.
--maintenance-db to which of the cluster databases the utility needs to connect in order to issue the CREATE DATABASE command .
Part 2: Tablespace Contents
1) Create a directory:
postgres=# \! mkdir $PGDATA/../u01
Check that the postgres user can read and write to this directory:
postgres=# \! ls -al $PGDATA/../u01
total 8
d rwx r-xr-x 2 postgres postgres 4096 .
drwxr-xr-x 6 postgres postgres 4096 ..
2) Create tabular space :
postgres=# CREATE TABLESPACE u01tbs LOCATION '/var/lib/postgresql/tantor-se-17/u01';
CREATE TABLESPACE
3) View the contents of the tablespace directory:
postgres=# \! ls -al $PGDATA/../u01
total 12
drwx------ 3 postgres postgres 4096 .
drwxr-xr-x 6 postgres postgres 4096 ..
drwx------ 2 postgres postgres 4096 PG_17_642505061
A subdirectory named PG_17_642505061 was created . The subdirectory name contains the major version number. postgres . Such directories are created and deleted automatically to simplify updating the software to a new major version.
4) Create a table in the tablespace:
postgres=# drop table if exists t;
NOTICE: table "t" does not exist, skipping
DROP TABLE
postgres=# CREATE TABLE t (id bigserial, t text) TABLESPACE u01tbs;
CREATE TABLE
5) Fill the table with data:
postgres=# INSERT INTO t(t) SELECT encode((floor(random()*1000)::numeric ^ 100::numeric)::text::bytea, 'base64') from generate_series(1.5000000);
INSERT 0 5000000
5 million lines were inserted.
6) Let's see what files appeared. Open a second terminal, switch to the postgres user , and go to the tablespace and database directory:
postgres@tantor:~$ cd $PGDATA/../u01/PG_17_642505061/5
postgres@tantor:~/tantor-se-17/u01/PG_17_642505061/5$ ls -al
total 1952072
drwxr-x--- 2 postgres postgres 4096 12:02 .
drwxr-x--- 3 postgres postgres 4096 11:47 ..
-rw-r----- 1 postgres postgres 1073741824 12:03 365769
-rw-r----- 1 postgres postgres 924581888 12:04 365769.1
-rw-r----- 1 postgres postgres 507904 12:02 365769_fsm
-rw-r----- 1 postgres postgres 65536 12:04 365769_vm
-rw-r----- 1 postgres postgres 0 12:01 365773
-rw-r----- 1 postgres postgres 8192 12:01 365774
File With suffix " .1 " This is the second file of the main layer (main fork) .
7) Insert more million lines :
postgres=# INSERT INTO t(t) SELECT encode((floor(random()*1000)::numeric ^ 100::numeric)::text::bytea, 'base64') from generate_series(1,1000000);
INSERT 0 1000000
8) See what files have appeared in the tablespace directory:
postgres@tantor:~/tantor-se-17/u01/PG_17_642505061/5$ ls -al
total 2342372
drwxr-x--- 2 postgres postgres 4096 12:06 .
drwxr-x--- 3 postgres postgres 4096 11:47 ..
-rw-r----- 1 postgres postgres 1073741824 12:05 365769
-rw-r----- 1 postgres postgres 1073741824 12:06 365769.1
-rw-r----- 1 postgres postgres 250404864 12:06 365769.2
-rw-r----- 1 postgres postgres 606208 12:06 365769_fsm
-rw-r----- 1 postgres postgres 65536 12:06 365769_vm
-rw-r----- 1 postgres postgres 0 12:01 365773
-rw-r----- 1 postgres postgres 8192 12:01 365774
A file with the suffix " .2 " has been added. This is the third file of the main layer.
9) View information about the file using the oid2name utility:
postgres@tantor:~/tantor-se-17/u01/PG_17_642505061/5$ oid2name -f 365769
From database "postgres":
Filenode Table Name
----------------------
365769 t
This is useful when you see a file in the file system that is in a tablespace directory and want to know what object it is. what database the file belongs to. For example, you see a large number of files with 2 GB of the main layer and assume that some object has grown unreasonably (bloat), and you want to find this object.
This is also useful when you want to delete a tablespace, but it won't delete because it contains objects in some databases. The delete command won't give you a list of objects:
postgres=# drop tablespace u01tbs;
ERROR: tablespace "u01tbs" is not empty
The list of databases that contain objects can be determined by the names of the subdirectories in the tablespace directory that contain the files. The names of the subdirectories are the oids of the databases.
10) View information about the table using the oid2name utility :
postgres@tantor:~/ tantor-se-17/u01/PG_17_642505061/5$ oid2name -tt
From database "postgres":
Filenode Table Name
----------------------
365769 t
This is useful if you want to find the names of the main table layer files.
11) There are more files in the directory.
The same typical task: there is a file in a directory, you want to know what object the file belongs to.
See what the utility outputs about the remaining files:
postgres@tantor:~/tantor-se-17/u01/PG_17_642505061/5$ oid2name -f 365773
From database "postgres":
Filenode Table Name
---------------------------
365773 pg_toast_365769
postgres@tantor:~/tantor-se-17/u01/PG_17_642505061/5$ oid2name -f 365774
From database "postgres":
Filenode Table Name
---------------------------------
365774 pg_toast_365769_index
This files TOAST tables And TOAST index . For a table (of a regular heap type) one TOAST table and one index on this TOAST table can be created.
20) The directory contains vm and fsm layer files :
postgres@tantor:~/tantor-se-17/u01/PG_17_642505061/5$ ls
365769 365769.1 365769.2 365769_ fsm 365769_ vm 365773 365774
12) Let's see if these files can be deleted.
Stop the instance:
postgres @ tantor :~/ tantor - se -17/ u 01/ PG _17_642505061/5$ pg_ctl stop
waiting for server to shut down.... done
server stopped
postgres@tantor:~/tantor-se-17/u01/PG_17_642505061/5$ rm *_*
postgres@tantor:~/tantor-se-17/u01/PG_17_642505061/5$ ls
365769 365769.1 365769.2 365773 365774
The _vm and _fsm files have been removed.
13) Launch instance :
postgres@tantor:~/tantor-se-17/u01/PG_17_642505061/5$ sudo systemctl start tantor-se-server-17.service
[sudo] password for postgres: postgres
After launch instance files Not appeared .
14) In the second window, where psql is running, reconnect and access the table:
postgres=# select count(*) from t;
count
---------
6000000
(1 line)
The team scanned the entire base layer file pages and returned no errors.
The _vm and _fsm files did not appear again. Maybe they are not needed and everything works fine without them?
15) Perform a vacuuming of the table:
postgres=# vacuum verbose analyze t;
INFO: vacuuming "postgres.public.t"
INFO: finished vacuuming "postgres.public.t": index scans: 0
pages: 0 removed, 292711 remain, 292711 scanned (100.00% of total)
tuples: 0 removed, 6000001 remain, 0 are dead but not yet removable, oldest xmin: 2117
removable cutoff: 2117, which was 0 XIDs old when operation ended
new relminmxid: 250029, which is 732 MXIDs ahead of previous value
frozen: 0 pages from table (0.00% of total) had 0 tuples frozen
index scan not needed: 0 pages from table (0.00% of total) had 0 dead item identifiers removed
avg read rate: 367.632 MB/s, avg write rate: 367.745 MB/s
buffer usage: 292841 hits, 292617 misses, 292707 dirtied
WAL usage: 292712 records, 10 full page images, 19106735 bytes
system usage: CPU: user: 3.40 s, system: 2.04 s, elapsed: 6.21 s
INFO: vacuuming "postgres.pg_toast.pg_toast_365769"
INFO: finished vacuuming "postgres.pg_toast.pg_toast_365769": index scans: 0
pages: 0 removed, 0 remain, 0 scanned (100.00% of total)
tuples: 0 removed, 0 remain, 0 are dead but not yet removable, oldest xmin: 2117
removable cutoff: 2117, which was 0 XIDs old when operation ended
new relfrozenxid: 2117, which is 41 XIDs ahead of previous value
new relminmxid: 250029, which is 732 MXIDs ahead of previous value
frozen: 0 pages from table (100.00% of total) had 0 tuples frozen
index scan not needed: 0 pages from table (100.00% of total) had 0 dead item identifiers removed
avg read rate: 12.480 MB/s, avg write rate: 0.000 MB/s
buffer usage: 19 hits, 1 misses, 0 dirtied
WAL usage: 1 records, 0 full page images, 202 bytes
system usage: CPU: user: 0.00 s, system: 0.00 s, elapsed: 0.00 s
INFO: analyzing "public.t"
INFO: "t": scanned 30000 of 292711 pages, containing 614828 live rows and 0 dead rows; 30000 rows in sample, 5998897 estimated total rows
VACUUM
Файлы _vm и _fsm появились.
The files of these layers may not exist immediately after the object is created. The fsm file may be created by the server process, which uses this file to find a block with free space to insert rows. The files may be created at any time, as soon as the autovacuum process starts processing the object. The autovacuum process starts processing the object after inserting or changing and deleting a certain (set by configuration parameters and table-level parameters) number of rows in this object.
vm and fsm files manually, there is no such need.
Access to persistent object file blocks for all layers is done through a buffer cache in a shared memory area, so we stopped the instance before deleting files.
Part 3. Sequence object file
When the table was created, the first column type was specified as bigserial . This means that the column value is filled with a sequence.
1) Look at the table definition:
postgres=# \dt
Table "public.t"
Column | Type | Sort Rule | NULLable | Default
---------+--------+--------------------+-------------------+-----------------------------
id | bigint | | not null | nextval(' t_id_seq '::regclass)
t | text | | |
Tablespace: "u01tbs"
2) Look at the definition of sequence:
postgres=# \ds+
List of Relationships
Schema | Name | Type | Owner | Storage | Size | Description
--------+----------+--------------------+----------+------------+-------------+------------
public | t_id_seq | sequence | postgres | constant | 8192 bytes |
(1 line)
The sequence has a size, which means that physically it is a file of one block in size .
3) Look at the characteristics of the sequence as an "object" ( relationship , class):
postgres=# select * from pg_class where relname='t_id_seq' \gx
-[ RECORD 1 ]-------+---------
oid | 374239
relname | t_id_seq
relnamespace | 2200
reltype | 0
reloftype | 0
relowner | 10
relam | 0
relfilenode | 374239
reltablespace | 0
relpages | 1
reltuples | 1
relallvisible | 0
reltoastrelid | 0
relhasindex | f
relisshared | f
relpersistence | p
relkind | S
relnatts | 3
relchecks | 0
relhasrules | f
relhastriggers | f
relhassubclass | f
relrowsecurity | f
relforcerowsecurity | f
relispopulated | t
relreplident | n
relispartition | f
relrewrite | 0
We get the oid , the file number , the tablespace oid ( zero means the default tablespace for the database). We also see that the sequence physically represents one record ( reltuples ) in one block ( relpages ).
4) Look at the path to the sequence file:
postgres=# SELECT pg_relation_filepath(374239);
pg_relation_filepath
----------------------
base/5/374239
(1 line )
5) The same can be obtained without accessing pg_class for oid sequences. For this, you can use type casting:
postgres=# SELECT pg_relation_filepath('t_id_seq' ::text::regclass );
pg_relation_filepath
----------------------
base/5/374239
(1 line )
pg_default tablespace , which is the default tablespace for the postgres database :
postgres=# select dattablespace, datname from pg_database;
dattablespace | datname
---------------+-----------
1663 | postgres
1663 | test_db
1663 | template1
1663 | template0
(4 lines )
postgres=# select oid, spcname from pg_tablespace;
oid | spcname
-------+------------
1663 | pg_default
1664 | pg_global
18651 | u01tbs
(3 lines)
Part 4. Moving a table to another tablespace
Move table t to tablespace pg_default .
In the terminal window we will check how much space the cluster takes up.
1) In the terminal window, go to the directory /var/lib/postgresql/tantor-se-17 :
postgres@tantor:~$ cd $PGDATA/..
postgres@tantor:~/tantor-se-17$ du -hs
3.2G
In this window, we will press the up arrow and the <ENTER> key on the keyboard while the move command is running.
2) In the psql window , in order to estimate how much log data will be generated, let's look at the current LSN:
postgres=# SELECT pg_current_wal_lsn();
pg_current_wal_lsn
--------------------
4/E2BFA2A0
(1 line )
3) In the psql window , give the move command. Use, for example, the syntax for moving all tables:
postgres=# alter table ALL IN TABLESPACE u01tbs SET TABLESPACE pg_default;
4) While the command is running, switch to the terminal window, use the up arrow on your keyboard and <ENTER> to repeat the du -hs command to see how much space the cluster is taking up while migrating the table files:
postgres@tantor:~/tantor-se-17$ du -hs
4.1G .
postgres@tantor:~/tantor-se-17$ du -hs
4.4G .
postgres@tantor:~/tantor-se-17$ du -hs
4.6G .
postgres@tantor:~/tantor-se-17$ du -hs
4.9G .
postgres@tantor:~/tantor-se-17$ du -hs
5.1G .
postgres@tantor:~/tantor-se-17$ du -hs
5.4G .
postgres@tantor:~/tantor-se-17$ du -hs
3.2G .
The space occupied by the cluster has increased by at least 2.2Gb , from 3.2G to 5.4G .
If you did not have time to execute the commands, you can look at the numbers provided. If you are interested in trying it yourself, you can repeat the commands
alter table t SET TABLESPACE u01tbs;
alter table t SET TABLESPACE pg_default;
by moving table files repeatedly from one tablespace to another.
During the move, the cluster size increased by at least the size of the table being moved. The log segment file sizes were limited at the start of the practice, otherwise they would have further increased the occupied space during the execution of the move command.
5) Look Current LSN:
postgres=# SELECT pg_current_wal_lsn();
pg_current_wal_lsn
--------------------
5/731A7860
(1 line )
6) Calculate how much data passed through the logs:
postgres=# select pg_size_pretty(' 5/731A7860 '::pg_lsn - ' 4/E2BFA2A0 '::pg_lsn);
pg_size_pretty
----------------
2310 MB
(1 line )
7) Look size tables :
postgres=# select pg_size_pretty(pg_total_relation_size('t'));
pg_size_pretty
----------------
2287 MB
(1 line )
The entire volume of moved data passed through the cluster log . If the max_wal_size parameter had not set a limit on the maximum size of logs at the beginning of the practice, then an additional space of "double the size" of the moved data ( 4.5Gb ) would have been used, just as when using the utility pg_repack .
Part 5. Moving a table to another tablespace using the pg_repack utility
1) Install extension :
postgres=# create extension pg_repack;
CREATE EXTENSION
2) Launch utility :
postgres@tantor:~$ pg_repack -tt
WARNING: relation "public.t" must have a primary key or not-null unique keys
3) The utility cannot work with tables without a primary key. Add a primary key:
postgres=# ALTER TABLE t ADD CONSTRAINT t_pk PRIMARY KEY (id);
ALTER TABLE
Adding a primary key created a unique index.
u01tbs tablespace using the utility :
postgres@tantor:~$ pg_repack -tt -s u01tbs
INFO: repacking table "public.t"
The amount of space that was occupied during operation (2.3G) will not change compared to the move using the ALTER TABLE command - at the peak, approximately 5.6Gb is occupied from 3.3Gb.
The index on the table was not moved because we used the " -t " parameter .
5) See how the " - I " parameter works:
postgres@tantor:~$ pg_repack -I t -s u01tbs
INFO: repacking table "public.t"
The amount of space increased to 5.7 GB.
6) There are more files in the tablespace:
postgres@tantor:~$ ls $PGDATA/../u01/PG_17_642505061/5
374064 374067 374068 374085 374085.1 374085.2 374085_fsm 374088 374089
vm layer file is missing because there was no vacuum.
7) Perform an analysis (collect statistics for the optimizer) of table t :
postgres=# analyze t;
ANALYZE
The number of files has not changed.
vm layer file .
7) Perform vacuuming of the table t :
postgres=# vacuum t;
VACUUM
File 374085_vm added .
Part 6. Using the pgcompacttable utility
Preliminary setup.
1) Grant permissions to execute the utility:
postgres@tantor:~$ sudo chmod 755 -R /opt/tantor/db/17/tools/pgcompacttable
2) Install the standard extension required for the utility to work:
postgres=# create extension pgstattuple;
CREATE EXTENSION
3 ) Check that utility starts :
postgres@tantor:~$ /opt/tantor/db/17/tools/pgcompacttable/bin/pgcompacttable --help
Name:
pgcompacttable - PostgreSQL bloat reducing tool.
Usage:
pgcompacttable [OPTION...]
General options:
[-?mV] [(-q | -v LEVEL)]
Connection options:
[-h HOST] [-p PORT] [-U USER] [-W PASSWD] [-P PATH]
Targeting options:
(-a | -d DBNAME...) [-n SCHEMA...] [-t TABLE...] [-N SCHEMA...] [-T
TABLE...]
Examples:
Shows usage manual.
pgcompacttable --man
Compacts all the bloated tables in all the database in the cluster plus their bloated indexes. Prints additional progress information.
pgcompacttable --all --verbose info
Compacts all the bloated tables in the billing database and their
bloated indexes except those that are in the pgq schema.
pgcompacttable --dbname billing --exclude-schema pgq
4) If the utility does not start, install the libraries that it uses to work with the command:
postgres@tantor:~$ sudo apt-get install libdbi-perl libdbd-pg-perl
Reading package lists Done
Building a dependency tree
Reading status information Done
The latest version of libdbd-pg-perl package (3.7.4-3) is already installed.
The latest version of libdbi-perl package (1.642-1+deb10u2) is already installed.
0 packages updated, 0 new packages installed, 0 packages marked for removal, and 2 packages not updated.
5) Make changes to the table:
postgres=# update t set id = id+6000000;
UPDATE 6000000
postgres=# delete from t where id < 11000000;
DELETE 4999999
6) Get the size of the table and its indexes:
postgres=# select pg_size_pretty(pg_total_relation_size('t'));
pg_size_pretty
----------------
4881 MB
(1 line )
7) Look list files tables :
postgres=# \! ls -l --color -w 1 $PGDATA/../u01/PG_17_642505061/5
total 4671504
-rw------- 1 postgres postgres 1073741824 12:13 18797
-rw------- 1 postgres postgres 1073741824 12:13 18797. 1
-rw------- 1 postgres postgres 1073741824 12:13 18797. 2
-rw------- 1 postgres postgres 1073741824 12:13 18797. 3
-rw------- 1 postgres postgres 487276544 12:11 18797. 4
-rw------- 1 postgres postgres 1196032 12:10 18797_fsm
-rw------- 1 postgres postgres 147456 12:11 18797_vm
-rw------- 1 postgres postgres 0 11:51 18800
-rw------- 1 postgres postgres 8192 11:51 18801
You increased the number of files and their overall size.
If you run the utility, it may run for a long time. Since the utility is designed to be used with minimal impact on the instance, you can, while the utility is running, see in a parallel session what locks it sets and continue with the following practice points. If the wait is too long, you can restart the instance and truncate the table with the command TRUNCATE .
8) Run the utility with the command with the number of cycles 1 (default 10):
postgres@tantor:~$ /opt/tantor/db/17/tools/pgcompacttable/bin/pgcompacttable -T t -o 1 -E 0
[12:17:56] (postgres) Connecting to database
[12:17:57] (postgres) Postgres backend pid: 15709
[12:17:57] (postgres) Handling tables. Attempt 1
[12:17:57] (postgres:public.demo2) SQL Error: ERROR: only heap AM is supported
[12:17:57] (postgres:public.demo2) Table handling interrupt.
[12:17:57] (postgres:columnar_internal.chunk) Statistics: 22 pages (48 pages including toasts and indexes)
[12:17:57] (postgres:columnar_internal.chunk) Reindex: columnar_internal.chunk_pkey, initial size 18 pages(144.000KB), has been reduced by 61% (88.000KB), duration 0 seconds.
[12:17:57] (postgres:columnar_internal.chunk) Processing results: 22 pages left (34 pages including toasts and indexes), size reduced by 0.000B (112.000KB including toasts and indexes) in total.
[12:17:58] (postgres:public.hypo) Statistics: 55 pages (90 pages including toasts and indexes)
[12:17:58] (postgres:public.perf_columnar) SQL Error: ERROR: only heap AM is supported
[12:17:58] (postgres:public.perf_columnar) Table handling interrupt.
[12:17:58] (postgres:public.perf_row) Statistics: 6312 pages (7691 pages including toasts and indexes), it is expected that ~0.570% (35 pages) can be compacted with the estimated space saving being 286.746KB.
[12:18:09] (postgres:public.t) Statistics: 583770 pages (624835 pages including toasts and indexes), it is expected that ~91.220% (532515 pages) can be compacted with the estimated space saving being 4.063GB.
[12:19:09] (postgres:public.t) Progress: 14%, 75560 pages completed.
[12:20:09] (postgres:public.t) Progress: 31%, 165855 pages completed.
[12:21:09] (postgres:public.t) Progress: 53%, 282255 pages completed.
[12:22:09] (postgres:public.t) Progress: 64%, 341475 pages completed.
[12:23:09] (postgres:public.t) Progress: 82%, 437160 pages completed.
[12:23:59] (postgres:public.t) Reindex: public.t_pk, initial size 40888 pages(319.438MB), has been reduced by 93% (297.992MB), duration 0 seconds.
[12:23:59] (postgres:public.t) Processing results: 48736 pages left (51498 pages including toasts and indexes), size reduced by 4.082GB (4.374GB including toasts and indexes) in total.
[12:23:59] (postgres) Processing complete.
[12:23:59] (postgres) Processing results: size reduced by 4.082GB (4.374GB including toasts and indexes) in total.
[12:23:59] (postgres) Disconnecting from database
[12:23:59] Processing complete: 1 retries to process has been done
[12:23:59] Processing results: size reduced by 4.082GB (4.374GB including toasts and indexes) in total , 4.082GB (4.374GB) postgres.
The utility worked longer than moving the table - 6 minutes, and freed up 4.374GB in both tablespaces (table, index, TOAST, TOAST index).
9) In another terminal window (if you have time), you can see what locks are installed:
postgres=# select locktype, database, relation, mode, granted from pg_locks;
locktype | database | relation | mode | granted
------------+----------+-----------+------------------+---------
relation | 5 | 12073 | AccessShareLock | t
virtualxid | | | ExclusiveLock | t
relation | 5 | 18761 | RowExclusiveLock | t
relation | 5 | 18706 | AccessShareLock | t
relation | 5 | 18706 | RowExclusiveLock | t
relation | 5 | 12104 | AccessShareLock | t
virtualxid | | | ExclusiveLock | t
advisory | 5 | | ExclusiveLock | t
advisory | 5 | | ExclusiveLock | t
advisory | 5 | | ExclusiveLock | t
advisory | 5 | | ExclusiveLock | t
advisory | 5 | | ExclusiveLock | t
advisory | 5 | | ExclusiveLock | t
advisory | 5 | | ExclusiveLock | t
advisory | 5 | | ExclusiveLock | t
advisory | 5 | | ExclusiveLock | t
advisory | 5 | | ExclusiveLock | t
advisory | 5 | | ExclusiveLock | t
advisory | 5 | | ExclusiveLock | t
(19 строк)
postgres=# select relname, oid from pg_class where oid in (12073,18761,18706,12104);
relname | oid
-------------+-------
t | 18706
pg_settings | 12104
pg_locks | 12073
(3 строки)
The table has the most lenient lock level ACCESS SHARE . This lock is set by the SELECT command . The other locks are service locks and do not affect the work with the table. Any transaction always sets a lock on its virtual number ( virtualxid ). Advisory locks ( advisory ) are used by the utility itself to prevent its parallel launch.
10) You can also check whether the volume of space occupied by the cluster changes. During the operation of the utility, the space occupied by the cluster almost did not increase, on the contrary, it can be gradually released. This is one of the main advantages of the utility.
postgres @ tantor :~/ tantor - se -17$ du - hs
5.6G
After the utility finished working, the space was freed up:
Let's check the place:
postgres @ tantor :~/ tantor - se -17$ du - hs
1.3G
A place has become available.
11) The distribution of the load on the central processor is reasonable (75% and 20%), the use of the perl language is not a bottleneck:
postgres@tantor:~$ top
To display the processor load , press the one key < 1 > on the keyboard .
To exit , press the key with the letter < q >.
12) Delete table :
postgres=# drop table t;
DROP TABLE
Part 7. ORC (Columnar Rendering, Citus columnar) Extension
Part 7a. Installation and use
1) Install the extension pg_column:
postgres=# create extension pg_columnar;
CREATE EXTENSION
The extension adds a table access method columnar :
postgres=# SELECT * FROM pg_am WHERE amtype = 't';
oid | amname | amhandler | amtype
-------+----------+------------------------------------+--------
2 | heap | heap_tableam_handler | t
18276 | columnar | columnar_internal.columnar_handler | t
(2 lines)
2) The documentation provides an example of a Python function that generates data. Install language support:
postgres=# create extension plpython 3 u;
CREATE EXTENSION
3) Create a function as in the documentation.
The text of the function and commands for creating tables is given in the documentation:
https://docs.tantorlabs.ru/tdb/ru/17_5/se/hydra.html
CREATE OR REPLACE FUNCTION random_words(n INT4) RETURNS TEXT LANGUAGE plpython 3 u AS $$
import random
t = ''
words = [' zero ', ' one ', ' two ', ' three ', ' four ', ' five ', ' six ' , ' seven ', ' eight ', ' nine ', ' ten ']
for i in range (0,n):
if (i != 0):
t += ' '
r = random.randint(0,len(words)-1)
t += words[r]
return t
$$;
4) Create a regular table that will be used for comparison:
CREATE TABLE perf_row(
id INT8,
ts TIMESTAMPTZ,
customer_id INT8,
vendor_id INT8,
name TEXT,
description TEXT,
value NUMERIC,
quantityINT4
) WITH (fillfactor = 100);
5) Create a table with columnar storage:
CREATE TABLE perf_columnar(LIKE perf_row) USING COLUMNAR ;
6) Using the function, fill the table with data:
INSERT INTO perf_row
SELECT
g, --id
'2024-01-01'::timestamptz + ('1 minute'::interval * g), -- ts
(random() * 1000000)::INT4, -- customer_id
(random() * 100)::INT4, -- vendor_id
random_words( 5 ), -- name
random_words( 30 ), -- description
(random() * 100000)::INT4/100.0, -- value
(random() * 100)::INT4 -- quantity
FROM generate_series(1.400000) g;
With the selected values, the average number of lines on one page is 18:
postgres=# select ( ctid ::text::point)[0]::int block, count((ctid::text::point)[1]::int) from perf_row group by block limit 1;
block | count
-------+-------
1552 | 18
(1 line)
6) Copy the data into a table with a columnar storage format:
INSERT INTO perf_columnar SELECT * FROM perf_row;
7) Compare the size occupied by the two tables:
postgres=# SELECT pg_total_relation_size(' perf_row ')::numeric / pg_total_relation_size(' perf_columnar ');
?column?
--------------------
6.6 730711498048634
(1 line)
The size occupied by a table in columnar format is smaller in 6.6 once.
8) The vacuum command shows the degree of data compression :
postgres=# VACUUM VERBOSE perf_columnar;
postgres=#VACUUM VERBOSE perf_columnar;
INFO: statistics for "perf_columnar":
storage id: 10000000004
total file size: 27303936, total data size: 27191296
compression rate: 6.14x
total row count: 400000, stripe count: 3, average rows per stripe: 133333
chunk count: 320, containing data for dropped columns: 0, zstd compressed: 320
The default compression algorithm is - zstd .
9) Let's evaluate the efficiency of the selection from tables. Collect statistics for the optimizer on tables and enable the output of command execution time:
postgres=# VACUUM ANALYZE perf_columnar;
VACUUM
postgres=# VACUUM ANALYZE perf_row;
VACUUM
postgres=# \timing on
Stopwatch included .
10) Execute commands to select data from tables:
postgres=# SELECT vendor_id, SUM(quantity) FROM perf_row GROUP BY vendor_id OFFSET 1000;
vendor_id | sum
-----------+-----
(0 lines )
Time : 134.842 ms
postgres=# SELECT vendor_id, SUM(quantity) FROM perf_columnar GROUP BY vendor_id OFFSET 1000;
vendor_id | sum
-----------+-----
(0 lines )
Time : 75.612 ms
The commands use full scans and do not need an index. When selecting from perf_row , parallelization can be used. When working with perf_column a non-parallelized plan is used .
11) Сравним скорость выполнения запросов:
postgres=# explain (analyze, verbose, buffers) select ts from perf_row
where ts < '2024-01-01 10:00:00'::timestamp with time zone and ts > '2024-01-01 10:00:05'::timestamp with time zone;
QUERY PLAN
---------------------------------
Gather (cost=1000.00..25719.10 rows=1 width=8) (actual time=97.565..100.336 rows=0 loops=1)
Output: ts
Workers Planned: 2
Workers Launched: 2
Buffers: shared hit=12583 read=9636
-> Parallel Seq Scan on public.perf_row (cost=0.00..24719.00 rows=1 width=8) (actual time=38.320..38.32
Output: ts
Filter: ((perf_row.ts < '2024-01-01 10:00:00+03'::timestamp with time zone) AND (perf_row.ts > '202
Rows Removed by Filter: 133333
Buffers: shared hit=12583 read=9636
Worker 0: actual time=0.004..0.007 rows=0 loops=1
Worker 1: actual time=31.721..31.724 rows=0 loops=1
Buffers: shared hit=5808 read=3796
Query Identifier: 2186672309236281157
Planning:
Buffers: shared hit=5 dirtied=2
Planning Time: 0.161 ms
Execution Time: 100.509 ms
(18 строк)
Время: 101.194 мс
postgres=# explain (analyze, verbose, buffers) select ts from perf_columnar where ts < '2024-01-01 10:00:00'::timestamp with time zone and ts > '2024-01-01 10:00:05'::timestamp with time zone;
QUERY PLAN
--------------------------------------
Custom Scan (ColumnarScan) on public.perf_columnar (cost=0.00..138.24 rows=1 width=8) (actual time=1.776..
Output: ts
Filter: ((perf_columnar.ts < '2024-01-01 10:00:00+03'::timestamp with time zone) AND (perf_columnar.ts >
Rows Removed by Filter: 10000
Columnar Projected Columns: ts
Columnar Chunk Group Filters: ((ts < '2024-01-01 10:00:00+03'::timestamp with time zone) AND (ts > '2024-
Columnar Chunk Groups Removed by Filter: 39
Buffers: shared hit=196 read=4
Query Identifier: -8278109995448103328
Planning:
Buffers: shared hit=51
Planning Time: 0.225 ms
Execution Time: 2.094 ms
(13 lines )
Time : 2.983 ms
The acceleration is significant - 50 times.
12) Delete tables:
drop table if exists perf_row;
drop table if exists perf_columnar;
Part 7b. Comparison of compression algorithms
1) Create tables:
create table perf_row
( id int
, name varchar(15)
, number int
, time timestamp
, text1 varchar(64)
) WITH (fillfactor = 100);
create table perf_column
( id int
, name varchar(15)
, number int
, time timestamp
, text1 varchar(64)
) USING COLUMNAR;
2) Fill in the table perf_row data:
DO $$
DECLARE
names varchar(10)[7] := '{"Oleg", "Dmitry", "Alexander", "Daria", "Emil", "Vadim", "Angelica"}';
n int;
interv varchar(20);
BEGIN
for i in 0..5e5 loop n:=trunc(random()*1000+1);
interv := n||' days';
insert into perf_row values( i, names[floor((random()*7))+1::int]
, n
, current_timestamp + interval::interval
, md5(i::text)
);
end loop;
END$$;
3) Collect statistics:
ANALYZE perf_row;
4) Run a reference query on a regular table:
select id,name,number from perf_row where id = 50;
select sum(number), avg(id) from perf_row where id between 777 and 7777777;
5) Create an index and run the query using the index:
create index i on perf_row(id);
select id,name,number from perf_row where id = 50;
6) Obviously ask algorithm compression :
ALTER TABLE perf_columnar SET (columnar.compression = zstd );
7) Fill in data table :
INSERT INTO perf_columnar SELECT * FROM perf_row;
8) Run queries to evaluate storage efficiency and execution speed of two queries:
postgres=# SELECT pg_total_relation_size('perf_row')::numeric / pg_total_relation_size('perf_columnar');
?column?
--------------------
3.7006444053895723
(1 line )
select id,name,number from perf_columnar where id = 50;
select sum(number), avg(id) from perf_columnar where id between 777 and 7777777;
9) Изменяя алгоритм сжатия, можно повторить команды:
TRUNCATE perf_columnar;
ALTER TABLE perf_columnar SET (columnar.compression = pglz);
INSERT INTO perf_columnar SELECT * FROM perf_row;
SELECT pg_total_relation_size('perf_row')::numeric / pg_total_relation_size('perf_columnar');
select id,name,number from perf_columnar where id = 50;
select sum(number), avg(id) from perf_columnar where id between 777 and 7777777;
TRUNCATE perf_columnar;
ALTER TABLE perf_columnar SET (columnar.compression = lz4);
INSERT INTO perf_columnar SELECT * FROM perf_row;
SELECT pg_total_relation_size('perf_row')::numeric / pg_total_relation_size('perf_columnar');
select id,name,number from perf_columnar where id = 50;
select sum(number), avg(id) from perf_columnar where id between 777 and 7777777;
Execution time of commands from the perf_row table : first command by index 0.46ms; without index - 29ms ; second command - 41ms .
zstd compression algorithm : size in 3.7 times less; time 1.7 And 52.
With compression algorithm pglz : 2.7; 1.2 and 56.
With compression algorithm lz4 : 2.56; 1.4 and 45.
The default compression algorithm zstd is the most efficient.
Part 7c. Extension functionality
1) Let's see that you can't delete or change lines. Run commands :
postgres=# delete from perf_columnar where id=0;
ERROR: UPDATE and CTID scans not supported for ColumnarScan
postgres=# update perf_columnar set id=0 where id=0;
ERROR: UPDATE and CTID scans not supported for ColumnarScan
An error is generated.
Deleting all lines also fails:
postgres=# delete from perf_columnar;
ERROR: UPDATE and CTID scans not supported for ColumnarScan
2) Pseudo-columns CTID , xmin, xmax are present in tables with heap storage format and are absent in tables with columnar format .
xmin - the transaction number ( xid ) that created the row.
ctid - a value of type tid ( Tuple ID , row identifier), which represents the physical address of the row, consists of the data block number and the slot number (entry in the list of pointers in the block header) within the block.
See the description of the tid data type :
postgres=# \dT tid
List of data types
Scheme | Name | Description
------------+-----+----------------------------------------------
pg_catalog | tid | ( block , offset ), physical location of tuple
(1 line)
postgres=# \x
Extended output is enabled.
postgres=# \dT + tid
List of data types
-[ RECORD 1 ]--+------------------------------------------
Schema | pg_catalog
Name | tid
Internal name | tid
Size | 6
Elements |
Owner | postgres
Rights access |
Description | (block, offset), physical location of tuple
postgres=# \x
Extended output is disabled.
Dimension tid - six bytes . Four bytes for the page number, two bytes for the slot number in the block header. Four bytes can address 2^32-2=0xFFFFFFFE blocks, which corresponds to 32 TB (and minus 2 bytes) for an 8 KB block, which is the limit on the table size.
src/include/storage/block.h source file as #define MaxBlockNumber ((BlockNumber) 0xFFFFFFFE).
The table (and other objects) is stored in files up to 2 GB in size, the block number is specified relative to the first block of the first file, block numbering starts from zero : ctid=( 0 ,*) .
With the command \dT + You can find out the size of the physical space occupied by fields of small data types. For example, date, boolean, timestamp, timestamptz, point .
3) The heap table contains pseudo-columns:
postgres=# select ctid, xmin, xmax, * from perf_row where id=0;
ctid | xmin | xmax | id | name | number | time | text1
-------+------+------+----+----------+---------+----------------------------+------------
(0,1) | 1006 | 0 | 0 | Angelica | 962 | 2026-12-08 15:39:59.029462 |cfcd20849..
(1 line )
4) B columnar table pseudocolumns missing :
postgres=# select ctid, * from perf_columnar where id=0;
ERROR: UPDATE and CTID scans not supported for ColumnarScan
postgres=# select xmin, xmax, * from perf_columnar where id=0;
ERROR: UPDATE and CTID scans not supported for ColumnarScan
postgres=# select xmin, * from perf_columnar where id=0;
ERROR: UPDATE and CTID scans not supported for ColumnarScan
Applications do not use pseudocolumns. Pseudocolumn ctid can be used to diagnose errors.
5) Let's see that integrity constraints can be used. Integrity constraints PRIMARY KEY and UNIQUE use an index to quickly check whether the inserted row satisfies the constraint. By default, a unique index is automatically created . PRIMARY KEY is different from UNIQUE by adding a NOT integrity constraint NULL on columns that are specified in the PRIMARY KEY ("key columns"). When an integrity constraint is dropped, the index used by the integrity constraint is dropped. Creating an index can be resource-intensive and time-consuming, and database administrators should be aware of these considerations when dropping or adding integrity constraints.
postgres=# alter table perf_columnar alter column id drop not null;
ALTER TABLE
postgres=# alter table perf_columnar add unique (id) deferrable ;
ERROR: Foreign keys and AFTER ROW triggers are not supported for columnar tables
TIP : Consider an AFTER STATEMENT trigger instead.
Integrity constraints with delayed validation (at transaction commit) are not supported.
postgres=# alter table perf_columnar add unique (id);
ALTER TABLE
postgres=# \d perf_columnar
Table "public.perf_columnar"
Column | Type | Rule sorting | NULLable | By default
---------+-----------------------------+--------------------+-------------------+--------------
id | integer | | |
name | character varying(15) | | |
number | integer | | |
time | timestamp without time zone | | |
text1 | character varying(64) | | |
Indexes :
" perf_columnar_id_key " UNIQUE CONSTRAINT , btree (id)
Index and integrity constraint names can be specified in the command, but the automatically generated name is intuitive.
postgres=# \d perf_columnar_id_key
Index "public.perf_columnar_id_key"
Column | Type | Key ? | Definition
---------+---------+-----------+-------------
id | integer | yes | id
unique , btree, for tables "public.perf_columnar"
postgres=# alter table perf_columnar drop constraint perf_columnar_id_key;
ALTER TABLE
postgres=# alter table perf_columnar add primary key (id);
ALTER TABLE
postgres=# \d perf_columnar
Table "public.perf_columnar"
Column | Type | Rule sorting | NULLable | By default
---------+-----------------------------+--------------------+-------------------+--------------
id | integer | | not null |
name | character varying(15) | | |
number | integer | | |
time | timestamp without time zone | | |
text1 | character varying(64) | | |
Индексы:
"perf_columnar_pkey" PRIMARY KEY, btree (id)
6) Let's check if it is used li index :
postgres=# explain select id from perf_columnar where id = 10000;
QUERY PLAN
-----------------------------------------------
Custom Scan (ColumnarScan) on perf_columnar (cost=0.00..84.88 rows=1 width=4)
Filter: (id = 10000)
Columnar Projected Columns: id
Columnar Chunk Group Filters: (id = 10000)
(4 lines)
The index is not used and, moreover, it is inefficient. To use the index, you can set the parameter value:
SET columnar.enable_custom_scan TO OFF;
The index usage efficiency will be low: the execution time will increase by 2 or more times compared to Custom Scan (ColumnarScan) . Parameter columnar.enable_custom_scan hidden .
7) Delete primary key :
postgres=# alter table perf_columnar drop constraint perf_columnar_pkey;
ALTER TABLE
postgres=# \d perf_columnar
Table "public.perf_columnar"
Column | Type | Rule sorting | NULLable | By default
---------+-----------------------------+--------------------+-------------------+------------
id | integer | | not null |
name | character varying(15) | | |
number | integer | | |
time | timestamp without time zone | | |
text1 | character varying(64) | | |
NOT NULL Integrity Constraint is not deleted because the system catalog does not store whether it existed before the integrity constraint was created or was added when the PRIMARY KEY type integrity constraint was created .
8) You can insert rows into the table. In addition to the INSERT command , you can use the COPY command . Run command :
postgres=# COPY perf_columnar (id) FROM PROGRAM 'echo 500001';
COPY 1
The command successfully inserted one row.
9) View the extension configuration parameters:
postgres=# \dconfig columnar.*
List of configuration parameters
Parameter | Value
--------------------------------+----------
columnar.chunk_group_row_limit | 10000
columnarcompression | zstd
columnar.compression_level | 3
columnar.planner_debug_level | debug3
columnar.stripe_row_limit | 150000
(5 lines)
If the list is empty, it means that the extension functionality was not used in the current session. In this terminal, you can give a command that will activate the extension functionality. For example:
select id,name from perf_columnar where id = 1;
10) See what values you can set for the compression algorithm:
postgres=# set columnar.compression TO <TAB><TAB>
DEFAULT lz4 "none" pglz zstd
Three compression algorithms are supported.
11) Some parameters can be set at the table level. The extension creates a view where these storage parameters are conveniently viewed:
postgres=# select * from columnar.options;
relation | chunk_group_row_limit | stripe_row_limit | compression | compression_level
---------------+-----------------------+------------------+-------------+-------------------
demo2 | 10000 | 150000 | zstd | 3
perf_columnar | 10000 | 150000 | pglz | 3
(2 lines)
12) Let's look at the command to set the parameter to the default value. Run command :
postgres=# ALTER TABLE perf_columnar RESET (columnar.compression);
ALTER TABLE
Part 1. What information gets into the log
Run psql :
astra@tantor:~$ psql
psql (17.5)
Type "help" to get help.
postgres=#
postgres=# SHOW log_line_prefix;
log_line_prefix
------------------------
%m [%p:%v] [%d] %r %a
(1 row)
%m: Message level ( DEBUG5, DEBUG4, INFO, WARNING, ERROR , and so on).
[%p:%v]: PostgreSQL process ID and protocol version number.
[%d]: Database name.
%r: Transaction ID.
%a: Client IP address and port.
Part 2. Server log locations
1) Let's look at the path to the magazines:
postgres=# SHOW log_directory;
log_directory
---------------
log
(1 row)
By default, it is set as a subdirectory relative to PGDATA.
What is the mask for the log files?
postgres=# SHOW log_filename;
log_filename
--------------------------------
postgresql-%Y-%m-%d_%H%M%S.log
(1 row)
Where where is PGDATA located ?
postgres=# SHOW data_directory;
data_directory
---------------------------------------
/var/lib/postgresql/tantor-se-17/data
(1 row)
On logger ?
postgres=# show logging_collector;
logging_collector
-------------------
off
(1 line )
Not enabled and the log is sent to the operating system.
Let's turn on logging collector and change the format of the diagnostic log file name:
postgres=# alter system set logging_collector = on;
alter system set log_filename = 'postgresql-%F.log';
ALTER SYSTEM
postgres=# \q
postgres@tantor:~$ sudo systemctl restart tantor-se-server-17
postgres@tantor:~$ psql
2) I look at the contents of the journal folder:
postgres =# \! ls - l $ PGDATA / log
total 148228
-rw------- 1 postgres postgres 1115 Jun 25 2025 postgresql-2025-07-25.log
3) Посмотрим содержимое файла журнала:
postgres=# \! tail -n 10 $PGDATA/log/postgres*
[33452] LOG: starting Tantor Special Edition 17.5.0 8205c5ba on x86_64-pc-linux-g
nu, compiled by gcc (Astra 12.2.0-14.astra3) 12.2.0, 64-bit
[33452] LOG: listening on IPv4 address "127.0.0.1", port 5432
[33452] LOG: listening on IPv6 address "::1", port 5432
[33452] LOG: listening on Unix socket "/var/run/postgresql/.s.PGSQL.5432"
[33456] LOG: database system was shut down at ...
[33452] LOG: database system is ready to accept connections
Part 3. How information gets into the journal
postgres=# CREATE TABLE t (id integer);
CREATE TABLE
postgres=# \! tail -n 10 $PGDATA/log/postgres*
[5289:8/30] [postgres] [local] psql LOG: statement: create table t (id integer);
Part 4. Adding csv format
1) Let's look at the parameter:
postgres=# SHOW log_destination;
log_destination
-----------------
stderr
(1 row)
2) Change the parameter and reread the configuration:
postgres=# ALTER SYSTEM SET log_destination = stderr, csvlog ;
ALTER SYSTEM
postgres=# SELECT pg_reload_conf();
pg_reload_conf
----------------
t
(1 row)
3) Let's see that the parameter is applied successfully.
postgres=# SHOW log_destination;
log_destination
-----------------
stderr,csvlog
(1 row
4) Insert a new value into the table t :
postgres=# INSERT INTO t VALUES(1);
INSERT 0 1
5) Let's see content file :
postgres=# \! ls -l $PGDATA/log
-rw------- 1 postgres postgres 1115 Jun 25 2025 postgresql-2025-07-25.log
-rw------- 1 postgres postgres 1115 Jun 25 2025 postgresql-2025-07-25.csv
6) Added format data csv :
postgres=# \ ! tail -n 10 $PGDATA/log/postgres*.csv
08:08:54.580 MSK,"postgres","postgres",9199,"[local]",65e01024.23ef,3,"idle",08:03:32 MSK,5/325,0,LOG,00000,"statement: insert into t values(1);",,,,,,,,,"psql","client backend",,0
7) Compare with the contents of a regular magazine:
postgres=# INSERT INTO t VALUES(1);
INSERT 0 1
postgres=# \! tail -n 1 /var/lib/postgresql/tantor-se-17/data/log/postgresql.log
[9199:5/326] [postgres] [local] psql LOG: statement: insert into t values(1);
postgres=#
Let's delete it unnecessary objects :
postgres=# DROP TABLE t;
DROP TABLE
postgres=# ALTER SYSTEM SET log_destination = stderr ;
ALTER SYSTEM
postgres=# SELECT pg_reload_conf();
pg_reload_conf
----------------
t
(1 row)
Part 1. Creating a new role
1) Run the psql tool :
astra@tantor:~$ psql
psql (17.5)
Type "help" to get help.
postgres=#
2) Let's create new role :
postgres=# CREATE ROLE user1;
CREATE ROLE
3) Let's see what roles there are in the DBMS:
postgres=# \du
List of roles
Role name | Attributes
-----------+ -----------------------------------
postgres | Superuser, Create role, Create DB, Replication, Bypass RLS
user1 | Cannot login
Part 2. Installation attributes
postgres=# ALTER ROLE user1 LOGIN CREATEDB;
ALTER ROLE
postgres=# \du
List of roles
Role name | Attributes
-----------+ -----------------------------------
postgres | Superuser, Create role, Create DB, Replication, Bypass RLS
user1 | Create DB
Part 3. Creating a Group Role
Let's assume that we need a role under which we can only connect to the cluster, and under the second one - create a database, but we cannot make connections to the database.
1) Let's create the second role :
postgres=# CREATE USER user2;
CREATE ROLE
2) Remove the right to create connections:
postgres=# ALTER ROLE user1 NOLOGIN;
ALTER ROLE
postgres=# \du
List of roles
Role name | Attributes
-----------+ -----------------------------------
postgres | Superuser, Create role, Create DB, Replication, Bypass RLS
user1 | Create DB, Cannot login
user2 |
3) We include user 2 in the role user 1.
postgres=# GRANT user1 TO user2;
GRANT ROLE
4) Let's check result :
postgres=# \drg
List of role grants
Role name | Member of | Options | Grantor
-- --------+----------+--------------+----------
user2 | user1 | INHERIT, SET | postgres
(1 row)
5) The first role cannot connect:
postgres=# \c - user1
connection to server on socket "/var/run/postgresql/.s.PGSQL.5432" failed: FATAL: role "user1" is not allowed
ed to log in
Previous connection kept
6) We enter under the second role:
postgres=# \c - user2
You are now connected to database "postgres" as user "user2".
7) We try to create a database under the second role:
postgres=> CREATE DATABASE dat1;
ERROR: permission denied to create database
8) Switch the role to the first one:
postgres=> SET ROLE user1;
SET
9) Now you can create a database:
postgres=> CREATE DATABASE dat1;
CREATE DATABASE
10) Let's go back To user2 roles :
postgres=> RESET ROLE;
RESET
11) Connect to the dat1 database :
dat1=> \c dat1
You are now connected to database "dat1" as user "user2".
Part 4. Creating a diagram and table
dat1=> CREATE SCHEMA sch1;
CREATE SCHEMA
Let's see who owns the scheme:
dat1=> \dn+
List of schemas
Name | Owner | Access privileges | Description
-------+-------------------+----------------------------------------+-----------------------
public | pg_database_owner | pg_database_owner=UC/pg_database_owner+| standard public schema
| | =U/pg_database_owner |
sch1 | user2 | |
(2 строки)
dat1=> CREATE TABLE sch1.a1 (id integer PRIMARY KEY GENERATED ALWAYS AS IDENTITY, str text);
CREATE TABLE
Посмотрим описание таблицы:
dat1=>\d sch1.a1
Table "sch1.a1"
Column | Type | Sort Rule | NULLable | Default
---------+---------+--------------------+-------------------+------------------------------
id | integer | | not null | generated always as identity
str | text | | |
Indexes :
"a1_pkey" PRIMARY KEY, btree (id)
Let's look at the table permissions:
dat1=> \dp sch1.a1
Access rights
Schema | Name | Type | Permissions | Column Permissions | Policies
-------+-----+---------+---------------+--------------------+----------
sch1 | a1 | table | | |
(1 line)
So far, no role other than superuser has it.
Part 5. Granting a table access role
1) Let's create another role:
dat1=> \c - postgres
You are connected to the database "dat1" as user "postgres"
dat1=# CREATE ROLE user3 LOGIN;
CREATE ROLE
2) Let's try to access table a1:
dat1=# \c - user3
You are connected to database "dat1" as user "user3".
dat1=> \dn
List of schemes
Name | Owner
--------+-------------------
public | pg_database_owner
sch1 | user2
(2 rows)
dat1=> SELECT * FROM sch1.a1;
ERROR: No access to schema sch1
LINE 1: SELECT * FROM sch1.a1;
3) Access denied - no privileges on the schema:
dat1=> \c - postgres
You are connected to the database "dat1" as user "postgres"
dat1=> GRANT USAGE on SCHEMA sch1 TO user3;
GRANT
dat1=> \dn+ sch1
List schemes
Name | Owner | Permissions | Description
------+----------+----------------+----------
sch1 | user2 | user2=UC/user2+|
| | user3=U/user2 |
(1 line )
dat1=> \c - user3
You are now connected to database "dat1" as user "user3".
dat1=> SELECT * FROM sch1.a1;
ERROR: table a1 not accessible
Now the failure is due to lack of privileges on table a1:
dat1=> \c - postgres
You are connected to the database "dat1" as user "postgres"
dat1=> GRANT SELECT, INSERT (str) ON TABLE sch1.a1 to user3;
GRANT
dat1=> \dp sch1.a1
Rights access
Schema | Name | Type | Permissions | Column Permissions | Policies
-------+-----+---------+---------------------+--------------------+----------
sch1 | a1 | table | user2=arwdDxt/user2+| str: +|
| | | user3=r/user2 | user3=a/user2 |
(1 line)
dat1=> \c - user3
You are connected to database "dat1" as user "user3"
dat1=> SELECT * FROM sch1.a1;
id | str
----+-----
(0 lines)
Now everything is fine. Access is granted within the granted privileges.
Let's check the insertion into the column:
dat1=> INSERT INTO sch1.a1 (str) VALUES ('first record');
INSERT 0 1
dat1=> SELECT * FROM sch1.a1;
id | str
----+---------------
1 | first entry
(1 row)
Let's check the insertion into the first column:
dat1=> INSERT INTO sch1.a1 OVERRIDING SYSTEM VALUE values (2);
ERROR: table a1 not accessible
Not enough privileges.
Deleting lines and objects is also impossible - you need to be the owner or superuser:
dat1=> DELETE FROM sch1.a1;
ERROR: table a1 not accessible
dat1=> DROP TABLE sch1.a1;
ERROR: must be the owner of table a1
Part 6. Deleting created objects
Let's delete the scheme:
dat1=> \c - user2
You are connected to database "dat1" as user "user2".
dat1=> DROP SCHEMA sch1;
ERROR: schema object sch1 cannot be deleted because other objects depend on it
DETAILS: table sch1.a1 depends on object schema sch1
TIP: To remove dependent objects, use DROP ... CASCADE.
The schema is not empty, you can perform a cascade delete:
dat1=> DROP SCHEMA sch1 CASCADE;
NOTE: the deletion applies to the table object sch1.a1
DROP SCHEMA
Let's switch to another database and delete dat1 :
dat1=> \c postgres
You are connected to the database "postgres" as user "user2".
postgres=> DROP DATABASE dat1 (force);
DROP DATABASE
To remove roles, we will use the superuser role:
postgres=> \c - postgres
You are connected to the database "postgres" as user "postgres".
postgres=# DROP ROLE user1, user2, user3;
DROP ROLE
Part 1. Location of configuration files
1) Run psql:
astra@tantor:~$ sudo su - postgres
postgres@tantor:~$ psql
psql (17.5)
Type "help" to get help.
2) Let's look at the location of the configuration file:
postgres=# SHOW hba_file;
hba_file
---------------------------------------------------
/var/lib/postgresql/tantor-se-17/data/pg_hba.conf
(1 line)
3) You can view the connection rules using the pg_hba_file_rules view :
postgres=# \d pg_hba_file_rules;
View "pg_catalog.pg_hba_file_rules"
Column | Type | Sort Rule | NULLable | Default
-------------+---------+--------------------+-------------------+--------------
rule_number | integer | | |
file_name | text | | |
line_number | integer | | |
type | text | | |
database | text[] | | |
user_name | text[] | | |
address | text | | |
netmask | text | | |
auth_method | text | | |
options | text[] | | |
error | text | | |
Part 2. Local changes for authentication
1) Text editor:
postgres @tantor:~$ mcedit /var/lib/postgresql/tantor-se-17/data/pg_hba.conf
add the line:
postgres@tantor:~$ tail -n 14 /var/lib/postgresql/tantor-se-17/data/pg_hba.conf
# TYPE DATABASE USER ADDRESS METHOD
local postgres astra peer map=map1
# "local" is for Unix domain socket connections only
local all all trust
# IPv4 local connections:
host all all 127.0.0.1/32 trust
# IPv6 local connections:
host all all ::1/128 trust
# Allow replication connections from localhost, by a user with the
# replication privilege.
local replication all trust
host replication all 127.0.0.1/32 trust
host replication all ::1/128 trust
2) Text editor:
postgres @tantor:~$ mcedit /var/lib/postgresql/tantor-se-17/data/pg_ident.conf
add the line:
postgres @tantor:~$ tail -n 3 /var/lib/postgresql/tantor-se-17/data/pg_ident.conf
# MAPNAME SYSTEM-USERNAME PG-USERNAME
map1 astra user1
3) Reread configuration :
postgres @tantor:~$ pg_ctl reload
server signaled
4) Create two users user1 and user2:
postgres @ tantor :~$ psql
psql (17.5)
Type " help " to get help
postgres=# CREATE USER user1;
CREATE ROLE
postgres=# CREATE ROLE user2 LOGIN;
CREATE ROLE
postgres=# \du
List of roles
Role name | Attributes
-----------+ -----------------------------------
postgres | Superuser, Create role, Create DB, Replication, Bypass RLS
user1 |
user2 |
Both users have the LOGIN attribute .
3) Let's see if there are any errors in the configuration:
postgres=# \d pg_ident_file_mappings;
View "pg_catalog.pg_ident_file_mappings"
Column | Type | Sort Rule | NULLable | Default
-------------+---------+--------------------+-------------------+--------------
map_number | integer | | |
file_name | text | | |
line_number | integer | | |
map_name | text | | |
sys_name | text | | |
pg_username | text | | |
error | text | | |
postgres=# SELECT map_number, line_number, map_name, sys_name, pg_username, error FROM pg_ident_file_mappings;
map_number | line_number | map_name | sys_name | pg_username | error
-----------+-------------+----------+----------+-------------+-------
1 | 73 | map1 | astra | user1 |
(1 row)
В столбце error пусто, значит ошибок нет.
postgres=# SELECT rule_number, type, database, user_name, auth_method, address, options, error FROM pg_hba_file_rules();
rule_number | type | database | user_name | auth_method | address | options |error
------------+-------+---------------+-----------+-------------+-----------+------------+----
1 | local | {postgres} | {astra} | peer | | {map=map1} |
2 | local | {all} | {all} | trust | | |
3 | host | {all} | {all} | trust | 127.0.0.1 | |
4 | host | {all} | {all} | trust | ::1 | |
5 | local | {replication} | {all} | trust | | |
6 | host | {replication} | {all} | trust | 127.0.0.1 | |
7 | host | {replication} | {all} | trust | ::1 | |
(7 rows)
error column is empty, which means there are no errors.
5) B In the astra user terminal, connect to the postgres database :
astra@tantor : ~ $ psql -U user1 -d postgres
Pager usage is off.
psql (17.5)
Type "help" for help.
postgres=> select current_user;
user
-------
user1
(1 row)
Session created under by user user1 .
6) Cleaning unnecessary objects
postgres=> \c postgres postgres
You are now connected to database "postgres" as user "postgres".
postgres=# DROP user user1, user2;
DROP ROLE
7)Text editor:
postgres @tantor:~$ mcedit /var/lib/postgresql/tantor-se-17/data/pg_hba.conf
comment line:
postgres@tantor:~$ tail -n 14 /var/lib/postgresql/tantor-se-17/data/pg_hba.conf
# TYPE DATABASE USER ADDRESS METHOD
#local postgres astra peer map=map1
# "local" is for Unix domain socket connections only
local all all trust
# IPv4 local connections:
host all all 127.0.0.1/32 trust
# IPv6 local connections:
host all all ::1/128 trust
# Allow replication connections from localhost, by a user with the
# replication privilege.
local replication all trust
host replication all 127.0.0.1/32 trust
host replication all ::1/128 trust
8) Перечитайте конфигурацию:
postgres@tantor:~$ pg_ctl reload
server signaled
postgres=# SELECT rule_number, type, database, user_name, auth_method, address, options, error FROM pg_hba_file_rules();
rule_number | type | database | user_name | auth_method | address | options|
------------+-------+---------------+-----------+-------------+-----------+---------+
1 | local | {all} | {all} | trust | | |
2 | host | {all} | {all} | trust | 127.0.0.1 | |
3 | host | {all} | {all} | trust | ::1 | |
4 | local | {replication} | {all} | trust | | |
5 | host | {replication} | {all} | trust | 127.0.0.1 | |
6 | host | {replication} | {all} | trust | ::1 | |
(6 rows)
Part 1. Creating a basic cluster backup
postgres @tantor:~$ rm -rf $HOME/backup
postgres@tantor:~$ ls -l $PGDATA/pg_tblspc
total 0
lrwxrwxrwx 1 postgres postgres 44 Mar 10 13:41 32913 -> /var/lib/postgresql/tantor-se-17/data/../u01
There is a symbolic link in the directory, which means there is a tablespace.
The tablespace was created in points 1 and 2 of Part 2 of the practice for Chapter 4b with the commands:
postgres=# \! mkdir /var/lib/postgresql/tantor-se-17/u01
postgres=#
CREATE TABLESPACE u01tbs LOCATION '/var/lib/postgresql/tantor-se-17/u01';
If the directory and tablespace do not exist, create them using these commands.
u01tbs tablespace :
postgres=# CREATE TABLE t (id bigserial, t text) TABLESPACE u01tbs;
CREATE TABLE
4) Create backup :
postgres @tantor:~$
pg_basebackup -D $HOME/backup/1 -T $PGDATA/../u01=$HOME/backup/1/u01 -P -c fast
30302/30302 kB (100%), 2/2 tablespaces
5) View the contents of the backup:
postgres@tantor:~$ ls -w 60 $HOME/backup/1
backup_label pg_multixact pg_twophase
backup_manifest pg_notify PG_VERSION
base pg_replslot pg_wal
global pg_serial pg_xact
pg_commit_ts pg_snapshots postgresql.auto.conf
pg_dynshmem pg_stat postgresql.conf
pg_hba.conf pg_stat_tmp u01
pg_ident.conf pg_subtrans
pg_logical pg_tblspc
6) Look at what directory the tablespace symbolic link points to:
postgres@tantor:~$ ls -l $HOME/backup/1/pg_tblspc
total 0
lrwxrwxrwx 1 postgres postgres 32 32913 -> /var/lib/postgresql/backup/1/ u01
Everything is correct: if you start another instance using the backup directory as PGDATA , the tablespace directory will be found and used by this path ( /var/lib/postgresql/backup/1/ u01 ), and not by the path from the cluster ( /var/lib/postgresql/tantor-se-17/data/../u01 ) that was backed up.
Part 2. Launching an instance on a cluster copy
1) In the $HOME/backup/1/postgresql.conf file, the port parameter is commented out, which means that the default value 5432 will be used. You need to set a different port value, since port 5432 is occupied by the cluster instance we backed up.
Any value higher than 1023 can be used (on ports lower than 1024, processes of unprivileged operating system users cannot listen). The port must not be busy (preferably not busy on any interface).
You can set the port (as well as other parameters) in the command line parameter passed to the postgres process (including through wrapper utilities, such as pg_ctl ) in postgresql.auto.conf or in postgresql.conf . Choose the most convenient method.
2) Set the port value to 5433 in the main parameters file:
postgres@tantor:~$ echo "port = 5433 " > > $HOME/backup/1/postgresql.conf
3) Launch instance :
postgres@tantor:~$ pg_ctl start -D $HOME/backup/1
Waiting for server to start...
MESSAGE: Passing protocol output to protocol collection process
TIP: From now on, logs will be output to the "log" directory .
ready
the server is running
to the cluster log :
postgres@tantor:~$ tail $HOME/backup/1/log/postgresql-*.log
LOG: starting PostgreSQL 17.5 on x86_64-pc-linux-gnu, compiled by gcc (Astra 12.2.0-14.astra3) 12.2.0, 64-bit
LOG: listening on IPv4 address "0.0.0.0", port 5433
LOG: listening on IPv6 address "::", port 5433
LOG: listening on Unix socket "/var/run/postgresql/.s.PGSQL.5433"
LOG: database system was interrupted; last known up at 23:36:29 MSK
LOG: redo starts at 115/A9000028
LOG: consistent recovery state reached at 115/A9000178
LOG: redo done at 115/A9000178 system usage: CPU: user: 0.00 s, system: 0.00 s, elapsed: 0.00 s
LOG: checkpoint starting: end-of-recovery immediate wait
LOG: checkpoint complete: wrote 4 buffers (0.0%); 0 WAL file(s) added, 0 removed, 1 recycled; write=0.003 s, sync=0.001 s, total=0.008 s; sync files=3, longest=0.001 s, average=0.001 s; distance=16384 kB, estimate=16384 kB; lsn=115/AA000028, redo lsn=115/AA000028
4) Read this point, but do not follow it . If you want diagnostic messages to be displayed on the screen, you need to comment out in the postgresql.conf file line with parameter logging_collector = 'on':
postgres@tantor:~$ cat $HOME/backup/1/postgresql.auto.conf
# Do not edit this file manually!
# It will be overwritten by the ALTER SYSTEM command.
shared_preload_libraries = 'pg_store_plans, pg_stat_statements, auto_explain'
logging_collector = 'on'
log_filename = 'postgresql-%F.log'
log_destination = 'stderr'
или добавить строку в файл конфигурации, например, командой:
postgres@tantor:~$
echo "logging_collector = off" >> $HOME/backup/1/postgresql.auto.conf
Restart the instance and check that messages are output:
postgres@tantor:~$ pg_ctl stop -D $HOME/backup/1
Waiting for server to complete...
ready
server stopped
postgres@tantor:~$ pg_ctl start -D $HOME/backup/1
expectation launch servers ....
[20912] MESSAGE : Starting PostgreSQL 17.5 on x86_64-pc-linux-gnu, compiled by gcc (Astra 12.2.0-14.astra3) 12.2.0, 64-bit
[20912] MESSAGE: Port 5433 is open to accept connections on IPv4 address "0.0.0.0"
[20912] MESSAGE: Port 5433 is open to accept connections on IPv6 address "::"
[20912] MESSAGE: Unix socket "/var/run/postgresql/.s.PGSQL.5433" is open to accept connections
[20915] MESSAGE: The DB system was shut down: MSK
[20912] MESSAGE: The DB system is ready to accept connections
ready
the server is running
5) Connect to the instance:
postgres@tantor:~$ psql -p 5433
Since the instance opened in normal mode (read-write, a mode that allows changes), we got a clone of the original cluster.
Part 3. Log files
1) Look at the name of the current log file in the session to the replica (on port 5433):
postgres=# select pg_walfile_name_offset(pg_current_wal_lsn()), pg_current_wal_lsn();
pg_walfile_name_offset | pg_current_wal_lsn
--------------------------------+--------------------
( 0000000 1 00000 115 000000 AA ,264) | 115 / AA 000108
(1 line)
The time line has not changed and is equal to 1 . Why?
Because we started the instance, the startup process rolled back the logs, and to it it looked like a normal instance startup after a crash.
Why emergency?
Because we made a backup on a running cluster, not on a correctly stopped one. If we stopped the cluster, we would not be able to use the pg_basebackup utility . The pg_basebackup utility cannot make backups on a stopped cluster.
2) Switch the log and see what changes to see how the numbers change:
postgres=# select pg_switch_wal();
pg_switch_wal
---------------
115/AA000 122
(1 line )
3) What did the function output? LSN in the file you switched from, plus one byte. That is, the LSN of the beginning of the unused part of the log file.
See which file has become current:
postgres=# select pg_walfile_name_offset(pg_current_wal_lsn()), pg_current_wal_lsn();
pg_walfile_name_offset | pg_current_wal_lsn
--------------------------------+--------------------
(0000000100000115000000 AB ,112) | 115/ AB 000070
(1 line)
The value of the last character in the file name is increased by one. The letters and numbers in the log file names are hexadecimal notation.
4) Let's execute the log file switching function several times:
postgres=# select pg_switch_wal();
pg_switch_wal
---------------
115/AB00008A
(1 line )
postgres=# select pg_switch_wal();
pg_switch_wal
---------------
115/ AC 000000
(1 line )
postgres=# select pg_switch_wal();
pg_switch_wal
---------------
115/ AC 000000
(1 line )
Why did n't the last calls switch the log? This is described in the documentation ( https://docs.tantorlabs.ru/tdb/ru/17_5/se/functions-admin.html ):
" If there has been no activity since the last write-ahead log file switch, pg_switch_wal does nothing and returns the starting position of the write-ahead log file that is currently in use."
6) When substituting arbitrary values, make sure that the pg_walfile_name_offset function calculates values depending on the timeline and the log file size:
postgres=# select pg_walfile_name_offset(' ABCD / EF 00FFFF');
pg_walfile_name_offset
----------------------------------
(000000010000 ABCD 000000 EF , 65535 )
(1 line)
We looked at how we could guess from the appearance of the LSN (the blue color of the EF value) in which log file this LSN is located without calling functions.
7) Stop the clone instance:
postgres@tantor:~$ pg_ctl stop -D $HOME/backup/1
Пример сообщений на английском языке:
LOG: received fast shutdown request
LOG: aborting any active transactions
LOG: background worker "logical replication launcher" (PID 31666) exited with exit code 1
waiting for server to shut down....
LOG: shutting down
LOG: checkpoint starting: shutdown immediate
LOG: checkpoint complete: wrote 0 buffers (0.0%); 0 WAL file(s) added, 0 removed, 0 recycled; write=0.001 s, sync=0.001 s, total=0.005 s; sync files=0, longest=0.000 s, average=0.000 s; distance=0 kB, estimate=44236 kB; lsn=115/AE000198, redo lsn=115/AE000198
LOG: database system is shut down
done
server stopped
Can be compared with messages in Russian.
Later in this practice, we will provide examples of utility messages in English so that you can compare them with the Russian messages you will receive in the console.
Part 4. Checking the integrity of the backup
1) pg_basebackup created a backup_manifes t file , which can be used to check whether the files in the backup have changed during their storage. Let's check the copy on which the instance was already launched:
postgres@tantor:~$ pg_verifybackup $HOME/backup/1
pg_verifybackup: error: "pg_stat/pg_stat_statements.stat" is present on disk but not in the manifest
pg_verifybackup: error: "pg_stat/pgstat.stat" is present on disk but not in the manifest
pg_verifybackup: error: "postmaster.opts" is present on disk but not in the manifest
pg_verifybackup: error: "base/5/pg_internal.init" is present on disk but not in the manifest
pg_verifybackup: error: "global/pg_internal.init" is present on disk but not in the manifest
pg_verifybackup: error: "global/pg_store_plans.stat" is present on disk but not in the manifest
pg_verifybackup: error: "postgresql.conf" has size 30440 on disk but size 30428 in the manifest
pg_verifybackup: error: "backup_label.old" is present on disk but not in the manifest
pg_verifybackup: error: "pg_subtrans/000000000001" is present on disk but not in the manifest
pg_verifybackup: error: "u01/PG_17_642505061/5/382539" is present on disk but not in the manifest
pg_verifybackup: error: "u01/PG_17_642505061/5/382539.1" is present on disk but not in the manifest
pg_verifybackup: error: "u01/PG_17_642505061/5/382541" is present on disk but not in the manifest
pg_verifybackup: error: "u01/PG_17_642505061/5/382540" is present on disk but not in the manifest
pg_verifybackup: error: "u01/PG_17_642505061/5/382539_vm" is present on disk but not in the manifest
pg_verifybackup: error: "u01/PG_17_642505061/5/382539_fsm" is present on disk but not in the manifest
pg_verifybackup: error: "backup_label" is present in the manifest but not on disk
pg_waldump: error: could not find file "0000000100000115000000A9": No such file or directory
pg_verifybackup: error: WAL parsing failed for timeline 1
.stat internal.init pg_subtrans/* files are normal, files are not included in the backup. postgresql.conf we updated, adding the port number. The log file A9 disappeared, because it was not needed by the clone for its recovery, and was not held by the min_wal_size parameter. The backup_label file was renamed to backup_label.old
backup_label file is important if present because the values in it are used to determine what LSN to start rolling back logs from, not the data in pg_control. The contents of pg_control were changed by the instance, it is present in the manifest file, if it is removed a message will be issued, but pg_control was not listed as changed.
2) Why are there records of all files in the tablespace?
The checksums of these files are in backup_manifest . The files have not been modified and have been verified successfully:
postgres@tantor:~$ cat $HOME/backup/1/backup_manifest | grep pg_tblspc
{ "Path": "pg_tblspc/32913/PG_17_642505061/5/382541", "Size": 8192, "Last-Modified": "11:16:27 GMT", "Checksum-Algorithm": " CRC32C ", "Checksum": "381590e3" },
{ "Path": "pg_tblspc/32913/PG_17_642505061/5/382540", "Size": 0 , "Last-Modified": "11:16:27 GMT", "Checksum-Algorithm": " CRC32C ", "Checksum": " 00000000 " },
The missing file lines are there because the tablespace directory was placed in the PGDATA/u01 subdirectory when the backup was made . This is one reason why tablespace directories should be placed outside of PGDATA .
3) Delete the clone directory:
postgres@tantor:~$ rm -rf $HOME/backup
Part 5. Consistent Backup
1) Let's create a backup again and place the directory of the tablespace u01 outside the main directory:
pg_basebackup -D $HOME/backup/1 -T $PGDATA/../u01=$HOME/backup /u01 -P -c fast
4472018/4472018 kB (100%), 2/2 tablespaces
2) Create a standby.signal file. If this file is present (the contents of the file are not important), the instance, seeing it, does not open the cluster for reading and writing (switches to "replica mode"):
postgres@tantor:~$ touch $HOME/backup/1/standby.signal
Let's set the parameter so that diagnostic messages are output to the console:
postgres@tantor:~$ echo "logging_collector = off" >> $HOME/backup/1/postgresql.auto.conf
3) Run the instance to get a "consistent" copy. Since the backup is autonomous, it contains the log files needed to reconcile the backup files.
Can launch instance command :
pg_ctl start -D $HOME/backup/1 -o " --port=5433 --recovery_target=immediate --recovery_target_action=shutdown "
Since after the instance is launched, it must shut down after reaching consistency ( recovery_target_action=shutdown ), you can directly launch the main instance process. If the instance itself did not stop, it would be better to use pg_ctl , since you would need to know what signal you can pass to the postgres process to stop it correctly. Let's launch instance :
postgres@tantor:~$ postgres -D $HOME/backup/1 --port=5433 --recovery_target=immediate --recovery_target_action=shutdown
LOG: starting PostgreSQL 17.5 on x86_64-pc-linux-gnu, compiled by gcc (Astra 12.2.0-14.astra3) 12.2.0, 64-bit
LOG: listening on IPv4 address "0.0.0.0", port 5433
LOG: listening on IPv6 address "::", port 5433
LOG: listening on Unix socket "/var/run/postgresql/.s.PGSQL.5433"
LOG: database system was interrupted; last known up at
WARNING: specified neither primary_conninfo nor restore_command
HINT: The database server will regularly poll the pg_wal subdirectory to check for files placed there.
LOG: entering standby mode
LOG: redo starts at 115/BB000028
LOG: consistent recovery state reached at 115/BB000178
LOG: database system is ready to accept read-only connections
LOG: recovery stopping after reaching consistency
LOG: shutdown at recovery target
LOG: shutting down
LOG: database system is shut down
4) Проверим бэкап:
postgres@tantor:~$ pg_verifybackup $HOME/backup/1
pg_verifybackup: error: "pg_stat/pg_stat_statements.stat" is present on disk but not in the manifest
pg_verifybackup: error: "pg_stat/pgstat.stat" is present on disk but not in the manifest
pg_verifybackup: error: "postmaster.opts" is present on disk but not in the manifest
pg_verifybackup: error: "global/pg_store_plans.stat" is present on disk but not in the manifest
pg_verifybackup: error: "backup_label.old" is present on disk but not in the manifest
pg_verifybackup: error: "backup_label" is present in the manifest but not on disk
errors related to files in the u01 directory during this check . The backup_label file has been renamed , which means that when using this backup, the restore will start from the LSNs specified in the pg_control file .
5) Let's check the LSN records in the control file:
postgres@tantor:~$ pg_controldata -D $HOME/backup/1
Database cluster state: shut down in recovery
Latest checkpoint location: 115/BB000070
Latest checkpoint's REDO location: 115/BB000028
Latest checkpoint's REDO WAL file: 0000000100000115000000BB
Latest checkpoint's TimeLineID: 1
Latest checkpoint's PrevTimeLineID: 1
Latest checkpoint's full_page_writes: on
Latest checkpoint's NextXID: 35739
Latest checkpoint's NextOID: 399126
Latest checkpoint's NextMultiXactId: 502936
Latest checkpoint's NextMultiOffset: 2034077
Latest checkpoint's oldestXID: 723
Latest checkpoint's oldestXID's DB: 1
Latest checkpoint's oldestActiveXID: 35739
Latest checkpoint's oldestMultiXid: 1
Latest checkpoint's oldestMulti's DB: 1
Latest checkpoint's oldestCommitTsXid:0
Latest checkpoint's newestCommitTsXid:0
...
Fake LSN counter for unlogged rels: 0/3E8
Minimum recovery ending location: 115/BB000178
Min recovery ending loc's timeline: 1
Backup start location: 0/0
Backup end location: 0/0
End-of-backup record required: no
wal_level setting: replica
If you delete the log file 0000000100000 115 000000 BB, then the instance will not start.
It is impossible (either before or after approval) to restore from this backup to a point earlier than the " Minimum recovery ending location ".
Part 6. Deleting log files
1) Delete the standby.signal file :
postgres@tantor:~$ rm $HOME/backup/1/standby.signal
2) Запустите экземпляр:
postgres@tantor:~$ pg_ctl start -D $HOME/backup/1 -o "--port=5433"
LOG: database system was not properly shut down; automatic recovery in progress
LOG: redo starts at 115/BB000028
LOG: redo done at 115/BB000178 system usage: CPU: user: 0.00 s, system: 0.00 s, elapsed: 0.00 s
LOG: checkpoint starting: end-of-recovery immediate wait
LOG: checkpoint complete: wrote 4 buffers (0.0%); 0 WAL file(s) added, 0 removed, 1 recycled; write=0.003 s, sync=0.001 s, total=0.008 s; sync files=3, longest=0.001 s, average=0.001 s; distance=16384 kB, estimate=16384 kB; lsn=115/BC000028, redo lsn=115/BC000028
LOG: database system is ready to accept connections
done
server started
3) Корректно остановите экземпляр:
postgres@tantor:~$ pg_ctl stop -D $HOME/backup/1
LOG: received fast shutdown request
waiting for server to shut down....
LOG: aborting any active transactions
LOG: background worker "logical replication launcher" (PID 4137) exited with exit code 1
LOG: shutting down
LOG: checkpoint starting: shutdown immediate
LOG: checkpoint complete: wrote 0 buffers (0.0%); 0 WAL file(s) added, 0 removed, 0 recycled; write=0.001 s, sync=0.001 s, total=0.007 s; sync files=0, longest=0.000 s, average=0.000 s; distance=0 kB, estimate=14745 kB; lsn=115/BC000108, redo lsn=115/BC000108
LOG: database system is shut down
done
server stopped
4) Let's see what has changed in the control file after a normal stop, compared to starting in replica mode:
postgres@tantor:~$ pg_controldata -D $HOME/backup/1
Database cluster state: shut down
pg_control last modified: 03:58:27 AM MSK
Latest checkpoint location: 115/BC000108
Latest checkpoint's REDO location: 115/BC000108
Latest checkpoint's REDO WAL file: 0000000100000115000000BC
Latest checkpoint's TimeLineID: 1
Latest checkpoint's PrevTimeLineID: 1
Latest checkpoint's full_page_writes: on
Latest checkpoint's NextXID: 35739
Latest checkpoint's NextOID: 399126
Latest checkpoint's NextMultiXactId: 502936
Latest checkpoint's NextMultiOffset: 2034077
Latest checkpoint's oldestXID: 723
Latest checkpoint's oldestXID's DB: 1
Latest checkpoint's oldestActiveXID: 0
Latest checkpoint's oldestMultiXid: 1
Latest checkpoint's oldestMulti's DB: 1
Latest checkpoint's oldestCommitTsXid:0
Latest checkpoint's newestCommitTsXid:0
Time of latest checkpoint: 03:58:27 AM MSK
Fake LSN counter for unlogged rels: 0/3E8
Minimum recovery ending location: 0/0
Min recovery ending loc's timeline: 0
Backup start location: 0/0
Backup end location: 0/0
End-of-backup record required: no
5) Delete all log files ( 0000000100000115000000BC ):
postgres@tantor:~$ rm -r $HOME/backup/1/pg_wal/ *
6) Try it launch instance :
postgres@tantor:~$ pg_ctl start -D $HOME/backup/1 -o "--port=5433"
waiting for server to start......
LOG: database system was shut down at 03:58:27 MSK
LOG: creating missing WAL directory "pg_wal/archive_status"
LOG: invalid checkpoint record
PANIC: could not locate a valid checkpoint record
LOG: startup process (PID 4151) was terminated by signal 6: Aborted
LOG: aborting startup due to startup process failure
LOG: database system is shut down
stopped waiting
pg_ctl: could not start server
Examine the log output.
Без файла журнала Latest checkpoint's REDO WAL file 0000000100000115000000BC экземпляр не запустился.
manually delete files in the pg_wal directory .
At least one of the files (the current log segment) will be needed when the instance starts.
7) Delete the backup directory:
postgres@tantor:~$ rm -rf $HOME/backup
Part 7. Creating a log archive using the utility pg_receivewal
1) Open a new terminal window as the postgres user .
Create a directory for the log archive:
postgres @tantor:~$ mkdir $HOME/archivelog
2) Launch pg_receivewal :
postgres@tantor:~$ pg_receivewal -D $HOME/archivelog --slot=arch --synchronous -v
pg_receivewal: error: replication slot "arch" does not exist
pg_receivewal: disconnected; waiting 5 seconds to try again
pg_receivewal: error: replication slot "arch" does not exist
pg_receivewal: disconnected; waiting 5 seconds to try again
Messages will be issued that there is no slot. We will study further how the messages will change when we create a slot.
3) In the second window, the terminal under the postgres user c create a backup with the creation and use of a slot:
postgres @tantor:~$ pg_basebackup -D $HOME/backup/1 -T $PGDATA/../u01=$HOME/backup/u01 -P -C --slot=arch
4472018/4472018 kB (100%), 2/2 tablespaces
4) While the backup is being made, the window with the running pg_receivewal utility will display errors about the slot being used:
pg_receivewal: starting log streaming at 115/BD000000 (timeline 1)
pg_receivewal: error: could not send replication command "START_REPLICATION": ERROR: replication slot "arch" is active for PID 5013
pg_receivewal: disconnected; waiting 5 seconds to try again
One slot can only be used by one replication session .
We ran pg_receivewal in advance, but it would have been worth running it after the backup, there would have been no skipped logs. It is not necessary to run the utility in advance. After pg_basebackup detached from the instance, pg_receivewal reconnected within 5 seconds :
pg_receivewal: starting log streaming at 115/ BD 000000 (timeline 1)
pg_receivewal: finished segment at 115/BE000000 (timeline 1)
pg_receivewal received log file BD .
5) Let's check from which log file the recovery will start:
postgres@tantor:~$ cat $HOME/backup/1/backup_label
START WAL LOCATION: 115/ BD 000028 (file 0000000100000115000000 BD )
CHECKPOINT LOCATION: 115/BD000070
BACKUP METHOD: streaming
BACKUP FROM: primary
START TIME: 07:48:25 MSK
LABEL: pg_basebackup base backup
START TIMELINE: 1
The recovery will start from the BD journal .
6) Let's see which file is current:
postgres@tantor:~$ psql
postgres=# select pg_walfile_name_offset(pg_current_wal_lsn()), pg_current_wal_lsn();
pg_walfile_name_offset | pg_current_wal_lsn
--------------------------------+--------------------
(0000000100000115000000BE,112) | 115/ BE 000070
(1 line)
Current BE file .
7) Посмотрим, что получает pg_receivewal:
postgres@tantor:~$ ls -al $HOME/archivelog
total 32776
drwxr-xr-x 2 postgres postgres 4096 07:48 .
drwxr-xr-x 10 postgres postgres 4096 08:04 ..
-rw-r----- 1 postgres postgres 16777216 07:48 0000000100000115000000BD
-rw-r----- 1 postgres postgres 16777216 07:48 0000000100000115000000BE.partial
It is currently receiving log records and writing to the file BE . The file has a .partial extension . The writing is synchronous (block by block: wal_block_size=8Kb ), since we specified the --synchronous parameter .
8) Check that the .partial file and the current cluster log are the same:
postgres@tantor:~$ diff $HOME/archivelog/0000000100000115000000BE.partial $PGDATA/pg_wal/0000000100000115000000BE
There is no difference, the files are the same.
9) Let's look at the replication slot status:
postgres=# select * from pg_replication_slots \gx
-[ RECORD 1 ]-------+------------
slot_name | arch
plugin |
slot_type | physical
datoid |
database |
temporary | f
active | t
active_pid | 5018
xmin |
catalog_xmin |
restart_lsn | 115/BE000198
confirmed_flush_lsn |
wal_status | reserved
safe_wal_size | 150994536
two_phase | f
conflicting |
postgres=# select * from pg_stat_replication \gx
-[ RECORD 1 ]----+----------------------------
pid | 5018
usesysid | 10
usename | postgres
application_name | pg_receivewal
client_addr |
client_hostname |
client_port | -1
backend_start | 07:48:43.452192+03
backend_xmin |
state | streaming
sent_lsn | 115/BE000198
write_lsn | 115/BE000198
flush_lsn | 115/BE000198
replay_lsn |
write_lag | 00:00:00.001285
flush_lag | 00:00:00.001285
replay_lag | 00:27:34.008699
sync_priority | 0
sync_state | async
reply_time | 08:16:17.463519+03
Part 8. Synchronous transaction commit and pg_receivewal
1) Let's specify the application name in the list of clients that can confirm transactions in synchronous mode:
postgres=# alter system set synchronous_standby_names = pg_receivewal;
ALTER SYSTEM
postgres=# select pg_reload_conf();
pg_reload_conf
----------------
t
2) Make sure that the status has become sync :
postgres=# select * from pg_stat_replication \gx
-[ RECORD 1 ]----+------------------------------
pid | 5169
usesysid | 10
usename | postgres
application_name | pg_receivewal
client_addr |
client_hostname |
client_port | -1
backend_start | 08:30:00.356885+03
backend_xmin |
state | streaming
sent_lsn | 115/BE000F70
write_lsn | 115/BE000F70
flush_lsn | 115/BE000F70
replay_lsn |
write_lag | 00:00:00.003395
flush_lag | 00:00:00.003395
replay_lag | 00:01:32.059937
sync_priority | 1
sync_state | sync
reply_time | 08:31:32.419514+03
3) If there is no client with the sync status , synchronous_standby_names is not empty, synchronous_commit is not set to local or off , then transactions will hang and when interrupted <ctrl+c> will produce errors like:
postgres=# insert into t (t) values ('aaa');
^C Cancel request sent
WARNING: canceling wait for synchronous replication due to user request
DETAIL: The transaction has already committed locally, but might not have been replicated to the standby .
INSERT 0 1
Sessions will hang until a client appears who confirms the transactions, or the administrator disables the mode using parameters.
4) Remove mode :
postgres=# alter system RESET synchronous_standby_names;
ALTER SYSTEM
postgres=# select pg_reload_conf();
pg_reload_conf
----------------
t
Part 9. Minimizing transaction data loss
To avoid loss of transaction data, you must use the synchronous commit mode before the loss occurs.
pg_wal directory size allows , copy the archive files that will be needed to restore the backup to the pg_wal directory . The log files that will be used to start the rollover are specified in backup_label or, if it is not present (renamed to backup_label.old ), then in pg_control (which is viewed by pg_controldata ). If the directory size does not allow, and you do not want to use links at the file system level, you can use the rectore_command parameter, but it will copy the log files from the archive directory to pg_wal, which takes time and increases the recovery time.
We assume that our main cluster crashed and disappeared. Thanks to the synchronous mode, pg_receivewal accepted all blocks of the current log. If it was used to confirm transactions, then according to the log records (about committing transactions), which it did not receive and did not have time to confirm, and the clients executing these transactions did not receive confirmation of committing, but received a message about a connection break (the cluster crashed and disappeared).
Let's not waste time on creating sessions, issuing commands, tracking LSN, so as not to get distracted, and focus on the main thing.
1) Copy content directories :
postgres@tantor:~$ cp $HOME/archivelog/* $HOME/backup/1/pg_wal
2) Rename the .partial file, removing the extension:
postgres@tantor:~$ mv $HOME/backup/1/pg_wal/0000000100000115000000BE.partial $HOME/backup/1/pg_wal/0000000100000115000000BE
3) Let's launch spare cluster :
postgres@tantor:~$ pg_ctl start -D $HOME/backup/1 -o "--port=5433"
LOG: consistent recovery state reached at 115/BD000178
LOG: invalid record length at 115/ BE 000 F70 : expected at least 26, got 0
LOG: database system is ready to accept connections
which corresponds to the value sent_lsn = 115/ BE 000 F70 that we saw in pg_stat_replication.
4) How to stop pg_receivewal ? If it was not sent to the background, as in our case, then type Ctrl+c in its window . If it was sent to the background, then you can find the process number and send the SIGINT signal . This is the correct termination of pg_receivewal . Example:
postgres@tantor$ kill -s SIGINT 5169
Utility will report in stdout:
pg_receivewal: not renaming "0000000100000115000000BE.partial", segment is not complete
5) Let's stop spare cluster :
postgres@tantor:~$ pg_ctl stop -D $HOME/backup/1
Part 1. Using the pg_dump utility
1) Do it command :
postgres@tantor:~$ pg_dump --schema-only
--schema-only option allows dumping only object definitions ("object schemas") without data. No other pg_dump options were used, so the default options were used:
connect to the database that psql would connect to ;
output to sdout - to the terminal screen;
The format of the generated dump is plain - text script.
<Shift+PgUp> key combination on the keyboard to see what the contents of the "dump" look like. The format is called plain . The "dump" contains comments, SET commands that set session parameters, allowing you to not depend on the parameter values of the database in which the commands from the dump would be executed:
SET statement_timeout = 0;
SET lock_timeout = 0;
SET idle_in_transaction_session_timeout = 0;
SET transaction_timeout = 0;
SET client_encoding = 'UTF8';
SET standard_conforming_strings = on;
SELECT pg_catalog.set_config( 'search_path', '' , false);
SET check_function_bodies = false;
SET xmloption = content;
SET client_min_messages = warning;
SET row_security = off;
Timeout parameters allow you to download large amounts of data without running into limitations.
row_security parameter will allow you to get errors if the row level security ("RLS") policy is triggered . By default , pg_dump will refuse to dump data if the role does not have the right to bypass these policies. The right to bypass policies is granted by the BYPASS RLS and SUPERUSER role attributes . This is necessary to ensure that all rows are dumped and will be loaded without errors.
check_function_bodies parameter disables checking of routine bodies at creation time. This check is needed by developers so that they can see errors during creation. The utility disables this check so as not to care about the unload order and the order of creating objects. This gives flexibility: to be able to create routines before creating tables, functions and other objects on which routines depend.
3) Create a database called dump and a table in that database:
postgres=# CREATE DATABASE dump;
CREATE DATABASE
postgres=# \c dump
You are connected to the database " dump " as user "postgres".
dump =# CREATE TABLE t (id bigserial, t text, b bytea);
CREATE TABLE
dump=# INSERT INTO t(t) values (' abc '), (NULL), ('');
INSERT 0 3
3) In the command line (in another terminal window or after exiting psql ), create the dump1 database and transfer the contents of the dump database into it :
dump=# \q
postgres@tantor:~$ createdb dump1;
postgres@tantor:~$ pg_dump -d dump | psql -d dump1
...
set_config
------------
(1 row)
...
CREATE TABLE
ALTER TABLE
CREATE SEQUENCE
ALTER SEQUENCE
ALTER SEQUENCE
ALTER TABLE
COPY 3
setval
--------
3
(1 line )
psql runs, it prints messages to the terminal screen.
pg_dump utility connected to the dump database and through a pipe ( " | " ) passed commands to the psql utility , which immediately executed them, connecting to the dump1 database .
Advantages of using a pipe ("conveyor"):
1) no space is needed for a file into which the data would be unloaded;
2) the time is reduced, since the unloading (pg_dump) and loading (psql) processes are running simultaneously .
Part 2. Custom format and pg_restore utility
1) Start the data reload from the dump1 database to the dump database in the custom format and pre-delete objects before creating them :
postgres@tantor:~$
pg_dump -d dump1 --format=custom | pg_restore -d dump --clean --if-exists
There are no errors. The custom format generates one file that can be loaded not by psql , but by the pg_restore utility .
2) Repeat the overload by adding the parameter --verbose to see what information it outputs:
postgres@tantor:~$
pg_dump -d dump1 --format=custom | pg_restore -d dump --clean --if-exists -v
pg_restore: Connect to a database for restoration
pg_restore: deleting DEFAULT t id
pg_restore: deleting SEQUENCE t_id_seq
pg_restore: dropping TABLE t
pg_restore: creating TABLE "public.t"
pg_restore: creating SEQUENCE "public.t_id_seq"
pg_restore: creating SEQUENCE OWNED BY "public.t_id_seq"
pg_restore: creates DEFAULT "public.t id"
pg_restore: processing data from table "public.t"
pg_restore: executing SEQUENCE SET t_id_seq
3) Check that the contents of table t match the original:
postgres@tantor:~$ psql -d dump -c "select * from t"
id | t | b
----+------+---
4 | abcg |
5 | |
6 | |
(3 lines )
4) Start the upload and download with the pg_restore utility with the --list parameter :
postgres@tantor:~$ pg_dump -d dump1 --format=custom | pg_restore -l
;
; Archive created at ..
; dbname: dump1
; TOC Entries: 10
; Compression: gzip
; Dump Version: 1.15-0
Format : CUSTOM
; Integer: 4 bytes
; Offset: 8 bytes
; Dumped from database version: 17.5
; Dumped by pg_dump version: 17.5
;
;
; Selected TOC Entries:
;
216; 1259 448357 TABLE public t postgres
217; 1259 448362 SEQUENCE public t_id_seq postgres
3288; 0 0 SEQUENCE OWNED BY public t_id_seq postgres
3135; 2604 448363 DEFAULT public t id postgres
3280; 0 448357 TABLE DATA public t postgres
3289; 0 0 SEQUENCE SET public t_id_seq postgres
Utility pg_restore gave out contents ( TOC , title o f c contents ) of dump .
-l option works with dumps in the format custom or directory . See what the list looks like. A line is displayed for each object. Lines can be commented out and, using the parameter -L pg_restore utilities , do not load these objects.
5) Objects may have dependencies on the presence of other objects. Dependencies are listed as a parameter when running pg_restore with the -v parameter . Use this parameter to see how dependencies are displayed :
postgres@tantor:~$ pg_dump -d dump1 --format=custom | pg_restore -l -v
;
; Archive created at 2024-03-23 08:36:49 MSK
; dbname: dump1
; TOC Entries: 10
; Compression: gzip
; Dump Version: 1.15-0
; Format: CUSTOM
; Integer: 4 bytes
; Offset: 8 bytes
; Dumped from database version: 17.5
; Dumped by pg_dump version: 17.5
;
;
; Selected TOC Entries:
;
3284; 0 0 ENCODING - ENCODING
3285; 0 0 STDSTRINGS - STDSTRINGS
3286; 0 0 SEARCHPATH - SEARCHPATH
3287; 1262 448356 DATABASE - dump1 postgres
216; 1259 448357 TABLE public t postgres
217; 1259 448362 SEQUENCE public t_id_seq postgres
; depends on: 216
3288; 0 0 SEQUENCE OWNED BY public t_id_seq postgres
; depends on: 217
3135; 2604 448363 DEFAULT public t id postgres
; depends on: 217 216
3280; 0 448357 TABLE DATA public postgres
; depends on: 216
3289; 0 0 SEQUENCE SET public t_id_seq postgres
; depends on: 217
The lines displaying dependencies are commented out.
6) If you do not specify the -d or -l parameters to the pg_restore utility , but only specify -f , then a script with SQL commands is created from the dump in the custom, directory, tar format. Create script :
postgres@tantor:~$
pg_dump -d dump1 --format=custom | pg_restore -f script.sql
7) Create a dump script in plain format :
postgres@tantor:~$ pg_dump -d dump1 -f script1.sql
8) Compare two script :
postgres@tantor:~$ diff script.sql script1.sql
The scripts are not different from each other. The pg_restore utility can form a plain dump file from custom, directory, tar dumps .
Part 3. Directory format
1) Create a dump in directory format :
postgres@tantor:~$ pg_dump -d dump1 --format= directory -f ./1
postgres@tantor:~$ ls ./1
3280 .dat .gz toc.dat
2) The directory is created automatically. The directory contains a binary dump file and data files, for which compression is used by default :
3) Delete the directory and create a dump without compression :
postgres@tantor:~$ rm -rf ./1
postgres@tantor:~$ pg_dump -d dump1 --format=directory -Z0 -f ./1
postgres@tantor:~$ ls ./1
3280.dat toc.dat
4) View the contents of any .dat file :
postgres@tantor:~$ cat ./1/ 3280 .dat
4 abcg \N
5 \N \N
6 \N
\.
.dat file contains the output of the COPY command in the default format for this command. \N are empty ( NULL ) values. \. are the COPY command termination characters .
5) You can only unload data, without commands for creating objects :
postgres@tantor:~$ pg_dump -d dump -a
The dump will not contain CREATE commands .
6) Параметр --quote-all-identifiers указывает брать в кавычки все идентификаторы:
postgres@tantor:~$ pg_dump -d dump --quote-all-identifiers | grep \"
-- Name: SCHEMA "public"; Type: COMMENT; Schema: -; Owner: pg_database_owner
COMMENT ON SCHEMA "public" IS 'standard public schema';
SET default_table_access_method = "heap";
CREATE TABLE "public"."t" (
"id" bigint NOT NULL,
"t" "text",
"b" "bytea"
ALTER TABLE "public"."t" OWNER TO "postgres";
CREATE SEQUENCE "public"."t_id_seq"
ALTER SEQUENCE "public"."t_id_seq" OWNER TO "postgres";
ALTER SEQUENCE "public"."t_id_seq" OWNED BY "public"."t"."id";
ALTER TABLE ONLY "public"."t" ALTER COLUMN "id" SET DEFAULT "nextval"('"public"."t_id_seq"'::"regclass");
COPY "public"."t" ("id", "t", "b") FROM stdin;
SELECT pg_catalog.setval('"public"."t_id_seq"', 6, true);
INSERT commands, the --rows-per-insert parameter is used instead of the
COPY command :
postgres@tantor:~$ pg_dump -d dump --rows-per-insert=1 | grep INS
INSERT INTO public.t VALUES (4, ' abc ', NULL);
INSERT INTO public.t VALUES (5, NULL, NULL);
INSERT INTO public.t VALUES (6, '', NULL);
Part 4. Compression and backup speed
1) Run psql and connect to the dump database :
postgres@tantor:~$ psql -d dump
psql (17.5)
Type "help" to get help.
2) Run the following commands in psql to create a table and fill it with data:
DROP TABLE IF EXISTS t;
CREATE TABLE t (id bigserial, t text);
INSERT INTO t(t) SELECT encode((floor(random()*1000)::numeric ^ 100::numeric)::text::bytea, 'base64') from generate_series(1.500000);
3) Run the following commands to measure the download time using different compression algorithms:
postgres@tantor:~$ date +%T ; rm -rf ./1 ; pg_dump -d dump --format=directory -Z lz4 -f ./1 ; date +%T ; ls -l ./1
23:28:5 4
23:28:5 5
total 114804
-rw-r--r-- 1 postgres postgres 117547931 23:28 3281.dat.lz4
-rw-r--r-- 1 postgres postgres 2127 23:28 toc.dat
postgres@tantor:~$ date +%T ; rm -rf ./1 ; pg_dump -d dump --format=directory -Z zstd -f ./1 ; date +%T ; ls -l ./1
23:29:17
23:29:18
total 7504
-rw-r--r-- 1 postgres postgres 7677214 23:29 3281.dat.zst
-rw-r--r-- 1 postgres postgres 2127 23:29 toc.dat
postgres@tantor:~$ date +%T ; rm -rf ./1 ; pg_dump -d dump --format=directory -Z gzip -f ./1 ; date +%T ; ls -l ./1
23:29:31
23:29:46
total 66436
-rw-r--r-- 1 postgres postgres 68022603 23:29 3281.dat.gz
-rw-r--r-- 1 postgres postgres 2127 23:29 toc.dat
postgres@tantor:~$ date +%T ; rm -rf ./1 ; pg_dump -d dump --format=directory -Z 0 -f ./1 ; date +%T ; ls -l ./1
23:29:5 2
23:29:5 3
total 175624
-rw-r--r-- 1 postgres postgres 179830026 23:29 3281.dat
-rw-r--r-- 1 postgres postgres 2127 23:29 toc.dat
Based on the results of the commands, you can estimate the unloading time depending on the selected compression algorithm. You can also change the compression level by specifying a colon and a number after the algorithm name: -Z zstd:1
Part 5. COPY command
1) The result of the COPY command can be passed to the input of a program, for example gzip :
dump=# COPY pg_authid TO PROGRAM 'gzip > file.gz';
COPY 17
This example calls the gzip program and creates a file $PGDATA/file.gz that contains a text file named "file".
2) You can save the results of any commands that return data. For example , the commands WITH :
COPY ( WITH RECURSIVE t(n) AS ( SELECT 1 UNION ALL SELECT n+1 FROM t )
SELECT n FROM t LIMIT 1
) TO stdout;
3) Do it commands :
drop table if exists t2;
create table t2 (c1 text);
insert into t2 (c1) VALUES (repeat(E'a\n', 357913941));
COPY t2 TO '/tmp/test';
When you execute the last command, you will get an error:
ERROR: out of memory
DETAILS : Cannot enlarge string buffer containing 1073741822 bytes by 1 more bytes .
The field size is one third of a gigabyte.
When unloading in text form, the field contents will look like this:
a\na\na\na\n and the field size will increase threefold to 107374182 3 bytes, which is 1 byte more than the maximum string buffer size.
unloaded using the Tantor Postgres configuration parameter enable_large_allocations = on or the binary format :
postgres=# COPY t2 TO '/tmp/test' WITH BINARY;
COPY 1
5) Delete file :
postgres=# \! rm /tmp/test
6) Compare the default format and CSV. Do this commands :
postgres=# copy t to stdout with (format text);
1 abcg \N
2 \N \N
3 \N
postgres=# copy t to stdout with (format csv );
1,abcg,
2,,
3,"",
In CSV format, the empty string was enclosed in quotation marks.
Part 1. Creating a replica
1) Check if there are tablespaces:
postgres=# \db
List of tablespaces
Name | Owner | Location
------------+----------+-----------------------------------------------
pg_default | postgres |
pg_global | postgres |
u01tbs | postgres | /var/lib/postgresql/tantor-se-17/data/../u01
(3 rows)
2) If there are tablespaces other than the two standard ones ( pg_global, pg_default ), look at what relationships they have:
SELECT n.nspname, relname
FROM pg_class c
LEFT JOIN pg_namespace n ON n.oid = c.relnamespace,
pg_tablespace t
WHERE relkind IN ('r','m','i','S','t') AND
n.nspname <> 'pg_toast' AND t.oid = reltablespace AND
t.spcname = ' u01tbs ';
nspname | relname
---------+---------
public | t
(1 line)
3) Drop objects that use these tablespaces:
postgres=# drop table t;
DROP TABLE
4) Delete tabular space u01tbs :
postgres=# drop tablespace u01tbs ;
DROP TABLESPACE
5) If there is no second terminal window ( fly-term ), then open a second terminal window and switch to the postgres user:
astra@tantor:~$ su - postgres
Password: postgres
postgres@tantor:~$
6) Delete directory :
postgres@tantor:~$ rm -rf /var/lib/postgresql/tantor-se-17-replica/data1
7) Make a backup with the following parameters:
-P - shows the progress of the reservation;
-C or --slot - creates a slot;
-R - creates configuration files for the replica:
postgres@tantor:~$ pg_basebackup -D /var/lib/postgresql/tantor-se-17-replica/data1 -P -R -C --slot=replica1
If you interrupt the backup, you will need to delete the directory:
rm -rf /var/lib/postgresql/tantor-se-17-replica/data1
And slot on master :
select pg_drop_replication_slot('replica1');
8) After successful backup creation, you need to set the port for the replica instance. Be sure to specify two angle brackets, if there is one, the file will be erased:
echo "port=5433" > > /var/lib/postgresql/tantor-se-17-replica/data1/postgresql.auto.conf
9) To display diagnostic messages on the terminal screen, add the following line to the configuration file:
echo " logging_collector = off" > > /var/lib/postgresql/tantor-se-17-replica/data1/postgresql.auto.conf
Otherwise, diagnostic messages will be written to the PGDATA/ log directory file .
When starting an instance with the pg_ctl utility in this case, the following message will be displayed:
Waiting for server to start...
[pid] MESSAGE: Passing log output to log collector process
[pid] TIP: From now on, logs will be output to the " log " directory.
ready
"HINT" message gives the value of the log_directory parameter . The log_destination parameter = stderr , which means that the current_logfiles file is created in PGDATA , which records the location of the log files to which the collector process writes .
10) Yes, you can. launch replica :
pg_ctl start -D /var/lib/postgresql/tantor-se-17-replica/data1
expectation launch servers ....
[7849] MESSAGE : Starting PostgreSQL 17.5 on x86_64-pc-linux-gnu, compiled by gcc (Astra 12.2.0-14.astra3) 12.2.0, 64-bit
[7849] MESSAGE: Port 5433 is open to accept connections on IPv4 address "0.0.0.0"
[7849] MESSAGE: Port 5433 is open to accept connections on IPv6 address "::"
[7849] MESSAGE: Unix socket "/var/run/postgresql/.s.PGSQL.5433" is open to accept connections
[7852] MESSAGE: The DB system was interrupted; last time running:
[7852] MESSAGE: Switching to standby server mode
[7852] MESSAGE: REDO entry starts at offset 9/BB000028
[7852] MESSAGE: Consistent recovery state reached at position 9/BB000130
[7849] MESSAGE: The DB system is ready to accept read-only connections
[7853] MESSAGE: Starting log transfer from master server, at position 9/BC000000 on timeline 1
ready
the server is running
Diagnostic messages (instance operation log) are output to the terminal.
The replica is created, receives journal entries without delay, and applies them.
Part 2. Replication slots
1) In a terminal window with psql connected to the master, see that the slot has been created and is active:
postgres=# select * from pg_replication_slots;
slot_name | plugin | slot_type | datoid | database | temporary | active |
-----------+--------+-----------+---------+----------+-----------+----------+-
replica1 | | physical | | | f | t |
(1 line )
2) Another view for monitoring replication:
postgres=# select * from pg_stat_replication \gx
-[ RECORD 1 ]----+------------------------------
pid | 7854
usesysid | 10
usename | postgres
application_name | walreceiver
client_addr |
client_hostname |
client_port | -1
backend_start | 13:56:31.619654+03
backend_xmin |
state | streaming
sent_lsn | 9/BC000198
write_lsn | 9/BC000198
flush_lsn | 9/BC000198
replay_lsn | 9/BC000198
write_lag |
flush_lag |
replay_lag |
sync_priority | 0
sync_state | async
reply_time | 14:24:31.557301+03
The default application name is walreceiver .
3) Connect To replica :
postgres=# \connect postgres postgres /var/run/postgresql 5433
You are connected to the database "postgres" as user "postgres" through a socket in "/var/run/postgresql", port "5433".
4) Look at the name of the replication slot to which the replica is connected:
postgres=# \dconfig primary_slot_name
List of configuration parameters
Parameter | Value
-------------------+----------
primary_slot_name | replica1
(1 line)
5) Look at the value of the cluster_name parameter :
postgres=# \dconfig cluster_name
List of configuration parameters
Parameter | Value
--------------+-------
cluster_name |
Meaning parameter cluster_name is empty , so That's why meaning parameter application_name has meaning By default walreceiver .
6) Look at the value of the primary_conninfo parameter :
postgres=# show primary_conninfo \gx
-[ RECORD 1 ]----+-----
primary_conninfo | user=postgres passfile='/var/lib/postgresql/.pgpass' channel_binding=prefer port=5432 sslmode=prefer sslcompression=0 sslcertmode=allow sslsni=1 ssl_min_protocol_version=TLSv1.2 gssencmode=prefer krbsrvname=postgres gssdelegation=0 compression=off target_session_attrs=any load_balance_hosts=disable
Part 3. Changing the cluster name
1) Set the meaning of the cluster_name parameter :
postgres=# alter system set cluster_name ='replica1';
ALTER SYSTEM
2) On replica performance pg_stat_replication empty :
postgres=# select * from pg_stat_replication;
pid | usesysid | usename | application_name | client_addr | client_hostname
-----+----------+---------+------------------+-------------+----------------
(0 lines)
3) Changing the cluster_name parameter requires restarting the instance. Restart the replica instance in the terminal window:
postgres @ tantor :~$
pg_ctl restart - D / var / lib / postgresql / tantor -se -17 - replica / data 1
Waiting for server to complete...
ready
server stopped
Waiting for server to start...
[25550] MESSAGE: Starting PostgreSQL 17.5 on x 86_64- pc - linux - gnu , compiled by gcc ( Astra 12.2.0-14. astra 3) 12.2.0, 64- bit
[25550] MESSAGE: Port 5433 is open to accept connections on IPv4 address "0.0.0.0"
[25550] MESSAGE: Port 5433 is open to accept connections on IPv6 address "::"
[25550] MESSAGE: Unix socket "/var/run/postgresql/.s.PGSQL.5433" is open to accept connections
[25553] MESSAGE: The DB system was shut down during recovery: 14:37:36 MSK
[25553] MESSAGE: Switching to standby server mode
[25553] MESSAGE: REDO entry starts at offset 9/BC000070
[25553] MESSAGE: Consistent recovery state reached at position 9/BC000198
[25553] MESSAGE: Invalid record length at position 9/BC000198: expected at least 26, got 0
[ 25550 ] MESSAGE: The DB system is ready to accept read-only connections
[ 25554 ] MESSAGE: Starting log transfer from master server, at position 9/BC 000000 on timeline 1
ready
the server is running
4) Look at the list of processes whose names contain the letter combination wal :
postgres@tantor:~$ ps -ef | grep wal
UID PID PPID CMD
postgres 2654 13810 postgres: 11/main: walwriter
70 11476 13796 postgres: walwriter
postgres 13539 13534 postgres: walwriter
postgres 25554 25550 postgres: replica1: walreceiver
postgres 25555 13534 postgres: walsender postgres [local] streaming 9/BC 000198
postgres 26488 31415 grep wal
The list contains the following processes:
walsender - sends a journal entry
walwriter - accepts what walsender sends to him
PPID= 25550 - this is the parent process ID for the process with PID= 25554 .
In this example, the postgres master process number is 13534 , walsender is 25555 .
5) Look list processes Masters :
postgres@tantor:~$ ps -o pid,command --ppid `head -n 1 /var/lib/postgresql/tantor-se-17/data/postmaster.pid`
PID COMMAND
13535 postgres: logger
13536 postgres: checkpointer
13537 postgres: background writer
13539 postgres:walwriter
13540 postgres: autovacuum launcher
13541 postgres: logical replication launcher
25555 postgres: walsender postgres [local] streaming 9/BC000198
postgres process that started them is not displayed.
6) Look list processes replicas :
postgres@tantor:~$ ps -o pid,command --ppid `head -n 1 /var/lib/postgresql/tantor-se-17-replica/data1/postmaster.pid`
PID COMMAND
25551 postgres: replica1 : checkpointer
25552 postgres: replica1 : background writer
25553 postgres: replica1 : startup recovering 0000000100000009000000BC
25554 postgres: replica1 : walreceiver
After setting the cluster_name value , the replica processes have an identifier of replica1 .
7) Let's prefix the process names for the master, connect to the master:
postgres=# \c postgres postgres /var/run/postgresql 5432
You are connected to the database "postgres" as user "postgres" through a socket in "/var/run/postgresql", port " 5432 ".
8) Complete command :
postgres=# alter system set cluster_name =' master ';
ALTER SYSTEM
9) Changing the cluster_name parameter requires restarting the instance, restart the master instance in the terminal window:
postgres@tantor:~$ sudo systemctl restart tantor-se-server-17
In the terminal window where the pg_ctl start command was executed , to start the replica, the replica instance diagnostic messages will be issued:
[25554] MESSAGE: Replication stopped by master server
[25554] DETAILS: End of log reached on timeline 1 at 9/BC000230.
[25554] IMPORTANT: Failed to send end of transfer message to master: server unexpectedly closed connection
Most likely the server stopped working due to a failure.
before or during the execution of a request.
COPY operation not performed
[25553] MESSAGE: Invalid record length at position 9/BC000230: expected at least 26, got 0
[ 5727 ] IMPORTANT: Failed to connect to master server: Connecting to server on socket "/var/run/postgresql/.s.PGSQL.5432" failed: The server unexpectedly closed the connection
Most likely the server stopped working due to a failure.
before or during the execution of a request.
[25553] MESSAGE : waiting for WAL to become available at 9/BC00024A
[ 5782 ] MESSAGE: Starting log transfer from master server, at position 9/BC000000 on timeline 1
[25551] MESSAGE: Restart point started: time
[25551] MESSAGE: restartpoint complete: buffers written: 1 (0.0%); WAL files added: 0, deleted: 0, recycled: 0; write=0.002 sec, sync=0.001 sec, total=0.010 sec; files_synced=0, longest_sync=0.000 sec, avg=0.000 sec; distance=0 kB, expected=0 kB; lsn=9/BC000198, lsn redo=9/BC000198
[25551] MESSAGE: Restore restart point at position 9/BC000198
10) Look list processes replicas :
postgres@tantor:~$ ps -o pid,command --ppid `head -n 1 /var/lib/postgresql/tantor-se-17-replica/data1/postmaster.pid`
PID COMMAND
5782 postgres: replica1: walreceiver streaming 9/BC0003A0
25551 postgres: replica1: checkpoint
25552 postgres: replica1: background writer
25553 postgres: replica1: startup recovering 0000000100000009000000BC
Previous process walreceiver 25554 was stopped And unloaded from memory . The process walreceiver was started 5725 , but it could not connect because the master instance refused the connection. The walreceiver process was started 5782 , which has successfully connected to the master and is receiving log data.
11) Look. list processes masters :
postgres@tantor:~$ ps -o pid,command --ppid `head -n 1 /var/lib/postgresql/tantor-se-17/data/postmaster.pid`
PID COMMAND
5743 postgres: master : logger
5751 postgres: master : checkpoint
5752 postgres: master : background writer
5755 postgres: master : walwriter
5756 postgres: master : autovacuum launcher
5757 postgres: master : logical replication launcher
5783 postgres: master : walsender postgres [local] streaming 9/BC000278
Now after the name of the master processes the value of the cluster_name parameter is specified .
Part 4. Creating a second replica
1) Create a slot for the second replica on the master:
postgres=# select pg_copy_physical_replication_slot('replica1','replica2');
pg_copy_physical_replication_slot
-----------------------------------
(replica2,)
(1 line)
2) Look at the list of slots:
postgres=# select slot_name, active, restart_lsn, wal_status from pg_replication_slots;
slot_name | active | restart_lsn | wal_status
------------+--------+--------------+--------------
pgstandby1 | f | 0/19187E70 | lost
replica1 | t | 9/BC000 3A0 | reserved
replica2 | f | 9/BC000 3A0 | reserved
(3 lines )
The second slot will hold the log files, starting with the file that contains the log entry with the address restart_lsn .
The list may contain a slot pgstandby1 . This is the slot of the replica that was originally in the virtual machine. This replica and slot can be deleted if no longer needed.
3) Generate journal entries on the master. Perform a checkpoint:
postgres=# checkpoint ;
CHECKPOINT
to the master cluster message log in the PGDATA/log directory :
[5751] LOG: checkpoint starting: immediate force wait
[5751] LOG: checkpoint complete: wrote 0 buffers (0.0%); 0 WAL file(s) added, 0 removed, 0 recycled; write=0.001 s, sync=0.001 s, total=0.009 s; sync files=0, longest=0.000 s, average=0.000 s; distance=0 kB, estimate=0 kB; lsn=9/BC0003E8, redo lsn=9/BC000 3A0
4) Let's see how restart_lsn has changed . Run a query to the list of slots:
postgres=# select slot_name, active, restart_lsn, wal_status from pg_replication_slots;
slot_name | active | restart_lsn | wal_status
-----------+--------+--------------+------------
pgstandby1 | f | 0/19187E70 | lost
replica1 | t | 9/BC0004C8 | reserved
replica2 | f | 9/BC000 3A0 | reserved
(3 lines )
The first replica received the generated log entry and the value shifted. For the second slot, the value did not change.
5) Let's create a second replica. In order not to overload the master, let's make a backup by copying files from the replica ("backup offloading").
postgres@tantor:~$ pg_basebackup -p 5433 -D /var/lib/postgresql/tantor-se-17-replica/data2 -P -R
466575/466575 KB (100%), tablespace 1/1
In case of an error, you can delete the backup:
rm -rf /var/lib/postgresql/tantor-se-17-replica/data 2
6) Add parameter port=543 4 And logging_collector = off for the second replica. You can edit the file with a text editor, you can add the parameter to the end of the file. The last meaning prevails .
postgres@tantor:~$ echo "port=543 4 " > > /var/lib/postgresql/tantor-se-17-replica/data 2 /postgresql.auto.conf
postgres@tantor:~$ echo "logging_collector = off" >> /var/lib/postgresql/tantor-se-17-replica/data2/postgresql.auto.conf
7) Посмотрите содержимое файла postgresql.auto.conf новой реплики:
postgres@tantor:~/tantor-se-17-replica/data2$ cat /var/lib/postgresql/tantor-se-17-replica/data2/postgresql.auto.conf
# Do not edit this file manually!
# It will be overwritten by the ALTER SYSTEM command.
# Do not edit this file manually!
# It will be overwritten by the ALTER SYSTEM command.
listen_addresses = '*'
max_slot_wal_keep_size = '128MB'
max_wal_size = '128MB'
min_wal_size = '512MB'
idle_in_transaction_session_timeout = '100min'
primary_conninfo = 'user=postgres passfile=''/var/lib/postgresql/.pgpass'' channel_binding=prefer port=5432 sslmode=prefer sslcompression=0 sslcertmode=allow sslsni=1 ssl_min_protocol_version=TLSv1.2 gssencmode=prefer krbsrvname=postgres gssdelegation=0 compression=off target_session_attrs=any load_balance_hosts=disable'
primary_slot_name = 'replica1'
port = '5433'
logging_collector = 'off'
cluster_name = 'replica1'
primary_conninfo = 'user=postgres passfile=''/var/lib/postgresql/.pgpass'' channel_binding=prefer port=5433 sslmode=prefer sslcompression=0 sslcertmode=allow sslsni=1 ssl_min_protocol_version=TLSv1.2 gssencmode=prefer krbsrvname=postgres gssdelegation=0 compression=off target_session_attrs=any load_balance_hosts=disable'
port=5434
logging_collector = off
pg_basebackup reserved by connecting To first replica And put her port 5433 in parameter primary_conninfo . This value enables cascading of log data transmission.
8) Edit the file /var/lib/postgresql/tantor-se-17-replica/data2/postgresql.auto.conf , setting the port to 543 2 : let the second replica connect to the master directly, slot and cluster name to replica 2 .
Example of file contents after editing:
postgres@tantor:~$ cat /var/lib/postgresql/tantor-se-17-replica/data2/postgresql.auto.conf
# Do not edit this file manually!
# It will be overwritten by the ALTER SYSTEM command.
listen_addresses = '*'
max_slot_wal_keep_size = '128MB'
max_wal_size = '128MB'
min_wal_size = '512MB'
idle_in_transaction_session_timeout = '100min'
primary_conninfo = 'user=postgres port=5432'
primary_slot_name = 'replica2'
cluster_name = 'replica2'
port=5434
logging_collector = off
9) Запустите вторую реплику:
postgres@tantor:~$ pg_ctl start -D /var/lib/postgresql/tantor-se-17-replica/data2
expectation launch servers ....
[5728] MESSAGE : Starting PostgreSQL 17.5 on x86_64-pc-linux-gnu, compiled by gcc (Astra 12.2.0-14.astra3) 12.2.0, 64-bit
[5728] MESSAGE: Port 5434 is open to accept connections on IPv4 address "0.0.0.0"
[5728] MESSAGE: Port 5434 is open to accept connections on IPv6 address "::"
[5728] MESSAGE: Unix socket "/var/run/postgresql/.s.PGSQL.5434" is open to accept connections
[5731] MESSAGE: The DB system was shut down during recovery:
[5731] MESSAGE: Switching to standby server mode
[5731] MESSAGE: REDO entry starts at offset 9/BC0003A0
[5731] MESSAGE: Consistent recovery state reached at position 9/BC0004C8
[5728] MESSAGE: The DB system is ready to accept read-only connections
[5731] MESSAGE: Invalid record length at position 9/BC000 4C8 : expected min 26, got 0
[5732] MESSAGE: Starting log transfer from master server, at position 9/BC000000 on timeline 1
ready
the server is running
10) Check the slot status:
postgres=# select slot_name, active, restart_lsn, wal_status from pg_replication_slots;
slot_name | active | restart_lsn | wal_status
------------+--------+--------------+--------------
pgstandby1 | f | 0/19187E70 | lost
replica1 | t | 9/BC000 4C8 | reserved
replica2 | t | 9/BC000 4C8 | reserved
(3 lines )
The slots are active. You now have a master and two replicas that are receiving log records via the replication protocol (streaming). restart_lsn is progressing on both slots.
11) Generate log entries. Perform a checkpoint:
postgres=# checkpoint;
CHECKPOINT
12) Repeat request to pg_replication_slots :
postgres=# select slot_name, active, restart_lsn, wal_status from pg_replication_slots;
slot_name | active | restart_lsn | wal_status
------------+--------+--------------+--------------
pgstandby1 | f | 0/19187E70 | lost
replica1 | t | 9/BC000 5F0 | reserved
replica2 | t | 9/BC000 5F0 | reserved
(3 lines )
Replica instance messages:
[5729] MESSAGE: Restart point started: time
[5729] MESSAGE: Restartpoint complete: 1 buffers written (0.0%); 0 WAL files added, 0 removed, 0 recycled; write=0.002 sec, sync=0.001 sec, total=0.008 sec; files synced=0, longest_sync=0.000 sec, avg=0.000 sec; distance=0 kB, expected=0 kB; lsn=9/BC000510, lsn redo=9/BC000 4C8
[5729] MESSAGE: Restore Restart Point at Position 9/BC000 4C8
[25551] MESSAGE: Restart point started: time
[25551] MESSAGE: restartpoint complete: 0 buffers written (0.0%); 0 WAL files added, 0 removed, 0 recycled; write=0.001 sec, sync=0.001 sec, total=0.006 sec; files_synced=0, longest_sync=0.000 sec, avg=0.000 sec; distance=0 kB, expected=0 kB; lsn=9/BC000510, lsn redo=9/BC000 4C8
[25551] MESSAGE: Restore restart point at position 9/BC000 4C8
The restart point is a reflection of the master checkpoint.
Part 5. Choosing a replica for the role of the master
We simulate a failure to receive log records from one of the replicas, for example, the second one . For example, we will make writing to the log file unavailable and restart the instance. The restart is necessary so that an error occurs when opening the file:
1) postgres @ tantor :~$ chmod - w / var / lib / postgresql / tantor - se -17- replica / data 2 / pg _ wal /000*
postgres@tantor:~$ pg_ctl restart -D /var/lib/postgresql/tantor-se-17-replica/data 2
12:19:48.996 MSK [5728] MESSAGE: Fast shutdown request received
Waiting for server to complete...
12:19:48.998 MSK [5728] MESSAGE: Aborting all active transactions
12:19:48.998 MSK [5732] IMPORTANT: terminating log reading process on administrator command
12:19:49.004 MSK [5729] MESSAGE: shutdown
12:19:49.017 MSK [5728] MESSAGE: DB system is offline
ready
server stopped
Waiting for server to start...
12:19:49.142 MSK [24184] MESSAGE : starting PostgreSQL 17.5 on x86_64-pc-linux-gnu, compiled by gcc (Astra 12.2.0-14.astra3) 12.2.0, 64-bit
12:19:49.142 MSK [24184] MESSAGE: Port 5434 is open to accept connections on IPv4 address "0.0.0.0"
12:19:49.142 MSK [24184] MESSAGE: Port 5434 is open to accept connections on IPv6 address "::"
12:19:49.144 MSK [24184] MESSAGE: Unix socket "/var/run/postgresql/.s.PGSQL.5434" is open to accept connections
12:19:49.149 MSK [24187] MESSAGE: The DB system was shut down during recovery: 12:19:48 MSK
12:19:49.149 MSK [24187] MESSAGE: Switching to standby server mode
12:19:49.152 MSK[24187] MESSAGE: REDO entry starts at offset 9/BC0004C8
12:19:49.152 MSK[24187] MESSAGE: Consistent recovery state reached at position 9/BC0005F0
12:19:49.152 MSK[24187] MESSAGE: invalid record length at position 9/BC0005F0: expected at least 26, got 0
12:19:49.152 MSK [24184] MESSAGE: DB system is ready to accept read-only connections
12:19:49.160 MSK[24188] MESSAGE: Starting log transfer from master, at position 9/BC000000 on timeline 1
12:19:49.160 MSK [24188] IMPORTANT: Could not open file "pg_wal/0000000100000009000000BC": Access denied
12:19:49.167 MSK[24190] MESSAGE: Starting log transfer from master, at position 9/BC000000 on timeline 1
12:19:49.168 MSK [24190] IMPORTANT: Could not open file "pg_wal/0000000100000009000000BC": Access denied
12:19: 49 .168 MSK [24187] MESSAGE : waiting for WAL to become available at 9/BC00060A
ready
the server is running
Errors will be written to the cluster log every 5 seconds. (value of the wal_retrieve_retry_interval parameter ):
12:19: 54.173 MSK[24232] MESSAGE: Starting log transfer from master, at position 9/BC000000 on timeline 1
12:19:54.174 MSK [24232] IMPORTANT: Could not open file "pg_wal/0000000100000009000000BC": Access denied
12:19:54.174 MSK [24187] MESSAGE : waiting for WAL to become available at 9/BC00060A
walreceiver retry interval from 5 seconds to 30 seconds. In the psql terminal window, connect to the second replica :
postgres=# \c postgres postgres /var/run/postgresql 543 4
You are connected to the database "postgres" as user "postgres" through a socket in "/var/run/postgresql", port "543 4 ".
postgres=# alter system set wal_retrieve_retry_interval='30s';
ALTER SYSTEM
postgres=# select pg_reload_conf();
pg_reload_conf
----------------
t
(1 line )
Errors in the second replica will be issued less frequently, once every 30 seconds.
3) Force the master to create log entries. Connect to the master and perform a checkpoint:
postgres=# \c postgres postgres /var/run/postgresql 543 2
You are connected to the database "postgres" as user "postgres" through a socket in "/var/run/postgresql", port "543 2 ".
postgres=# checkpoint;
CHECKPOINT
postgres=# select slot_name, active, restart_lsn, wal_status from pg_replication_slots;
slot_name | active | restart_lsn | wal_status
-----------+--------+--------------+------------
pgstandby1 | f | 0/19187E70 | lost
replica1 | t | 9/BC000 6D0 | reserved
replica2 | f | 9/BC000 5F0 | reserved
(3 lines )
The status of the second replica is inactive and restart_lsn has become different.
4) Simulate a master failure. Stop the master:
postgres@tantor:~$ pg_ctl stop -D /var/lib/postgresql/tantor-se-17/data
Waiting for server to complete...
12:40:35.444 MSK [5782] MESSAGE: replication stopped by master
12:40:35.444 MSK [5782] DETAILS: End of log reached on timeline 1 at 9/BC0007B0.
12:40:35.444 MSK [5782] IMPORTANT: Failed to send end of transfer message to master: server unexpectedly closed connection
Most likely the server stopped working due to a failure before or during the request.
COPY operation not performed
12:40:35.444 MSK[25553] MESSAGE: invalid record length at position 9/BC0007B0: expected at least 26, got 0
12:40:35.453 MSK [753] IMPORTANT: Failed to connect to master server: Connecting to server via socket "/var/run/postgresql/.s.PGSQL.5432" failed: The server unexpectedly closed the connection
Most likely the server stopped working due to a failure before or during the request.
12:40:35.453 MSK [25553] MESSAGE : waiting for WAL to become available at 9/BC0007CA
ready
server stopped
5) Let's fix the problem on the second replica. Restore permissions to the log file:
postgres@tantor:~$ chmod +w /var/lib/postgresql/tantor-se-17-replica/data2/pg_wal/000*
6) Having two replicas in case of master failure, you need to choose the replica that is better to make the master.
Look at the journal entries on the first replica:
postgres@tantor:~$ \c postgres postgres /var/run/postgresql 543 3
You are connected to the database "postgres" as user "postgres" through a socket in "/var/run/postgresql", port "543 3 ".
postgres=# select pg_last_wal_replay_lsn();
pg_last_wal_replay_lsn
------------------------
9/BC000 7B0
(1 line )
postgres=# select pg_last_wal_receive_lsn();
pg_last_wal_receive_lsn
-------------------------
9/BC000 7B0
(1 line)
7) Look at what journal entries are on the second replica:
postgres@tantor:~$ \c postgres postgres /var/run/postgresql 543 4
You are connected to the database "postgres" as user "postgres" through a socket in "/var/run/postgresql", port "543 4 ".
postgres=# select pg_last_wal_replay_lsn();
pg_last_wal_replay_lsn
------------------------
9/BC000 5F0
(1 line )
postgres=# select pg_last_wal_receive_lsn();
pg_last_wal_receive_lsn
-------------------------
9/BC000 000
(1 line)
8) When working actively, it is difficult to calculate which LSN value is greater.
Calculate by substituting the values taken from the replica:
postgres=# select '9/BC000 5F0 '::pg_lsn - '9/BC000 7B0 '::pg_lsn;
?column?
----------
- 448
(1 line)
The first replica has more values, which means it contains the latest changes.
We did not enable the transaction commit mode with confirmation of at least one of the replicas. In real operation, in this case there is no guarantee that at least one replica has received the latest log records. In the case of promotion of any of the replicas, some transactions may be lost, which is unacceptable.
If synchronous commit with confirmation was not enabled, it is worth looking for log files on the master or, if they are damaged, in the streaming log archive (filled by the pg_receivewal utility ), if it was configured. When using files from the archive, you will need to copy the current log file. It is easy to identify by the .partial suffix in the name. When copying to the directory of the replica, which is planned to be the master (so that the replica rolls the file), you need to remove the suffix.
9) Consider the case when the master's PGDATA/pg_wal was found. This directory contains the latest log records saved by the master. Copy all files to the PGDATA/pg_wal directory of the second replica (it has not received the latest log records from the master):
postgres@tantor:~$ cp /var/lib/postgresql/tantor-se-17/data/pg_wal/* /var/lib/postgresql/tantor-se-17-replica/data2/pg_wal
cp: no -r specified ; skipped directory '/var/lib/postgresql/tantor-se-17/data/pg_wal/archive_status'
Why do we copy all the files? Because the master keeps log files to be able to recover from an instance failure, and holds files for the replicas.
To avoid wasting time on studying which files the replica is missing, you can copy all the log files. Those that are not needed by the replica will not be reused.
10) Let's see which log records have been applied (by the startup process , which reads the pg_wal directory with logs and applies files from it) and received (by the walreceiver process , which receives log records and writes to log files in the pg_wal directory ) on the second replica:
postgres=# select pg_last_wal_replay_lsn();
pg_last_wal_replay_lsn
------------------------
9/BC000 7B0
(1 line )
postgres=# select pg_last_wal_receive_lsn();
pg_last_wal_receive_lsn
-------------------------
9/BC000 000
(1 line)
in walreceiver , the master is stopped and the process could not receive anything.
Now both replicas have rolled all the log records and contain all the data. There will be no transaction loss when promoting any of the replicas .
The first replica managed to get all the records because we correctly stopped the master while the first replica was connected to it. We copied all the master log files to the second replica.
Part 6. Preparing to switch to a replica
Let's configure the configuration parameters of the former master.
The slot name in the primary_slot_name parameter can be set in advance. After switching to a replica, the slots will disappear - they will not be on the new master.
Connection parameters primary_conninfo can also be set in advance. We will specify the port value for the first replica 543 3 , we will make it the master.
Most of the parameters that relate to replica properties have no effect while the cluster is in the master role, so the values of such parameters can be set in advance.
1) Look at the contents of the former master's parameter file:
postgres@tantor:~$ cat /var/lib/postgresql/tantor-se-17/data/postgresql.auto.conf
# Do not edit this file manually!
# It will be overwritten by the ALTER SYSTEM command.
listen_addresses = '*'
max_slot_wal_keep_size = '128MB'
max_wal_size = '128MB'
min_wal_size = '512MB'
idle_in_transaction_session_timeout = '100min'
cluster_name = ' master '
2) Set the parameters of the network connection from which the former master will collect log data:
postgres@tantor:~$ echo "primary_conninfo = 'user=postgres port=543 3 '" >> /var/lib/postgresql/tantor-se-17/data/postgresql.auto.conf
3) Let's set the name of the slot it will use:
postgres@tantor:~$ echo "primary_slot_name = ' master '" >> /var/lib/postgresql/tantor-se-17/data/postgresql.auto.conf
4) To display diagnostic messages on the terminal screen:
echo "logging_collector = off" > > /var/lib/postgresql/tantor-se-17/data/postgresql.auto.conf
5 ) Check that lines added :
postgres@tantor:~$ cat /var/lib/postgresql/tantor-se-17/data/postgresql.auto.conf
# Do not edit this file manually!
# It will be overwritten by the ALTER SYSTEM command.
listen_addresses = '*'
max_slot_wal_keep_size = '128MB'
max_wal_size = '128MB'
min_wal_size = '512MB'
idle_in_transaction_session_timeout = '100min'
cluster_name = 'master'
primary_conninfo = 'user=postgres port=5433'
primary_slot_name = 'master'
logging_collector = off
6) Uninitialized replication slots can be created in advance in case the cluster becomes a master on all candidate replicas.
Create a slot on the second replica:
postgres@tantor:~$ psql -p 543 4
psql (17.5)
Type "help" to get help.
postgres=# select pg_is_in_recovery();
pg_is_in_recovery
-------------------
t
(1 row)
postgres=# select pg_create_physical_replication_slot(' master ');
pg_create_physical_replication_slot
-------------------------------------
( master ,)
(1 row)
7) Let's create a slot for the first replica in advance. Do this command :
postgres=# select pg_create_physical_replication_slot('replica 1 ');
pg_create_physical_replication_slot
-------------------------------------
(replica 1 ,)
(1 row)
8) Check the slot parameters:
postgres=# select * from pg_replication_slots \gx
-[ RECORD 1 ]-------+----------
slot_name | master
plugin |
slot_type | physical
datoid |
database |
temporary | f
active | f
active_pid |
xmin |
catalog_xmin |
restart_lsn |
confirmed_flush_lsn |
wal_status |
safe_wal_size | 150994944
two_phase | f
conflicting |
-[ RECORD 2 ]-------+----------
slot_name | replica1
plugin |
slot_type | physical
datoid |
database |
temporary | f
active | f
active_pid |
xmin |
catalog_xmin |
restart_lsn |
confirmed_flush_lsn |
wal_status |
safe_wal_size | 150994944
two_phase | f
conflicting |
on the future master replica1 (port 5433), for practice purposes (point 11 of this part of the practice).
It makes sense to create slots in advance, this will reduce the number of commands executed when switching to a replica.
The value safe_wal_size=144MB=128MB+16MB determines how many bytes can be written to the log so that this slot does not end up in the state lost . Determined by the value of the parameter max_slot_wal_keep_size=128MB plus wal_segment_size=16MB .
9) Since the former master is stopped, you can create a standby.signal file so that when the instance starts, it does not open the former master in write mode. Create a standby.signal file in the former master directory:
postgres @ tantor :~$ touch / var / lib / postgresql / tantor - se -17/ data / standby . signal
After creating the standby.signal file , you can start the former master and then promote one of the replicas. Or in the opposite order: promote one of the replicas and then start the former master. There will be no difference if the former master was stopped and the new master received and applied all the log records (no transaction losses).
10) Launch former master :
postgres@tantor:~$ pg_ctl start -D /var/lib/postgresql/tantor-se-17/data
expectation launch servers ....
MESSAGE : Starting PostgreSQL 17.5 on x86_64-pc-linux-gnu, compiled by gcc (Astra 12.2.0-14.astra3) 12.2.0, 64-bit
[7824] MESSAGE: Port 5432 is open to accept connections on IPv4 address "0.0.0.0"
[7824] MESSAGE: Port 5432 is open to accept connections on IPv6 address "::"
[7824] MESSAGE: Unix socket "/var/run/postgresql/.s.PGSQL.5432" is open to accept connections
[7827] MESSAGE: DB system was shut down: 12:40:35 MSK
[7827] MESSAGE: Switching to standby server mode
[7827] MESSAGE: Consistent recovery state reached at position 9/BC000 7B0
[7827] MESSAGE: Invalid record length at position 9/BC000 7B0 : expected at least 26, got 0
[7824] MESSAGE: The DB system is ready to accept read-only connections
[7828] MESSAGE: Starting log transfer from master server, at position 9/BC000000 on timeline 1
[7828] ERROR: replication slot "master" does not exist
[7828] STATEMENT: START_REPLICATION SLOT "master" 9/BC000000 TIMELINE 1
[7828] IMPORTANT: Failed to start WAL broadcast: ERROR: replication slot "master" does not exist
[7828] MESSAGE : waiting for WAL to become available at 9/BC000 7CA
ready
the server is running
The former master instance has started and successfully entered the replication startup standby mode. The errors indicate that the slot named master does not exist. We did not create it in advance (in point 8 of this part of the practice) in order to get this error and fix it - create the slot after the former master has started.
11) Connect to the first replica replica1 (port 543 3 ) and create replication slots:
postgres=# \c postgres postgres /var/run/postgresql 543 3
You are connected to the database "postgres" as user "postgres" through a socket in "/var/run/postgresql", port " 543 3 ".
postgres=# select pg_create_physical_replication_slot('master');
pg_create_physical_replication_slot
-------------------------------------
(master,)
(1 row)
postgres=# select pg_create_physical_replication_slot(' replica 2 ');
pg_create_physical_replication_slot
-------------------------------------
(replica 2 ,)
(1 row)
The former master will automatically use the created slot.
master instance messages will show:
MESSAGE : waiting for WAL to become available at 9/BC000 7CA
MESSAGE: Starting log transfer from master server, at position 9/BC000000 on timeline 1
12) Check the status of replication slots on replica1 (port 543 3 ):
postgres=# select slot_name, active, restart_lsn, wal_status from pg_replication_slots;
slot_name | active | restart_lsn | wal_status
-----------+--------+-------------+------------
master | t | 9/BC000 7B0 | reserved
replica2 | f | |
(2 lines)
13) Check the replication slot statistics on the former master :
postgres=# \c postgres postgres /var/run/postgresql 5432
You are connected to the database "postgres" as user "postgres" through a socket in "/var/run/postgresql", port "5432".
postgres=# select slot_name, active, restart_lsn, wal_status from pg_replication_slots;
slot_name | active | restart_lsn | wal_status
------------+--------+--------------+--------------
pgstandby1 | f | 0/19187E70 | lost
replica1 | t | 9/BC0007B0 | reserved
replica2 | t | 9/BC0007B0 | reserved
(3 lines )
postgres=# select * from pg_stat_replication \gx
-[ RECORD 1 ]----+------------------------------
pid | 18624
usesysid | 10
usename | postgres
application_name | replica1
client_addr |
client_hostname |
client_port | -1
backend_start | 16:07:37.4+03
backend_xmin |
state | streaming
sent_lsn | 9/BC0007B0
write_lsn | 9/BC0007B0
flush_lsn | 9/BC0007B0
replay_lsn | 9/BC0007B0
write_lag |
flush_lag |
replay_lag |
sync_priority | 0
sync_state | async
reply_time | 16:31:37.866881+03
-[ RECORD 2 ]----+------------------------------
pid | 18693
usesysid | 10
usename | postgres
application_name | replica2
client_addr |
client_hostname |
client_port | -1
backend_start | 16:07:52.385223+03
backend_xmin |
state | streaming
sent_lsn | 9/BC0007B0
write_lsn | 9/BC0007B0
flush_lsn | 9/BC0007B0
replay_lsn | 9/BC0007B0
write_lag |
flush_lag |
replay_lag |
sync_priority | 0
sync_state | async
reply_time | 16:31:32.847758+03
It turns out that the future master replica1 and replica2 are connected to the previous master. The reply_time is current. We have not yet promoted any of the clusters to the master - all three clusters are physical replicas.
Therefore, the following messages are periodically displayed in the terminal window:
OPERATOR : SELECT slot_name, database, slot_type, xmin::text::int8, active, pg_wal_lsn_diff(pg_current_wal_insert_lsn(), restart_lsn) AS retained_bytes FROM pg_replication_slots LIMIT 50 OFFSET 0;
ERROR: recovery process in progress
TIP: WAL management functions cannot be used during recovery.
14) Check the replication slot statistics on replica1, to which the former master is connected :
postgres=# \c postgres postgres /var/run/postgresql 543 3
You are connected to the database "postgres" as user "postgres" through a socket in "/var/run/postgresql", port "543 3 ".
postgres=# select * from pg_stat_replication \gx
-[ RECORD 1 ]----+------------------------------
pid | 20280
usesysid | 10
usename | postgres
application_name | master
client_addr |
client_hostname |
client_port | -1
backend_start | 16:11:07.446672+03
backend_xmin |
state | streaming
sent_lsn | 9/BC0007B0
write_lsn | 9/BC0007B0
flush_lsn | 9/BC0007B0
replay_lsn | 9/BC0007B0
write_lag |
flush_lag |
replay_lag |
sync_priority | 0
sync_state | async
reply_time | 16:39:18.004533+03
Time reply_time is current.
15) View the instance process lists:
postgres@tantor:~$ ps -o pid,command --ppid `head -n 1 /var/lib/postgresql/tantor-se-17/data/postmaster.pid`
PID COMMAND
18615 postgres: master: checkpointer
18616 postgres: master: background writer
18617 postgres: master: startup recovering 0000000100000009000000BC
18624 postgres: master: walsender postgres [local] streaming 9/BC0007B0
18693 postgres: master: walsender postgres [local] streaming 9/BC0007B0
20279 postgres: master: walreceiver
postgres@tantor:~$ ps -o pid,command --ppid `head -n 1 /var/lib/postgresql/tantor-se-17-replica/data1/postmaster.pid`
PID COMMAND
18622 postgres: replica1: walreceiver
20280 postgres: replica1: walsender postgres [local] streaming 9/BC0007B0
25551 postgres: replica1: checkpointer
25552 postgres: replica1: background writer
25553 postgres: replica1: startup recovering 0000000100000009000000BC
postgres@tantor:~$ ps -o pid,command --ppid `head -n 1 /var/lib/postgresql/tantor-se-17-replica/data2/postmaster.pid`
PID COMMAND
18692 postgres: replica2: walreceiver
24185 postgres: replica2: checkpointer
24186 postgres: replica2: background writer
24187 postgres: replica2: startup recovering 0000000100000009000000BC
Current condition : replica1 takes away magazines With master . master takes away magazines With replica1 . replica2 takes away logs from master . All clusters in recovery mode (physical replicas).
Part 7. Switching to a replica
How to make a replica a master? You can promote replica1 to master with the command:
a) pg_ctl promote -D /var/lib/postgresql/tantor-se-17-replica/data 1
b ) having caused function psql -p 5433 -c "select pg_promote();"
You can choose any method.
1) Promote replica1 to master:
postgres@tantor:~$ psql -p 5433 -c "select pg_promote();"
pg_promote
------------
t
(1 row)
Messages in cluster logs:
[25553] MESSAGE: Status upgrade request received
[18622] IMPORTANT: Terminating log reading process on administrator command
[25553] MESSAGE: REDO records processed up to offset 9/BC000718, system load: CPU: User: 0.94s, System: 1.13s, Elapsed: 104038.32s
[25553] MESSAGE: Selected new timeline ID: 2
[25553] MESSAGE: Archive restore complete
[25551] MESSAGE: Checkpoint started: force
[20279] MESSAGE: Replication stopped by master server
[20279] DETAILS: Timeline 1 at 9/BC0007B0 reached end of log.
[20279] MESSAGE: Downloading history file for timeline 2 from main server
[20279] IMPORTANT: Terminating log reading process on admin command
[18617] MESSAGE: New Timeline Target 2
[25550] MESSAGE: The DB system is ready to accept connections
[25551] MESSAGE: checkpoint complete: buffers written: 2 (0.0%); WAL files added: 0, deleted: 0, recycled: 0; write=0.002 sec, sync=0.001 sec, total=0.014 sec; files_synced=2, longest_sync=0.001 sec, avg=0.001 sec; distance=0 kB, expected=0 kB; lsn=9/BC000828, lsn redo=9/BC0007E0
[4727] MESSAGE: Starting log transfer from master server, at position 9/BC000000 on timeline 2
[18617] MESSAGE: REDO entry starts at offset 9/BC0007B0
[18692] MESSAGE: Replication stopped by master server
[18692] DETAILS: Timeline 1 at 9/BC0007B0 reached end of log.
[18692] MESSAGE: Downloading history file for timeline 2 from main server
[18692] IMPORTANT: Terminating log reading process on admin command
[24187] MESSAGE: New Timeline Target 2
[4730] MESSAGE: Starting log transfer from master server, at position 9/BC000000 on timeline 2
2) View the status of replication slots:
postgres@tantor:~$ psql -p 5433
postgres=# select slot_name, active, restart_lsn, wal_status from pg_replication_slots;
slot_name | active | restart_lsn | wal_status
-----------+--------+--------------+------------
master | t | 9/BC000908 | reserved
replica2 | f | |
(2 строки)
postgres=# select * from pg_stat_replication \gx
-[ RECORD 1 ]----+------------------------------
pid | 4729
usesysid | 10
usename | postgres
application_name | master
client_addr |
client_hostname |
client_port | -1
backend_start | 19:31:35.37509+03
backend_xmin |
state | streaming
sent_lsn | 9/BC000908
write_lsn | 9/BC000908
flush_lsn | 9/BC000908
replay_lsn | 9/BC000908
write_lag |
flush_lag |
replay_lag |
sync_priority | 0
sync_state | async
reply_time | 19:40:25.699932+03
postgres=# \c postgres postgres /var/run/postgresql 543 2
You are connected to the database "postgres" as user "postgres" through a socket in "/var/run/postgresql", port "543 2 ".
postgres=# select slot_name, active, restart_lsn, wal_status from pg_replication_slots;
slot_name | active | restart_lsn | wal_status
-----------+--------+--------------+------------
pgstandby1 | f | 0/19187E70 | lost
replica1 | f | 9/BC0007B0 | reserved
replica2 | t | 9/BC000 908 | reserved
(3 строки)
postgres=# select * from pg_stat_replication \gx
-[ RECORD 1 ]----+------------------------------
pid | 4731
usesysid | 10
usename | postgres
application_name | replica2
client_addr |
client_hostname |
client_port | -1
backend_start | 19:31:35.411578+03
backend_xmin |
state | streaming
sent_lsn | 9/BC000908
write_lsn | 9/BC000908
flush_lsn | 9/BC000908
replay_lsn | 9/BC000908
write_lag |
flush_lag |
replay_lag |
sync_priority | 0
sync_state | async
reply_time | 19:45:05.821085+03
The new master replica1 pushes redo log data to the physical replica master . The physical replica master pushes redo log data to the physical replica replica1 .
The former master's slot list includes a slot named replica1 that was initialized while it was the master. The slot names are independent of the cluster names. The clusters are indistinguishable from each other, and the former master cannot tell that the replica1 slot was used by the new master. This slot will cause the master to hold log files for a replication client that is unlikely to connect since it is now the master.
What's good: using cascading, you can store log files not on the master, but on replicas from which other replicas pick up log records.
3) When replica1 was promoted to master, the timeline increased by one . This is reflected in the control files and log file names. Also, text files 0000000 2 .history were created in the PGDATA/pg_wal directories of the clusters, and their names contain the timeline number .
Take a look content file stories :
postgres@tantor:~$ cat /var/lib/postgresql/tantor-se-17-replica/data1/pg_wal/*.history
1 9/BC000 7B0 no recovery target specified
4) Look at the timeline in the master replica control file (the same for other clusters):
postgres@tantor:~$ pg_controldata | grep timeline
postgres@tantor:~$ pg_controldata | grep time
Last contact point timeline: 2
Prev. timeline last k.t.: 2
Time line min. position k.v.: 2
Date/time storage format: 64-bit integers
This file will be used in the process of restoring from backups that were created before the new timeline appeared.
5) Unused initialized replication slots should always be removed.
Otherwise, these slots will hold logs until max_slot_wal_keep_size is reached , the slot status will change to unreserved . If after a checkpoint (files are deleted after a checkpoint) the log files are not deleted due to retention by the wal_keep_size parameter , the lot status will change to extended . If they are deleted, the slot status will change to lost and the slot will become useless.
Remove slots you won't use:
postgres=# \c postgres postgres /var/run/postgresql 543 2
You are connected to the database "postgres" as user "postgres".
postgres=# select pg_drop_replication_slot('replica1');
pg_drop_replication_slot
--------------------------
(1 line )
postgres=# select pg_drop_replication_slot('pgstandby1');
pg_drop_replication_slot
--------------------------
(1 line )
6) Let's create an uninitialized replication slot in advance for the next role change:
postgres=# select pg_create_physical_replication_slot('replica1');
pg_create_physical_replication_slot
-------------------------------------
(replica1,)
(1 line)
7) Check the list of slots:
postgres=# select slot_name, active, restart_lsn, wal_status from pg_replication_slots;
slot_name | active | restart_lsn | wal_status
-----------+--------+--------------+------------
replica1 | f | |
replica2 | t | 9/BC000908 | reserved
(2 lines)
Slot replica1 is not initialized and will not hold logs.
Part 8. Enabling Feedback
1) If you plan to use replicas to serve queries, then to protect against long-running query failures on the replica, you can configure parameters that will either delay the application of log records on the replica, or notify the master that long-running queries are running on the replica and that old row versions should not be deleted.
Set hot_standby_feedback=on on the master replica :
postgres=# \c postgres postgres /var/run/postgresql 543 2
You are connected to the database "postgres" as user "postgres".
postgres=# alter system set hot_standby_feedback = on;
ALTER SYSTEM
postgres=# select pg_reload_conf();
pg_reload_conf
----------------
t
(1 line )
2) You can test the feedback by opening a transaction on the master replica :
postgres=# begin transaction isolation level repeatable read;
BEGIN
postgres= * # select count(*) from pg_class;
count
-------
423
(1 line)
The transaction started when the select started executing . The table accessed by the select can be any.
3) In the replicas themselves, you can search for processes executing commands that hold the horizon in the same way as on the master - by querying pg_stat_activity . Run on replica request :
postgres= * # SELECT backend_xmin, backend_xid, pid, datname, state FROM pg_stat_activity WHERE backend_xmin IS NOT NULL OR backend_xid IS NOT NULL ORDER BY greatest(age(backend_xmin), age(backend_xid)) DESC;
backend_xmin | backend_xid | pid | datname | state
--------------+-------------+------+----------+--------
17580 | | 4117 | postgres | active
(1 line)
4) In another terminal window, in another session to the replica1 cluster, which is the master:
postgres@tantor:~$ psql -p 543 3
postgres=# select slot_name, active, active_pid, xmin from pg_replication_slots;
slot_name | active | active_pid | xmin
-----------+--------+------------+-------
master | t | 4729 | 17580
replica2 | f | |
(2 lines )
The replica holds the horizon of all databases in the cluster (old row versions cannot be vacuumed on the master) at xid= 17580.
5) Receive number transactions :
postgres=# select pg_current_xact_id();
pg_current_xact_id
--------------------
17580
(1 line )
6) You can perform transactions, but it is enough to simply increase the transaction counter.
Get the transaction number and the transaction counter will increase:
postgres=# select pg_current_xact_id();
pg_current_xact_id
--------------------
17581
(1 line )
7) Run a query on the master that will show which server process of the master instance is holding the horizon:
postgres=# SELECT backend_xmin, backend_xid, pid, datname, state FROM pg_stat_activity WHERE backend_xmin IS NOT NULL OR backend_xid IS NOT NULL ORDER BY greatest(age(backend_xmin), age(backend_xid)) DESC;
backend_xmin | backend_xid | pid | datname | state
--------------+-------------+------+----------+--------
17582 | | 6562 | postgres | active
(1 row)
pg_stat_activity shows only processes his own instance .
8) Complete command :
postgres=# select slot_name, active, active_pid, xmin from pg_replication_slots;
slot_name | active | active_pid | xmin
-----------+--------+------------+-------
master | t | 4729 | 17580
replica2 | f | |
(2 lines )
The horizon of all master databases (the current master is replica1 ) is held at xid= 17580 .
9) Connect to the replica and view the replica process data:
postgres=# \c postgres postgres /var/run/postgresql 543 2
You are now connected to database "postgres" as user "postgres" via socket in "/var/run/postgresql" at port "5432".
postgres=# SELECT backend_xmin, backend_xid, pid, datname, state FROM pg_stat_activity WHERE backend_xmin IS NOT NULL OR backend_xid IS NOT NULL ORDER BY greatest(age(backend_xmin), age(backend_xid)) DESC;
backend_xmin | backend_xid | pid | datname | state
--------------+-------------+------+----------+---------------------
17580 | | 4117 | postgres | idle in transaction
17582 | | 7692 | postgres | active
(2 rows)
4117 - pid of the server process in which the transaction is open .
7692 - pid of the server process on master that executed this request. 17582 means that this server process is outputting up-to-date data (in accordance with the changes received from the master and applied to the replica).
7) Complete the open transaction in the window where it is open:
postgres= * # commit;
COMMIT
8) Within 10 seconds (the value of the walreceiver_status_interval parameter ) xmin on replica1 will stop being held and xmin will increase:
postgres=# select slot_name, active, active_pid, xmin from pg_replication_slots;
slot_name | active | active_pid | xmin
-----------+--------+------------+-------
master | t | 4729 | 17582
replica2 | f | |
(2 lines )
4729 - pid walsender on replica1 . This can be checked with the command:
postgres@tantor:~$ ps -ef | grep 4729
postgres 4729 25550 postgres: replica1: walsender postgres [local] streaming 9/BC0017B8
Part 9. pg_rewind utility
1) Stop replica 1 :
postgres@tantor:~$ pg_ctl stop -D /var/lib/postgresql/tantor-se-17-replica/data1
Waiting for server to complete...
[25550] MESSAGE: Fast shutdown request received
[25550] MESSAGE: Aborting all active transactions
[25550] MESSAGE: Background process "logical replication launcher" (PID 4728) exited with exit code 1
[25551] MESSAGE: Shutdown
[25551] MESSAGE: Checkpoint started: shutdown immediate
[25551] MESSAGE: checkpoint complete: 0 buffers written (0.0%); 0 WAL files added, 0 removed, 0 recycled; write=0.001 sec, sync=0.001 sec, total=0.012 sec; files_synced=0, longest_sync=0.000 sec, avg=0.000 sec; distance=0 kB, expected=0 kB; lsn=9/BC001950, lsn redo=9/BC001950
[25550] MESSAGE: DB system is off
ready
server stopped
2) Подсоединитесь к master (порт 5432) и повысьте его до мастера:
postgres@tantor:~$ psql
postgres=# select pg_promote();
LOG: replication terminated by primary server
DETAIL: End of WAL reached on timeline 2 at 9/BC001A18.
LOG: fetching timeline history file for timeline 3 from primary server
FATAL: terminating walreceiver process due to administrator command
LOG: new target timeline is 3
MESSAGE: Invalid record length at position 9/BC001B40: expected minimum 26, got 0
MESSAGE: Starting log transfer from master server, at position 9/BC000000 on timeline 3
pg_promote
------------
t
(1 line)
3) Now master is the master, replica2 is connected to it, which has not stopped and is receiving log data.
replica1 correctly before promoting the new master. Can we start replica1 or is there something else we need to do?
For demonstration purposes, let's start and stop replica1 . This is equivalent to forgetting to stop replica1 before promoting master, or to the same as if the replica1 instance had stopped incorrectly and failed to push the latest log. record on master .
postgres@tantor:~$ pg_ctl start -D /var/lib/postgresql/tantor-se-17-replica/data1
expectation launch servers ....
MESSAGE : Starting PostgreSQL 17.5 on x86_64-pc-linux-gnu, compiled by gcc (Astra 12.2.0-14.astra3) 12.2.0, 64-bit
MESSAGE: Port 5433 is open to accept connections on IPv4 address "0.0.0.0"
MESSAGE: Port 5433 is open to accept connections on IPv6 address "::"
MESSAGE: Unix socket "/var/run/postgresql/.s.PGSQL.5433" is open to accept connections
MESSAGE: The DB system was turned off:
MESSAGE: The DB system is ready to accept connections
ready
the server is running
4) Stop replica1 :
postgres@tantor:~$ pg_ctl stop -D /var/lib/postgresql/tantor-se-17-replica/data1
Waiting for server to complete...
MESSAGE: Fast shutdown request received
MESSAGE: Aborting all active transactions
MESSAGE: Background process "logical replication launcher" (PID 27234) exited with exit code 1
MESSAGE: Shutdown
MESSAGE: Checkpoint started: shutdown immediate
MESSAGE: checkpoint completed : buffers written: 3 (0.0%); WAL files added: 0, deleted: 0, recycled: 0; write=0.001 sec, sync=0.001 sec, total=0.004 sec; files_synced=2, longest_sync=0.001 sec, avg=0.001 sec; distance=0 kB, expected=0 kB; lsn=9/BC001A30, lsn redo=9/BC001A30
MESSAGE: DB system is off
ready
server stopped
5) We did not create a file before launching standby.signal and the cluster started with the master role.
Create a standby . signal file :
postgres @ tantor :~$
touch /var/lib/postgresql/tantor-se-17-replica/data1/standby.signal
But it's too late: when stopping, a checkpoint was performed and a journal entry was created on timeline 2.
If you now start the replica1 instance again , the master will deny it access, replica1 will reconnect to the master without delay, and continuously write messages to the diagnostic log. An example of such messages:
MESSAGE: Starting log transfer from master server, at position 9/BC000000 on timeline 2
MESSAGE: Replication stopped by master server
DETAILS: Timeline 2 at 9/BC0019E8 reached end of log.
IMPORTANT: Termination of the log reading process on administrator command
MESSAGE: New timeline 3 has branched off from current database timeline 2 to current restore point 9/BC001AC8
MESSAGE : waiting for WAL to become available at 9/BC001AE2
In this case, you can try using the pg_rewind utility.
6) Give command :
postgres@tantor:~$ pg_rewind -D /var/lib/postgresql/tantor-se-17-replica/data1 --source-server='user=postgres port=5432' -R -P
pg_rewind: connection to server established
pg_rewind: error: target server must have data checksums or "wal_log_hints = on"
If the utility did not return an error about checksum calculation not being enabled on replica1 (as on the other clusters), and was successfully completed, then you can proceed to launching the replica1 instance .
7) Make sure there is no checksum calculation:
postgres@tantor:~$ pg_checksums -D /var/lib/postgresql/tantor-se-17-replica/data1
pg_checksums: error: checksums are not enabled in cluster
8) Enable checksum calculation:
postgres @ tantor :~$ pg _ checksums - e - D / var / lib / postgresql / tantor - se -17- replica / data 1
If the utility returns an error like:
pg_checksums: error: invalid segment number 0 in file name '/var/lib/postgresql/tantor-se-17-replica/data1/global/pg_store_plans.stat'
This means that there is a file in the tablespace file that should not be there. Errors related to the presence of unknown files in PGDATA are possible. In this example, it is a file of an unknown format:
pg_store_plans.c
/* Location of stats file */
#define PGSP_DUMP_FILE "global/pg_store_plans.stat"
9) In any case, the pg_rewind utility will copy the necessary files from the master, so delete the file that prevents the calculation of checksums on data file blocks:
postgres@tantor:~$ rm /var/lib/postgresql/tantor-se-17-replica/data1/global/pg_store_plans.stat
10) Repeat the command to enable checksum calculation:
postgres@tantor:~$ pg_checksums -e -D /var/lib/postgresql/tantor-se-17-replica/data1
Checksum processing completed
Files scanned: 1913
Blocks scanned: 54747
Files written: 1563
Blocks written: 54701
pg_checksums: data directory synchronization
pg_checksums: control file modification
Cluster checksums are enabled
11) Run pg_rewind again:
postgres@tantor:~$ pg_rewind -D /var/lib/postgresql/tantor-se-17-replica/data1 --source-server='user=postgres port=5432' -R -P
pg_rewind: connection to server established
pg_rewind: servers diverged at WAL position 9/BC0019E8 on timeline 2
pg_rewind: rewind from last common checkpoint at position 9/BC001950 on timeline 2
pg_rewind: Reading a list of source files
pg_rewind: Reading list of target files
pg_rewind: Read WAL on target cluster
pg_rewind: 194 MB to copy (total source directory size: 615 MB)
199097/199097 KB (100%) copied
pg_rewind: Create a copy label and modify the control file
pg_rewind: Synchronize target data directory
pg_rewind: Done!
Can I start the cluster instance? No. The pg_rewind utility has synchronized all files with the master, including the configuration parameter files, and they contain the master settings.
Before running the pg_rewind utility , it is worth saving the parameter files that are in PGDATA .
12) Edit the postgresql.auto.conf file to look like this:
postgres@tantor:~$ cat /var/lib/postgresql/tantor-se-17-replica/data1/postgresql.auto.conf
# Do not edit this file manually!
# It will be overwritten by the ALTER SYSTEM command.
listen_addresses = '*'
max_slot_wal_keep_size = '128MB'
max_wal_size = '128MB'
min_wal_size = '512MB'
idle_in_transaction_session_timeout = '100min'
cluster_name = 'replica1'
primary_slot_name = 'replica1'
logging_collector = 'off'
hot_standby_feedback = 'on'
primary_conninfo = 'user=postgres port=5432'
wal_retrieve_retry_interval = '30s'
port = 5433
13) Launch instance replica1 :
postgres@tantor:~$ pg_ctl start -D /var/lib/postgresql/tantor-se-17-replica/data1
expectation launch servers ....
[18861] MESSAGE : Starting PostgreSQL 17.5 on x86_64-pc-linux-gnu, compiled by gcc (Astra 12.2.0-14.astra3) 12.2.0, 64-bit
[18861] MESSAGE: Port 5433 is open to accept connections on IPv4 address "0.0.0.0"
[18861] MESSAGE: Port 5433 is open to accept connections on IPv6 address "::"
[18861] MESSAGE: Unix socket "/var/run/postgresql/.s.PGSQL.5433" is open to accept connections
[18864] MESSAGE: The DB system was interrupted during recovery, log time:
[18864] TIP: If this happens repeatedly, some data may have been corrupted and you should select an earlier point to restore.
[18864] MESSAGE: Switching to standby server mode
[18864] MESSAGE: REDO entry starts at offset 9/BC0019E8
[18864] MESSAGE: Consistent recovery state reached at position 9/BC001D48
[18864] MESSAGE: Invalid record length at position 9/BC001D48: expected at least 26, got 0
[18861] MESSAGE: The DB system is ready to accept read-only connections
[18865] MESSAGE: Starting log transfer from master server , at position 9/BC000000 on timeline 3
ready
the server is running
14) Check replication statistics on the master:
postgres@tantor:~$ psql
postgres=# select * from pg_stat_replication \gx
-[ RECORD 1 ]----+------------------------------
pid | 23531
usesysid | 10
usename | postgres
application_name | replica2
client_addr |
client_hostname |
client_port | -1
backend_start | 12:32:18.89956+03
backend_xmin |
state | streaming
sent_lsn | 9/BC001D48
write_lsn | 9/BC001D48
flush_lsn | 9/BC001D48
replay_lsn | 9/BC001D48
write_lag |
flush_lag |
replay_lag |
sync_priority | 0
sync_state | async
reply_time | 13:17:04.270387+03
-[ RECORD 2 ]----+------------------------------
pid | 18866
usesysid | 10
usename | postgres
application_name | replica1
client_addr |
client_hostname |
client_port | -1
backend_start | 13:13:42.353704+03
backend_xmin |
state | streaming
sent_lsn | 9/BC001D48
write_lsn | 9/BC001D48
flush_lsn | 9/BC00 1D48
replay_lsn | 9/BC00 1D48
write_lag |
flush_lag |
replay_lag |
sync_priority | 0
sync_state | async
reply_time | 13:17:02.430073+03
Both replicas accept the log data and roll it forward.
Reminder: checksums are enabled only on replica1 . Feedback ( hot_standby_feedback = 'on') is enabled on master and replica1 .
Part 1. Table replication
1) Promote the replica on port 5433 to master:
postgres@tantor:~$ psql -p 543 3 -c "select pg_promote()"
pg_promote
------------
t
(1 line)
There are currently two masters on ports 5432 and 5433. The master on port 5432 has a replica on port 5434.
Example of log messages about replica promotion:
[18864] MESSAGE: Status upgrade request received
[9445] IMPORTANT: Terminating log reading process on administrator command
[18864] MESSAGE: Invalid record length at position 9/BC09D2D0: expected at least 26, got 0
[18864] MESSAGE: REDO records processed up to offset 9/BC09D288, system load: CPU: User: 0.09s, System: 0.11s, Elapsed: 17564.43s
[18864] MESSAGE: Last completed transaction was executed at 18:03:37.805708+03
[18864
5) Check that the lines have been added:
] MESSAGE: Selected new timeline ID: 4
[18864] MESSAGE: Archive restoration completed
[ 18862 ] MESSAGE: checkpoint started: force
[18861] MESSAGE: The DB system is ready to accept connections
[ 18862 ] MESSAGE: checkpoint completed: buffers written: 7 (0.0%); WAL files added: 0, deleted: 0, recycled: 0; write=0.504 sec, sync=0.004 sec, total=0.510 sec; files_synced=7, longest_sync=0.002 sec, avg=0.001 sec; distance=29 kB, expected=159 kB; lsn=9/BC09D3C8, lsn redo=9/BC09D338
2) Remove the replication slot replica1 in the master cluster (port 5432), which was used by replica1 (port 5433) and is no longer needed:
psql -p 5432 -c "select slot_name, slot_type, active, restart_lsn, wal_status from pg_replication_slots"
slot_name | slot_type | active | restart_lsn | wal_status
-----------+-----------+--------+-------------+------------
replica1 | physical | f | 9/BC09D2D0 | reserved
replica2 | physical | t | 9/BC09D3F8 | reserved
(2 lines )
psql -p 5432 -c "select pg_drop_replication_slot(' replica1 ')"
pg_drop_replication_slot
--------------------------
(1 line )
psql -p 5432 -c "select slot_name, slot_type, active, restart_lsn, wal_status from pg_replication_slots"
slot_name | slot_type | active | restart_lsn | wal_status
-----------+-----------+--------+-------------+------------
replica2 | physical | t | 9/BC09D3F8 | reserved
(1 line )
on replica2 :
psql -p 543 4 -c "select slot_name, slot_type, active, restart_lsn, wal_status from pg_replication_slots"
slot_name | slot_type | active | restart_lsn | wal_status
-----------+-----------+--------+-------------+------------
master | physical | f | |
replica1 | physical | f | |
(2 lines)
3) Check which tables in the postgres database on port 5432 do not have a replication identifier:
psql -p 5432 -c "SELECT relnamespace::regnamespace||'.'||relname "table"
FROM pg_class
WHERE relreplident IN ('d','n') -- d primary key , n none
AND relkind IN ('r','p') -- r is a table , p is partitioned
AND oid NOT IN (SELECT indrelid FROM pg_index WHERE indisprimary)
AND relnamespace <> 'pg_catalog'::regnamespace
AND relnamespace <> 'information_schema'::regnamespace
ORDER BY 1"
table
----------
public.demo2
public.hypo
utl_file.utl_file_dir
(3 lines )
4) Delete the demo2 tables if they exist :
psql -p 5432 -c "drop table if exists t"
NOTICE: table "t" does not exist, skipping
DROP TABLE
psql -p 5432 -c "drop table if exists demo2"
DROP TABLE
5) Create a table that we will replicate and insert a row:
psql -p 5432 -c "create table t (id bigserial PRIMARY KEY , t text)"
CREATE TABLE
psql -p 5432 -c "insert into t (t) values ('a')"
INSERT 0 1
6) Create a definition of the destination table in the postgres cluster database on port 5433:
pg_dump -tt --schema-only --clean --if-exists | psql -p 5433
This step is mandatory: the table structure to which changes will be replicated must be created separately, since the logical replication functionality does not automatically create tables. The table and columns must have the same names. The order of the columns is not important, there may be additional columns, the presence of which would not interfere with inserting rows. An obstacle to inserting rows: the presence of a NOT NULL integrity constraint in the absence of a DEFAULT default value .
7) Set wal_level= logical on all clusters.
Set hot_standby_feedback= on on replica2 , it was not set in the previous practice. Enabling feedback is mandatory for logical replication, Otherwise, when you change the definition and set of tables in a publication (which changes rows in the system catalog tables that store data about the properties of replicated tables), you may encounter " This slot has been invalidated because of a conflict with recovery " errors .
Set checkpoint_timeout='30min' to prevent checkpoints and restart points (by default, every 5 minutes) from writing messages to cluster logs, making logical replication messages difficult to read:
psql -p 5432 -c "ALTER SYSTEM SET wal_level= logical "
psql -p 5433 -c "ALTER SYSTEM SET wal_level= logical "
psql -p 5434 -c "ALTER SYSTEM SET wal_level= logical "
psql -p 5434 -c "ALTER SYSTEM SET hot_standby_feedback= on "
psql -p 5432 -c "alter system set checkpoint_timeout='30min'"
psql -p 5433 -c "alter system set checkpoint_timeout='30min'"
psql -p 5434 -c "alter system set checkpoint_timeout='30min'"
Changing the wal_level parameter requires instances to be restarted. Make sure V this :
psql -p 5432 -c "select pg_reload_conf()"
pg_reload_conf
----------------
t
(1 line )
psql -p 5432 -c "select * from pg_settings where name = 'wal_level'" -x
-[ RECORD 1 ]---+--------------------------------------------------
name | wal_level
setting | replica
unit |
category | Write-Ahead Log / Settings
short_desc | Sets the level of information written to the WAL.
extra_desc |
context | postmaster
vartype | enum
source | default
min_val |
max_val |
enumvals | {minimal,replica,logical}
boot_val | replica
reset_val | replica
sourcefile |
sourceline |
pending_restart | t
8) Stop and start the instances in the terminal window(s) in which you want to receive diagnostic messages:
pg_ctl stop -D /var/lib/postgresql/tantor-se-17-replica/data2
pg_ctl stop -D /var/lib/postgresql/tantor-se-17-replica/data1
pg_ctl stop -D /var/lib/postgresql/tantor-se-17/data
pg_ctl start -D /var/lib/postgresql/tantor-se-17/data
pg_ctl start -D /var/lib/postgresql/tantor-se-17-replica/data1
pg_ctl start -D /var/lib/postgresql/tantor-se-17-replica/data2
You can use multiple terminal windows to make it easier to see which instance is outputting which messages. It is difficult to distinguish messages from different instances in one terminal window. It is convenient to open three terminals as bookmarks rather than windows. To open a terminal as a bookmark, select File -> New from the terminal menu, or the <Ctrl+t> key combination:
The links for switching ( 1 2 3 ) are located at the bottom left of the terminal window:
9) Create a publication for table t :
psql -p 5432 -c "CREATE PUBLICATION t for TABLE t"
CREATE PUBLICATION
10) Create a subscription to replica1 that connects to the physical replica replica2 . Connecting to a physical replica complicates the topology, but reduces the load on the master. The subscription name defines the default name of the logical replication slot and must be unique across the entire configuration:
psql -p 5433 -c "CREATE SUBSCRIPTION sub1 CONNECTION 'dbname=postgres port=543 4 user=postgres' PUBLICATION t WITH (origin=none)"
If the subscription were connected directly to the master, the command would return the result immediately. In our case, the subscription is connected to a physical replica and the command to create the subscription will hang. After 15-17 seconds, the command will hang and return the following result:
NOTE: Replication slot "sub1" has been created on the publishing server
CREATE SUBSCRIPTION
If the subscription creation command hangs for more than 20 seconds, this means that there is no activity of background and server processes on the master, in this case, perform the following practice point. During real transaction operation on the master, there are subscription creation commands and initial synchronization commands will be executed with a delay of up to ~20 seconds.
11) If the subscription creation command hangs and does not produce a result, then in any other terminal window you can issue the command:
psql -p 5432 -c "select pg_log_standby_snapshot()"
pg_log_standby_snapshot
-------------------------
9/BC0D9C58
(1 line )
The cluster log shows the replication protocol commands :
[12447] MESSAGE: Logical decoding process reached consistency point at 9/BC0D9C10
[12447] DETAILS: There are no more active transactions.
OPERATOR : CREATE_REPLICATION_SLOT "sub1" LOGICAL pgoutput (SNAPSHOT 'nothing')
[12551] MESSAGE: Starting logical replication apply process for subscription "sub1"
[12552] MESSAGE: Logical decoding starting for slot "sub1"
[12552] DETAILS: Transferring transactions committed after 9/BC0D9C58, reading WAL since 9/BC0D9C10.
[12552] OPERATOR : START_REPLICATION SLOT "sub1" LOGICAL 0/0 (proto_version '4', origin 'none', publication_names '"t"')
After the following message, the create subscription command will produce the following result:
[12552] MESSAGE: Logical decoding process reached consistency point at 9/BC0D9C10
[12552] DETAILS: There are no more active transactions.
[12552] OPERATOR : START_REPLICATION SLOT "sub1" LOGICAL 0/0 (proto_version '4', origin 'none', publication_names '"t"')
[12553] MESSAGE: Logical replication table synchronization process for subscription "sub1" of table "t" has started
Processes 12551 and 12553 are replica1 processes .
The remaining processes are replica2 processes .
12) The synchronization process has started , but in the absence of transactions on the master, it will hang and wait for a synchronization point. To speed up synchronization, call the pg_log_standby_snapshot() function on the master again, or go to step 13, in which a transaction is performed on the master:
psql -p 5433 -c "select * from t"
id | t
----+---
(0 lines )
psql -p 5432 -c "select pg_log_standby_snapshot()"
pg_log_standby_snapshot
-------------------------
9/BC1CADE0
(1 line )
After the function is called (either a checkpoint or some time after any transaction occurs on the master and the log record is transferred to the physical replica), the following message will appear:
[12601] MESSAGE: Table synchronization process for logical replication for subscription "sub1" of table "t" has finished processing
The physical replica log will show messages indicating that the slot has reached a consistency point and is ready to work:
MESSAGE: Logical decoding process reached consistency point at 9/BC263F10
DETAILS: There are no more active transactions .
OPERATOR : CREATE_REPLICATION_SLOT "pg_43351_sync_43342_7353194261070147214" LOGICAL pgoutput (SNAPSHOT 'use')
MESSAGE: Logical decoding starting for slot "pg_43351_sync_43342_7353194261070147214"
DETAILS: Transferring transactions committed after 9/BC263F58, reading WAL since 9/BC263E48.
OPERATOR : START_REPLICATION SLOT "pg_43351_sync_43342_7353194261070147214" LOGICAL 9/BC263F58 (proto_version '4', origin 'none', publication_names '"t"')
psql -p 5433 -c "select * from t"
id | t
----+---
1 | a
(1 line)
13) Check that replication is in progress:
psql -p 5432 -c "INSERT INTO t (t) VALUES (' b ')"
INSERT 0 1
psql -p 5433 -c "select * from t"
id | t
----+---
1 | a
2 | b
(2 rows)
We inserted a second line into the master, and the connected subscription received this line from the physical replica.
Note for this part of the practice: Here is a list of commands that allow you to repeat the creation of a subscription (from point 4 to point 12):
psql -p 5432 -c "checkpoint"
psql -p 5433 -c "drop SUBSCRIPTION sub1"
psql -p 5432 -c "drop PUBLICATION t"
psql -p 5432 -c "select pg_log_standby_snapshot()"
psql -p 5432 -c "drop table t"
psql -p 5432 -c "create table t (id bigserial PRIMARY KEY, t text)"
psql -p 5432 -c "insert into t (t) values ('a')"
pg_dump -t t --schema-only --clean --if-exists | psql -p 5433 > /dev/null
psql -p 5432 -c "CREATE PUBLICATION t for TABLE t"
psql -p 5433 -c "CREATE SUBSCRIPTION sub1 CONNECTION 'dbname=postgres port=5434 user=postgres' PUBLICATION t WITH (origin=none)"
psql -p 5433 -c "select * from t"
psql -p 5432 -c "INSERT INTO t (t) VALUES ('b')"
psql -p 5433 -c "select * from t"
Part 2. Replication without a primary key
1) Drop the primary key of table t on the source (port 5432):
psql -c "ALTER TABLE t DROP CONSTRAINT t_pkey"
ALTER TABLE
We could remove the integrity constraint on the destination table as well, but we won't do that because we'll add the primary key again later.
If you do not enter duplicate rows on the source, the integrity constraint will not manifest itself on the receiver. If you enter a duplicate in the id column , the application of records in the subscription will be suspended.
psql -c "\d t"
Table "public.t"
Column | Type | Sort Rule | NULLable | Default
---------+--------+--------------------+-------------------+-------------------------------
id | bigint | | not null | nextval('t_id_seq'::regclass)
t | text | | |
Publications :
"t"
psql -p 5433 -c "\d t"
Table "public.t"
Column | Type | Sort Rule | NULLable | Default
---------+--------+--------------------+-------------------+-------------------------------
id | bigint | | not null | nextval('t_id_seq'::regclass)
t | text | | |
Indexes :
"t_pkey" PRIMARY KEY , btree (id)
Sequences for generating the id column value and the NOT NULL integrity constraint have been preserved and are present in both tables.
2) There is no key on the table. Let's check that row inserts are not blocked and are replicated correctly. Insert a row into table t :
psql -c "INSERT INTO t (t) VALUES ('b')"
INSERT 0 1
3) Updates and deletions are blocked. Give the update and deletion commands to the row and see what error is issued:
psql -c "update t set t='c' where id=2"
ERROR: table 't' cannot be modified because it does not have a replica id , but it publishes changes
HINT: To make this table updatable, set REPLICA IDENTITY by executing ALTER TABLE .
psql -c "delete from t where id=2"
ERROR: Delete from table 't' cannot be performed because it does not have a replica id , but it publishes deletes
HINT: To make this table delete-capable, set REPLICA IDENTITY by executing ALTER TABLE .
4) Set all columns to row IDs :
psql -c "ALTER TABLE t REPLICA IDENTITY FULL "
ALTER TABLE
5) Updates and deletions are no longer blocked and are replicated correctly. Run the commands:
psql -c "update t set t='c' where id=3"
UPDATE 1
psql -c "delete from t where id=3"
DELETE 1
psql -p 5432 -c "select * from t"
id | t
----+---
1 | a
2 | b
(2 lines )
psql -p 5433 -c "select * from t"
id | t
----+---
1 | a
2 | b
(2 lines )
Insert and delete commands were replicated correctly.
Using REPLICA IDENTITY FULL is undesirable because when performing UPDATE and DELETE on the source, the values of all columns are transmitted through the log, and this increases traffic. If it is actually possible to identify rows by several columns, then it is worth using them as an identifier - the primary key.
6) Let's see what happens if we set the row identification method to NOTHING .
Do it command :
psql -c "ALTER TABLE t REPLICA IDENTITY NOTHING "
ALTER TABLE
7) Run the line update command:
psql -c "update t set t='c' where id =2"
ERROR: table 't' cannot be modified because it does not have a replica id , but it publishes changes
HINT: To make this table updatable, set REPLICA IDENTITY by executing ALTER TABLE .
The error is the same as before: no identifier to publish an update or delete.
8) Neither adding a primary key, nor REFRESH , nor DISABLE subscriptions will fix the error. We will check this in the following points.
Pause your subscription:
psql -p 543 3 -c "ALTER SUBSCRIPTION sub1 DISABLE "
ALTER SUBSCRIPTION
9) Check the subscription status with the psql command \dRs :
psql -p 543 3 -c "\dRs"
List of subscriptions
Name | Owner | Enabled | Publication
------+----------+---------+------------
sub1 | postgres | f | {t}
(1 line)
10) On the source, try updating the line:
psql -c "update t set t='c' where id =2"
ERROR: table 't' cannot be modified because it does not have a replica id , but it publishes changes
HINT: To make this table updatable, set REPLICA IDENTITY by executing ALTER TABLE .
The update does not work, even though the subscription is suspended.
11) Insert the line on the source:
psql -c "INSERT INTO t (t) VALUES ('c')"
INSERT 0 1
12) Check that the line does not appear on the receiver:
psql -p 543 3 -c "select * from t"
id | t
----+---
1 | a
2 | b
(2 lines )
13) Turn on subscription :
psql -p 543 3 -c "ALTER SUBSCRIPTION sub1 ENABLE "
ALTER SUBSCRIPTION
14) Check that the line appears on the receiver :
psql -p 543 3 -c "select * from t"
id | t
----+---
1 | a
2 | b
4 | s
(3 lines )
After the subscription was suspended (transition to DISABLE status ), the application of changes was suspended. After enabling (transition to ENABLE status) , the accumulated changes were applied.
15) Add primary key :
psql -c "ALTER TABLE t ADD CONSTRAINT t_key PRIMARY KEY (id)"
ALTER TABLE
But its presence is not enough. We need to specify that it is used as REPLICA IDENTITY, since before we set REPLICA IDENTITY NOTHING .
16) Enable the use of the primary key as the replication identifier, i.e. set the default value :
psql -c "ALTER TABLE t REPLICA IDENTITY DEFAULT "
ALTER TABLE
17) Now updating the line does not produce an error and replication proceeds:
psql -c "update t set t='d' where id =4"
UPDATE 1
psql -p 5433 -c "select * from t"
id | t
----+---
1 | a
2 | b
4 | d
(3 lines )
Part 3. Adding a table to a publication
1) Create another table for replication:
psql -c "CREATE TABLE t1 AS SELECT * FROM t"
SELECT 3
psql -c "ALTER TABLE t1 ADD CONSTRAINT t1_key PRIMARY KEY (id)"
ALTER TABLE
psql -c "\d t1"
Table "public.t1"
Column | Type | Sort Rule | NULLable | Default
---------+--------+--------------------+-------------------+--------------
id | bigint | | not null |
t | text | | |
Indexes :
"t1_key" PRIMARY KEY , btree (id)
Unlike table t, there is no auto-incrementing column and sequence.
The table is not created in the subscription database, it will need to be created manually.
2) View the list of publications using the psql command :
psql -c "\dRp"
List of publications
Name|Owner|All tables| Add|Modify|Delete|Empty |Via root
---+--------+-----------+----------+---------+---------+----------+------------+------------
t |postgres|f |t |t |t |t |f
(1 line )
Replicated insert, update, delete, truncate .
3) Add a new table to the publication:
psql -c "ALTER PUBLICATION t ADD TABLE t1"
ALTER PUBLICATION
There will be no errors in the cluster log, since we did not execute the pg_log_standby_snapshot() function . They will appear after the row insertion command in the next paragraph.
4) Insert a row into table t1 :
psql -c "INSERT INTO t1 VALUES (5, 'e')"
INSERT 0 1
In the subscriber log replica1 :
ERROR: target logical replication relation "public.t1" does not exist
CONTEXT : processing remote data for replication origin "pg_43450" during message type "INSERT" in transaction 17768, finished at 9/BC3D92F0
MESSAGE: Background process "logical replication worker" (PID 17622) exited with exit code 1
MESSAGE: Starting logical replication apply process for subscription "sub1"
Error stating that the logical replication worker could not replicate the row insert because table t1 did not exist on the subscriber .
In the log of the physical replica replica2 :
MESSAGE : 9/BC3CD550 has already been streamed, forwarding to 9/BC3D9240
OPERATOR : START_REPLICATION SLOT "sub1" LOGICAL 9/BC3CD550 (proto_version '4', origin 'none', publication_names '"t"')
MESSAGE: Logical decoding starts for slot "sub1"
DETAILS: Transferring transactions committed after 9/BC3D9240, reading WAL since 9/BC3D9088.
OPERATOR : START_REPLICATION SLOT "sub1" LOGICAL 9/BC3CD550 (proto_version '4', origin 'none', publication_names '"t"')
MESSAGE: Logical decoding process reached consistency point at 9/BC3D9088
DETAILS: There are no more active transactions.
5) Create a table structure in the receiving database:
pg_dump -t t1 --schema-only --clean --if-exists | psql -p 5433
Periodic errors in the cluster log have stopped being displayed, but there will be no rows in the subscription table yet:
psql -p 5433 -c "select * from t1"
id | t
----+---
(0 lines)
6) Insert the line on the source:
psql -c "INSERT INTO t1 VALUES (6, 'f')"
INSERT 0 1
7) Check that the line on the subscriber does not appear:
psql -p 5433 -c "select * from t1"
id | t
----+---
(0 lines)
8) The rows will not appear on the subscriber until the subscription is updated. At the same time, replication will continue for other tables in the subscription:
psql -c "INSERT INTO t (t) VALUES ('e')"
psql -p 5433 -c "select * from t"
id | t
----+---
1 | a
3 | b
4 | d
5 | e
(4 lines )
7) Update on subscriber subscription :
psql -p 543 3 -c "ALTER SUBSCRIPTION sub1 REFRESH PUBLICATION"
ALTER SUBSCRIPTION
psql -p 543 3 -c "select * from t1"
id | t
----+---
(0 lines)
The lines have not appeared yet.
How long will it take for the lines to appear, i.e. for the initial synchronization to be performed and the changes to be applied?
The subscriber works through a physical replica. If the subscriber connected to the master directly, there would be no delay.
Either after a checkpoint on the master, or after calling the pg_log_standby_snapshot() function on the source .
8) Call this function on the source:
psql -c "select pg_log_standby_snapshot()"
pg_log_standby_snapshot
-------------------------
9/BC3D9938
(1 line )
9) Check that the lines on the subscriber have appeared:
psql -p 543 3 -c "select * from t1"
id | t
----+---
1 | a
2 | b
4 | d
5 | e
6 | f
(5 lines )
In the subscriber log:
13:21:11.024 MSK[29400] MESSAGE: logical replication table synchronization process started for subscription "sub1" of table "t1"
13:22:14 .121 MSK[29400] MESSAGE: Table synchronization process in logical replication for subscription "sub1", table "t1" has finished processing
In the physical replica log:
13:22:14 .101 MSK[29401] MESSAGE: Logical decoding process reached consistency point at 9/BC3D98F0
13:22:14.101 MSK [29401] DETAILS: There are no more active transactions.
13:22:14.101 MSK [29401] OPERATOR : CREATE_REPLICATION_SLOT "pg_43450_sync_43451_7353194261070147214" LOGICAL pgoutput (SNAPSHOT 'use')
13:22:14.118 MSK [29401] MESSAGE: starting logical decoding for slot "pg_43450_sync_43451_7353194261070147214"
13:22:14.118 MSK[29401] DETAILS: Transferring transactions committed after 9/BC3D9938, reading WAL since 9/BC3D98F0.
13:22:14.118 MSK [29401] OPERATOR : START_REPLICATION SLOT "pg_43450_sync_43451_7353194261070147214" LOGICAL 9/BC3D9938 (proto_version '4', origin 'none', publication_names '"t"')
The table synchronization worker synchronized (transferred rows) the table on the receiver with the table on the source.
The important thing is that when you add a table to a publication, change capture starts, and after updating the subscription, the synchronization of table rows will be performed by default "seamlessly" (without blocking access to the table on the source).
10) Clear rows in table t1 on the source:
psql -c "TRUNCATE t1"
TRUNCATE TABLE
Part 4. Bidirectional replication
1) Create a publication for tables t , t1 :
psql -p 5433 -c "CREATE PUBLICATION t for TABLE t, t1;"
2) Create a subscription. The subscription name defines the default name of the logical replication slot and must be unique across the entire configuration. Use the name sub2 .
The slot cannot copy data because the tables are synchronized, so you need to set copy_data=off .
We can't allow loops, so origin=none :
psql -p 5432 -c "CREATE SUBSCRIPTION sub2 CONNECTION 'dbname=postgres port=5433 user=postgres' PUBLICATION t WITH ( origin=none , copy_data=off )"
NOTE: Replication slot "sub2" has been created on the publishing server
CREATE SUBSCRIPTION
IN loge at 5432:
13:37: 12.419 MSK[3882] MESSAGE: Starting logical replication apply process for subscription "sub2"
In the log at 5433:
13:37:12.410 MSK[3881] MESSAGE: Logical decoding process reached consistency point at 9/BC3E3E88
13:37:12.410 MSK [3881] DETAILS: There are no more active transactions.
13:37:12. 410 MSK [3881] OPERATOR : CREATE_REPLICATION_SLOT "sub2" LOGICAL pgoutput (SNAPSHOT 'nothing')
13:37:12. 424 MSK[3883] MESSAGE: Logical decoding starts for slot "sub2"
13:37:12.424 MSK[3883] DETAILS: Transferring transactions committed after 9/BC3E3ED0, reading WAL since 9/BC3E3E88.
13:37:12.424 MSK [3883] OPERATOR : START_REPLICATION SLOT "sub2" LOGICAL 0/0 (proto_version '4', origin 'none', publication_names '"t"')
13:37:12.424 MSK[3883] MESSAGE: Logical decoding process reached consistency point at 9/BC3E3E88
13:37:12.424 MSK [3883] DETAILS: There are no more active transactions.
13:37:12.424 MSK [3883] OPERATOR : START_REPLICATION SLOT "sub2" LOGICAL 0/0 (proto_version '4', origin 'none', publication_names '"t"')
The create command will not hang, since the source and subscriber are in different clusters and the subscription is connected to the master, not to the physical replica.
The hang will occur if the source and subscriber databases are in the same cluster.
To continue the command, it would be necessary to call the pg_log_standby_snapshot() function on the source (5433) .
4) Check that replication is going in the newly created direction:
psql -p 5433 -c "INSERT INTO t (t) VALUES ('f')"
ERROR: Duplicate key value violates uniqueness constraint "t_pkey"
DETAILS: Key "(id)=( 1 )" already exists.
occurred . The cause is that a sequence was used to generate values in a primary key column. Sequence states are not replicated, and at 5433 the sequence generated the value 1 .
4) Look at the values that two sequences in two databases produce:
psql -p 5433 -c "select nextval('t_id_seq')"
nextval
---------
2
(1 row)
psql -p 5432 -c "select nextval('t_id_seq')"
nextval
---------
6
(1 row)
5) Check what is the maximum value in the column of the replicated table:
psql -p 5433 -c "select max(id) from t"
max
-----
5
(1 line)
6) To eliminate the problem, we will set the sequence to output even numbers on one database and odd numbers on the other. If we were using three databases linked by replication, there would be three sequences, and then we would use INCREMENT BY 3 on each of them and RESTART WITH that differ by one .
Reset the sequence values so that they generate even and odd numbers:
psql -p 5432 -c "ALTER SEQUENCE t_id_seq INCREMENT BY 2 RESTART WITH 8 "
psql -p 5433 -c "ALTER SEQUENCE t_id_seq INCREMENT BY 2 RESTART WITH 9 "
The sequences will generate numbers: 8,10,12... and 9,11,13...
7) Check that the insert works:
psql -p 5433 -c "INSERT INTO t (t) VALUES ('g')"
psql -p 5432 -c "INSERT INTO t (t) VALUES ('h')"
8) Verify that the inserted rows were replicated:
postgres@tantor:~$ psql -p 5433 -c "select * from t"
id | t
----+---
1 | a
2 | b
4 | d
5 | e
9 | g
8 | h
(6 строк)
postgres@tantor:~$ psql -p 5432 -c "select * from t"
id | t
----+---
1 | a
2 | b
4 | d
5 | e
9 | g
8 | h
(6 строк)
9) Check that updates are also working and replicating:
psql -p 5432 -c "update t set t='HH' where id =8"
psql -p 5433 -c "update t set t='GG' where id =9"
psql -p 5432 -c "select * from t"
psql -p 5433 -c "select * from t"
postgres@tantor:~$ psql -p 5432 -c "select * from t"
id | t
----+----
1 | a
2 | b
4 | d
5 | e
8 | HH
9 | GG
(6 lines )
postgres@tantor:~$ psql -p 5433 -c "select * from t"
id | t
----+----
1 | a
2 | b
4 | d
5 | e
8 | HH
9 | GG
(6 lines)
We have configured bidirectional replication. A physical replica is used in one direction. Physical replicas can be used in both directions.
Part 5. Deleting subscriptions and publications
1) Delete subscriptions, publications, tables:
psql -p 5432 -c "drop subscription sub2"
psql -p 5433 -c "drop publication t"
psql -p 5433 -c "drop subscription sub1"
psql -p 5432 -c "drop publication t"
psql -p 5432 -c "checkpoint"
psql -p 5432 -c "drop table t"
psql -p 5432 -c "drop table t1"
psql -p 5433 -c "drop table t"
psql -p 5433 -c "drop table t1"
Note 1:
If you delete a replication slot before deleting a subscription, for example by issuing the command:
psql -p 5434 -c "select pg_drop_replication_slot('sub1')"
then when you try to delete a subscription, an error will be returned and the subscription will not be deleted:
psql -p 5433 -c "drop subscription sub1"
ERROR: Replication slot "sub1" on the publishing server was not deleted:
ERROR: replication slot "sub1" does not exist
In this case, the following sequence of commands is used to delete the slot:
psql -p 5433 -c "alter subscription sub1 disable"
psql -p 5433 -c "alter subscription sub1 set (slot_name=none)"
psql -p 5433 -c "drop subscription sub1"
Note 2:
When adding tables to a publication on a physical replica or changing subscription properties, an error like this may occur:
MESSAGE: Starting logical replication apply process for subscription "sub1"
ERROR: Failed to start WAL broadcast: ERROR: No more changes can be received from replication slot "sub1"
DETAILS: This slot has been revoked due to a conflict with restore .
MESSAGE: Background process "logical replication worker" (PID 31049) exited with exit code 1
On English language :
DETAIL: This slot has been invalidated because it was conflicting with recovery .
The error occurs in the following cases:
1) hot_standby_feedback = off on the cluster where the logical replication slot is created
2) hot_standby_feedback = on , but there is no physical replication slot on the master for the physical replica on which the logical replication slot is created.
Reason: Autovacuum on the master removes old versions of rows from the system catalog tables that are needed for logical decoding on the cluster where the logical replication slot is created.
Description: https://git.postgresql.org/gitweb/?p=postgresql.git;a=commit;h=6af1793954e8c5e753af83c3edb37ed3267dd179
1) See what extensions are installed in the database:
postgres=# \dx
List of installed extensions
Name | Version | Schema | Description
----------+---------+-----------+--------- ---------------------
hypopg | 1.4.1 | public | Hypothetical indexes for PostgreSQL
pg_columnar | 11.1-12 | public | Hydra Columnar extension
pg_stat_statements | 1.11 | public | track planning and execution statistics of
pg_store_plans | 1.8.1 | public | track plan statistics of all SQL statements
plpgsql | 1.0 | pg_catalog | PL/pgSQL procedural language
plpython3u | 1.0 | pg_catalog | PL/Python3U untrusted procedural language
(6 rows)
Список в вашей базе может отличаться от приведенного.
2) Check if the orafce extension is available for installation :
postgres=# select * from pg_available_extensions where name ilike '%ora%';
name | default_version | installed_version | comment
--------+-----------------+-------------------+----------------------------
orafce | 4.13 | 4.13 | Functions and operators that emulate a subset of functions a
(1 line)
3) What schemes are in the database? Get a list of schemes:
postgres =# \ dn
List of schemes
Name | Owner
--------+-------------------
public | pg_database_owner
(1 line)
4) Install the orafce extension into the database :
postgres=# CREATE EXTENSION orafce;
CREATE EXTENSION
5) Get the list of schemes:
postgres=# \dn
List of schemes
Name | Owner
--------------+-------------------
dbms_alert | postgres
dbms_assert | postgres
dbms_output | postgres
dbms_pipe | postgres
dbms_random | postgres
dbms_sql | postgres
dbms_utility | postgres
oracle | postgres
plunit | postgres
plvchr | postgres
plvdate | postgres
plvlex | postgres
plvstr | postgres
plvsubst | postgres
public | pg_database_owner
utl_file | postgres
(16 строк)
Расширение создало 15 схем.
Oracle Database has objects - procedure packages. Tantor DBMS does not have packages. Packages are used to combine subroutines. A close analogue of packages are schemes. Unlike packages, schemes can contain objects of any type, not just subroutines.
In Oracle Database, packages supplied by default have the prefix " dbms_ "
6) Some of the objects that are called in Oracle Database without a package name prefix are created by an extension in the oracle schema. Insert Name this schemes V path search :
postgres=# set search_path TO "$user", public, oracle;
SET
7) Refer to the dual table, which is used by applications running Oracle Database to call single-row functions. In Oracle Database, the FROM clause in the SELECT command is mandatory , but in PostgreSQL, it is optional. Applications in Oracle Database typically use the " SELECT function() FROM DUAL; " command.
Do it command :
postgres=# SELECT sysdate() FROM dual;
You may notice that parentheses are required. In Oracle Database, the SYSDATE function is used without parentheses. In PostgreSQL, functions without arguments cannot be called without parentheses, except for those that are called without parentheses according to the SQL standard. For example : current_date, current_timestamp, current_catalog, current_role, current_user, session_user, user, current_schema . Moreover, of these functions, only current_schema can be called with parentheses.
VARCHAR2 data type used in Oracle Database :
postgres=# select 'hello'::varchar2;
varchar2
----------
hello
(1 line)
9) The extension creates functions that are used in Oracle Database for debug output as part of the dbms_output procedure package :
postgres=# SELECT dbms_output.serveroutput(true);
serveroutput
--------------
(1 line )
Analogue teams in Oracle Database "SET SERVEROUTPUT ON"
postgres=# SELECT dbms_output. put ('aa');
put
-----
(1 line )
postgres=# SELECT dbms_output. put ('bb');
put
-----
(1 line )
postgres=# SELECT * FROM dbms_output.get_lines(1);
lines | numlines
--------+----------
{aabb} | 1
(1 строка)
postgres=# SELECT dbms_output.put('aa');
put
-----
(1 строка)
postgres=# SELECT dbms_output.put('bb');
put
-----
(1 строка)
postgres=# SELECT * FROM dbms_output. get_line() ;
line | status
------+--------
aabb | 0
(1 line )
Result get_line() And get_lines(1) is the same .
The result of enable() and serveroutput(true) is the same.
10) Reset the search path parameter value to the default value:
postgres=# reset search_path;
RESET
1) The extension allows using variables to store values at the session level. The extension provides functionality similar to the variables of procedure packages in Oracle Database. The functionality is also similar to the "application contexts" attributes in Oracle Database. Creating variables
The advantage of using variables: fast access. Variables can be used as a more efficient and simpler alternative to temporary tables.
Install extension :
postgres=# CREATE EXTENSION pg_variables;
CREATE EXTENSION
2) Set the value 101 for the variable ("attribute") int1 in the "package" ("context", group of variables) named vars. The term "package" is used in the extension to denote groups of variables.
postgres=# SELECT pgv_set('vars', 'int1', 101);
pgv_set
---------
(1 line)
3) Set a text variable in the same package:
postgres=# SELECT pgv_set('vars', 'text1', ' text variable ' :: text , true);
pgv_set
---------
(1 line)
4) To get the values, use the pgv_get function . The first and second parameters are clear: the name of the package and the variable. The third argument is the variable type. Run the command and see the result:
postgres=# SELECT pgv_get('vars', 'int1');
ERROR: function pgv_get(unknown, unknown) does not exist
The error means that the third parameter of the function does not have a default value.
5) Empty value is not passed:
postgres=# SELECT pgv_get('vars', 'int1', null);
ERROR: function pgv_get(unknown, unknown, unknown) is not unique
6) The package knows the type of the variable and reports it:
postgres=# SELECT pgv_get('vars', 'int1', null::numeric);
ERROR: variable "int1" requires "integer" value
7) We pass a value of this type - the function returns the value:
postgres=# SELECT pgv_get('vars', 'int1', 0);
pgv_get
---------
101
(1 line)
8) You can also use an empty value NULL:: int of a given type:
postgres=# SELECT pgv_get('vars', 'int1', NULL:: int );
pgv_get
---------
101
(1 line)
9) It is impossible to create two variables with the same name but different types:
postgres=# SELECT pgv_set('vars', 'int1', null::text);
ERROR: variable "int1" requires "integer" value
10) Getting the value of a text variable:
postgres=# SELECT pgv_get('vars', 'text1', NULL:: text );
pgv_get
---------------
text variable
(1 line )
11) List variables :
postgres=# SELECT * FROM pgv_list() order by package, name;
package | name | is_transactional
---------+-------+------------------
vars | int1 | f
vars | text1 | f
(2 lines)
By default , is_transactional=false and does not affect the work with variables whether the transaction is open or not. If is_transactional=true , then when rolling back a transaction, including to savepoints, actions with variables will be rolled back.
12) The transactionality of a variable is set by the fourth parameter of the pgv_set function at the time of variable creation. It cannot be redefined after creation:
postgres=# SELECT pgv_set('vars', 'text1', 'text variable'::text, true);
ERROR: variable "text1" already created as NOT TRANSACTIONAL
13) You can delete the variable and create it again with the same name:
postgres=# SELECT pgv_remove('vars', 'text1');
pgv_remove
------------
(1 строка)
postgres=# SELECT pgv_set('vars', 'text1', 'text variable'::text, true);
pgv_set
---------
(1 строка)
postgres=# SELECT * FROM pgv_list() order by package, name;
package | name | is_transactional
---------+-------+------------------
vars | int1 | f
vars | text1 | t
(2 строки)
14) Using transaction variables does not inflate the transaction counter. Let's check this. Current transaction number in the cluster:
postgres=# SELECT pg_current_xact_id();
pg_current_xact_id
--------------------
871
(1 line )
15) Open a transaction, create a transaction variable and commit the transaction:
postgres=# begin transaction;
BEGIN
postgres=*# SELECT pgv_set('vars', 'text2', 'text variable'::text, true);
pgv_set
---------
(1 line )
postgres=*# SELECT pg_current_xact_id_if_assigned();
pg_current_xact_id_if_assigned
--------------------------------
(1 line)
Transaction number is not assigned, virtual number is used.
16) After the transaction is committed, the function for obtaining the transaction number returns the following number:
postgres=*# commit;
COMMIT
postgres=# SELECT pg_current_xact_id();
pg_current_xact_id
--------------------
872
(1 line )
postgres=# SELECT pg_current_xact_id();
pg_current_xact_id
--------------------
873
(1 line )
This means that the transaction in which the transaction variable was created did not use a real transaction number.
Getting the actual transaction number would introduce a delay. Working with transactional variables is as efficient as with non-transactional ones.
17) Used memory By packages :
postgres=# SELECT * FROM pgv_stats() order by package;
package | allocated_memory
---------+------------------
vars | 16384
(1 line )
18) Deleting a variable called int1 :
postgres=# SELECT pgv_remove('vars', 'int1');
pgv_remove
------------
(1 line)
19) Removing a package with variables of this package:
postgres=# SELECT pgv_remove('vars');
pgv_remove
------------
(1 line)
20) Remove all packages and all variables:
postgres=# SELECT pgv_free();
pgv_free
----------
(1 line)
In any case, the lifespan of variables is until the end of the session.
Part 1. Preparing the replica
The page_repair extension includes a shared library and two functions. The functions allow one block to be copied over a network connection from a physical replica per procedure call.
To use the extension, you need a physical replica. If you have one, you can skip the steps to create it. Creating a physical replica was discussed in Practice 8a.
Stopping a cluster present in a virtual machine:
postgres@tantor:~$ sudo systemctl stop tantor-se-server-17-replica
Stopping a cluster if it was created and is not usable as a physical replica (became master, cannot overlay log data due to missing log files):
postgres@tantor:~$ pg_ctl stop -D /var/lib/postgresql/tantor-se-17-replica/data1
postgres@tantor:~$ rm -rf /var/lib/postgresql/tantor-se-17-replica/data1
Creation replicas :
postgres@tantor:~$ rm /var/lib/postgresql/tantor-se-17/data/global/pg_store_plans.stat
postgres@tantor:~$ pg_basebackup -D /var/lib/postgresql/tantor-se-17-replica/data1 -P -R -C --slot=replica1 --checkpoint=fast
If you interrupt the backup, you will need to delete the directory: rm -rf /var/lib/postgresql/tantor-se-17-replica/data1
And slot on master : psql -c " select pg_drop_replication_slot('replica1')"
postgres@tantor:~$ echo "port=5433" > > /var/lib/postgresql/tantor-se-17-replica/data1/postgresql.auto.conf
Launch replicas :
postgres@tantor:~$ pg_ctl start -D /var/lib/postgresql/tantor-se-17-replica/data1 -l log_replica1.log
Checking that replication works :
postgres@tantor:~$ psql -c "select * from pg_replication_slots"
status column must contain the value "t".
Part 2. Preparing the table
1) Create a table and fill it with data:
postgres=# drop table if exists t;
NOTICE: table "t" does not exist, skipping
DROP TABLE
postgres=# CREATE TABLE t (id bigserial primary key, t text);
CREATE TABLE
postgres=# INSERT INTO t(t) SELECT encode((floor(random()*1000)::numeric ^
100::numeric)::text::bytea, 'base64') from generate_series(1,1000);
INSERT 0 1000
postgres=# update t set t = t || 'a';
UPDATE 1000
A thousand rows were inserted and a thousand rows were updated. The pages contain current and outdated row versions until the autovacuum is done.
2) Size file tables :
postgres=# select pg_relation_size('t');
pg_relation_size
------------------
802816
(1 line)
3) Relative path to the file with lines:
postgres=# SELECT pg_relation_filepath('t'::regclass);
pg_relation_filepath
----------------------
base/5/16622
(1 line )
4) Prefix for obtaining an absolute path from a relative one (aka PGDATA ):
postgres=# \dconfig data_directory
List of configuration parameters
Parameter | Value
----------------+---------------------------------------
data_directory | /var/lib/postgresql/tantor-se-17/data
(1 line)
5) The block number in which the line with id=900 is located:
postgres=# select ctid, id from t where id=900;
ctid | id
--------+-----
( 92 ,15) | 900
(1 line)
6) Stop the instance:
postgres@tantor:~$ pg_ctl stop -D /var/lib/postgresql/tantor-se-17/data
Waiting for server to finish.... done
server stopped
7) Insert garbage into the block that contains the line with id=100 :
postgres@tantor:~$ dd if=/dev/urandom conv=notrunc bs=8192 seek= 92 count=1 of= /var/lib/postgresql/tantor-se-17/data/ base/5/16622
1+0 records received
1+0 entries sent
8192 bytes (8.2 kB, 8.0 KiB) copied, 0.000300021 s, 27.3 MB/s
8) Launch cluster :
postgres@tantor:~$ sudo systemctl start tantor-se-server-17
9) Run the commands that require accessing the damaged page:
postgres=# select ctid, id from t where id=900;
ERROR: invalid page in block 92 of relation base/5/16622
postgres=# select count(*) from t;
ERROR: invalid page in block 92 of relation base/5/16622
postgres=# analyze verbose t;
INFO: analyzing "public.t"
ERROR: invalid page in block 92 of relation base/5/16622
10) Заморозка не может быть выполнена:
postgres=# select pg_current_xact_id();
pg_current_xact_id
--------------------
797
(1 строка)
postgres=# vacuum freeze t;
ERROR: invalid page in block 92 of relation base/5/16622
CONTEXT : while scanning block 92 of relation "public.t"
postgres=# select relfrozenxid from pg_class where relname='t';
relfrozenxid
--------------
795
(1 line)
11) Commands with a full table scan , having reached a faulty block, will also interrupt work:
postgres=# explain update t set t = t || 'b' where id > 100;
QUERY PLAN
-----------------------------------
Update on t (cost=0.00..112.75 rows=0 width=0)
-> Seq Scan on t (cost=0.00..112.75 rows=900 width=38)
Filter: (id > 100)
(3 lines )
postgres=# explain (analyze) update t set t = t || 'b' where id > 100;
ERROR: invalid page in block 54 of relation base/5/16622
12) Indexed access commands that do not read the faulty block can be executed:
postgres=# update t set t = t || 'b' where id<500;
UPDATE 499
13) Vacuuming, if it accesses a damaged block (determined by the visibility map), cannot be performed. Old versions of rows will not be cleared, table files will increase in size.
postgres=# vacuum verbose t;
INFO: vacuuming "postgres.public.t"
ERROR: invalid page in block 92 of relation base/5/16622
CONTEXT : while scanning block 92 of relation "public.t"
Part 3. Restoring a page using page_repair
1) Install the extension into the database with the table that has the damaged page:
postgres=# CREATE EXTENSION page_repair;
CREATE EXTENSION
2) Look at the definitions of two functions included in the extension:
postgres=# \df pg_repair_page
List functions
Schema | Name | Result Data Type | Argument Data Types | Type
--------+----------------+-----------------------+------------------------------+--
public | pg_repair_page | boolean | regclass, bigint, text | func .
public | pg_repair_page | boolean | regclass, bigint, text, text | func .
(2 lines)
3) Call the function to restore the page:
postgres=# select pg_repair_page('t'::regclass, 92 , 'port=5433');
ERROR: data checksums are not enabled
The extension needs checksums enabled on the cluster. Checksums are needed to deny recovery if the administrator wants to recover an undamaged block. It is difficult to examine the contents of a block, but easy with a checksum.
4) Enable checksum calculation on the cluster with the corrupted table:
postgres=# \q
postgres@tantor:~$ pg_ctl stop -D /var/lib/postgresql/tantor-se-17/data
Waiting for server to finish.... done
server stopped
postgres@tantor:~$ rm /var/lib/postgresql/tantor-se-17/data/global/pg_store_plans.stat
postgres@tantor:~$ pg_checksums -e -D /var/lib/postgresql/tantor-se-17/data
Checksum processing completed
Files scanned: 1271
Blocks scanned: 27179
Files written: 1055
Blocks written: 27178
pg_checksums: data directory synchronization
pg_checksums: control file modification
Cluster checksums are enabled
postgres @ tantor :~$ sudo systemctl start tantor - se - server -17
5) Call the function again to restore the page:
postgres@tantor:~$ psql -c "select pg_repair_page('t'::regclass, 92 , 'port=5433')"
NOTICE: skipping page repair of the given page --- page is not corrupted
pg_repair_page
----------------
t
(1 line )
The function completed successfully, reporting that it did not restore the page, since according to its logic, the page was not damaged.
6) Check if it is damaged li page :
postgres@tantor:~$ psql -c "select ctid, id from t where id=900"
ERROR: invalid page in block 92 of relation base/5/16622
The page is still corrupted. Why does the extension consider the page uncorrupted?
When enabling checksum calculation, they were calculated for the damaged block as well. The enable utility cannot check blocks at the logical level, it calculates checksums and inserts them into the blocks.
7) To erase the checksum, repeat the page damage procedure:
pg_ctl stop -D /var/lib/postgresql/tantor-se-17/data
dd if=/dev/urandom conv=notrunc bs=8192 seek= 92 count=1 of= /var/lib/postgresql/tantor-se-17/data/ base/5/16622
sudo systemctl start tantor-se-server-17
8) Repeat procedure recovery pages :
postgres@tantor:~$ psql -c "select pg_repair_page('t'::regclass, 92 , 'port=5433')"
ERROR: page on standby is also corrupted
The function reports that, according to its logic, the page on the replica is also damaged.
9) Check if the page on the replica is damaged:
postgres@tantor:~$ psql -p 5433 -c "select ctid, id from t where id=900"
ctid | id
---------+-----
(92.15) | 900
(1 line )
postgres@tantor:~$ psql -p 5433 -c "select count(*) from t"
count
-------
1000
(1 line)
The table pages on the replica are not damaged. Why does the extension refuse to restore the page?
Because the replica does not have checksum calculation enabled. The error text is misleading.
10) Enable the calculation of checksums of data blocks on the replica:
postgres@tantor:~$ pg_ctl stop -D /var/lib/postgresql/tantor-se-17-replica/data1
Waiting for server to finish.... done
server stopped
postgres@tantor:~$ rm /var/lib/postgresql/tantor-se-17-replica/data1/global/pg_store_plans.stat
postgres@tantor:~$ pg_checksums -e -D /var/lib/postgresql/tantor-se-17-replica/data1
Checksum processing completed
Files scanned: 1271
Blocks scanned: 27179
Files written: 1055
Blocks written: 27178
pg_checksums: data directory synchronization
pg_checksums: control file modification
Cluster checksums are enabled
postgres @ tantor :~$ pg _ ctl start - D / var / lib / postgresql / tantor - se -17- replica / data 1 - l log_replica 1.log
11) Repeat the page recovery procedure:
postgres@tantor:~$ psql -c "select pg_repair_page('t'::regclass, 92 , 'port=5433')"
pg_repair_page
----------------
t
(1 line )
12) Check if the table pages are readable:
postgres@tantor:~$ psql -c "select count(*) from t"
count
-------
1000
(1 line)
Pages are readable, the page was restored by copying from a physical replica.
Using the page_repair extension requires checksumming to be enabled on the master and the physical replica from which the page will be copied to the master.
Enabling checksum calculation inserts a checksum into any blocks, including damaged ones.
Part 4. Page zeroing
In the absence of physical replicas and/or the ability to recover from backups, it is impossible to restore a damaged block. It is also impossible to leave such a block in the table - vacuuming and freezing will not work. It is possible to make the faulty page empty. In this case, all the contents of the block are considered non-existent.
1) Repeat the block damage procedure:
pg_ctl stop -D /var/lib/postgresql/tantor-se-17/data
dd if=/dev/urandom conv=notrunc bs=8192 seek=92 count=1 of=/var/lib/postgresql/tantor-se-17/data/base/5/16622
sudo systemctl start tantor-se-server-17
psql -c "select ctid, id from t where id=900"
WARNING: page verification failed, calculated checksum 9494 but expected 37021
ERROR: invalid page in block 92 of relation base/5/16622
With checksums enabled, a warning was added to the error .
2) Enable the parameter at the session level:
postgres=# set zero_damaged_pages = on;
SET
3) Run a query on the table:
postgres=# select count(*) from t;
count
-------
1000
(1 line)
The number of lines is correct, there are no errors. Why?
Because autovacuum processed the table, updated the visibility map, all blocks contain only current row versions. Therefore, when using index-only scanning, the server process does not need to read table blocks to check whether the row referenced by the index record is current.
postgres=# explain select count(*) from t;
QUERY PLAN
--------------------------------------
Aggregate (cost=49.77..49.78 rows=1 width=8)
-> Index Only Scan using t_pkey on t (cost=0.28..47.27 rows=1000 width=0)
(2 строки)
4) Выполните команду:
postgres=# select count(*) from t where t is not null;
WARNING: page verification failed, calculated checksum 9494 but expected 37021
WARNING: invalid page in block 92 of relation base/5/16622; zeroing out page
count
-------
980
(1 строка)
The number of lines is different - 20 lines less. The damaged block contained 20 lines, they are considered missing.
The warning messages are a result of setting the zero_damaged_pages = on parameter and enabling checksum calculation. If checksums were disabled, there would be no warnings, but the result (980) would be the same.
5) Run the command:
postgres=# vacuum freeze t;
VACUUM
The vacuum is successful, considering the block empty.
In this case, the block has not changed and will not change in the file. The parameter zero_damaged_pages = on does not change the contents of the block in the file.
pg_ctl stop -D /var/lib/postgresql/tantor-se-17/data
dd if=/dev/zero conv=notrunc bs=8192 seek= 92 count=1 of= /var/lib/postgresql/tantor-se-17/data/ base/5/16622
sudo systemctl start tantor-se-server-17
psql -c "select ctid, id from t where id=900"
ctid | id
------+----
(0 lines)
The contents of the faulty block are filled with zeros. The checksum is correct - also zeros. The block is considered undamaged, just empty.
6) Run the commands:
postgres@tantor:~$ psql -c "select count(*) from t"
count
-------
999
(1 line )
postgres@tantor:~$ psql -c "select ctid, id from t where id=901"
ctid | id
------+----
(0 lines )
postgres@tantor:~$ psql -c "select count(*) from t"
count
-------
998
(1 line)
The number of rows changes as a result of sampling.
The server process uses an index scan (not an Index Only Scan ), checks the contents of the block, and does not find the line:
postgres@tantor:~$ psql -c "explain select ctid, id from t where id=903"
QUERY PLAN
----------------------------------------
Index Scan using t_pkey on t (cost=0.28..8.29 rows=1 width=14)
Index Cond: (id = 903)
(2 строки)
7) Перестройте индексы:
postgres=# reindex (verbose) table t;
INFO: index "t_pkey" was reindexed
ПОДРОБНОСТИ: CPU: user: 0.00 s, system: 0.00 s, elapsed: 0.00 s
INFO: index "pg_toast_16622_index" was reindexed
ПОДРОБНОСТИ: CPU: user: 0.00 s, system: 0.00 s, elapsed: 0.00 s
REINDEX
postgres=# select count(*) from t;
count
-------
980
(1 line )
8) Delete table :
postgres=# drop table t;
DROP TABLE
Part 1. Installing an extension from source code using pldebugger as an example
This part of the practice illustrates the installation of modules supplied from source codes.
The extension, an example of installation of which is considered, can be useful for developers when working with databases on which development is carried out.
Debugging subroutines requires server support and a graphical client application (development environment) that will display the source code of the subroutine, initiate debugging, and receive debug information. The functionality is standard for debuggers: setting breakpoints, step-by-step execution, monitoring variables and changing them.
The server part is a module (library and extension) created by EnterpriseDB , freely distributed, located at https://github.com/EnterpriseDB/pldebugger
The main client application is pgAdmin. Other client applications can use the server part.
1) Switch to root as it is the owner of the software:
astra@tantor:~$ su -
Password: root
root@tantor:~#
2) Download the pldebugger extension :
root @ tantor :~#
wget https://github.com/EnterpriseDB/pldebugger/archive/refs/heads/master.zip
3) Unzip archive :
root@tantor:~# unzip master.zip
4) Go to the directory where the original extension files were unpacked:
root@tantor:~# cd pldebugger- master
5) Add to the path the directory with the pg_config utility and an environment variable that tells the make utility to use the PGXS extension installation logic:
root@tantor:~/pldebugger-master# export PATH=/opt/tantor/db/17/bin:$PATH
export USE_PGXS = 1
6) The README.pldebugger file describes how to install the extension. Give the first command:
root@tantor:~/pldebugger-master# make
A warning will appear:
plpgsql_debugger.c: In function 'is_datum_visible':
plpgsql_debugger.c:1258:36: warning: declaration of 'i' shadows a previous local [-Wshadow=compatible-local]
1258 | int i;
| ^
plpgsql_debugger.c:1234:43: note: shadowed declaration is here
1234 | int i;
| ^
showing the quality of the extension code writing.
7) The next command described in the README.pldebugger file is copying the extension files to the standard directories of the DBMS software.
Do it command :
root@tantor:~/pldebugger-master# make install
/usr/bin/mkdir -p '/opt/tantor/db/17/lib/postgresql'
/usr/bin/mkdir -p '/opt/tantor/db/17/share/postgresql/extension'
/usr/bin/mkdir -p '/opt/tantor/db/17/share/postgresql/extension'
/usr/bin/mkdir -p '/opt/tantor/db/17/share/doc/postgresql/extension'
/usr/bin/install -c -m 755 plugin_debugger.so '/opt/tantor/db/17/lib/postgresql/plugin_debugger.so'
/usr/bin/install -c -m 644 .//pldbgapi.control '/opt/tantor/db/17/share/postgresql/extension/'
/usr/bin/install -c -m 644 .//pldbgapi--1.1.sql .//pldbgapi--unpackaged--1.1.sql .//pldbgapi--1.0--1.1.sql '/
opt/tantor/db/17/share/postgresql/extension/'
/usr/bin/install -c -m 644 .//README-pldebugger.md '/opt/tantor/db/17/share/doc/postgresql/extension/'
/usr/bin/mkdir -p '/opt/tantor/db/17/lib/postgresql/bitcode/plugin_debugger'
/usr/bin/mkdir -p '/opt/tantor/db/17/lib/postgresql/bitcode'/plugin_debugger/
/usr/bin/install -c -m 644 plpgsql_debugger.bc '/opt/tantor/db/17/lib/postgresql/bitcode'/plugin_debugger/./
/usr/bin/install -c -m 644 plugin_debugger.bc '/opt/tantor/db/17/lib/postgresql/bitcode'/plugin_debugger/./
/usr/bin/install -c -m 644 dbgcomm.bc '/opt/tantor/db/17/lib/postgresql/bitcode'/plugin_debugger/./
/usr/bin/install -c -m 644 pldbgapi.bc '/opt/tantor/db/17/lib/postgresql/bitcode'/plugin_debugger/./
cd '/opt/tantor/db/17/lib/postgresql/bitcode' && /usr/lib/llvm-13/bin/llvm-lto -thinlto -thinlto-action=thinli
nk -o plugin_debugger.index.bc plugin_debugger/plpgsql_debugger.bc plugin_debugger/plugin_debugger.bc plugin_d
ebugger/dbgcomm.bc plugin_debugger/pldbgapi.bc
8) Обновите список файлов для поиска:
root@tantor:~/pldebugger-master# updatedb
Поищите файл модуля:
root@tantor:~/pldebugger-master# locate plugin_debugger
/opt/tantor/db/17/lib/postgresql/plugin_debugger.so
bitcode/plugin_debugger
bitcode/plugin_debugger.index.bc
bitcode/plugin_debugger/dbgcomm.bc
bitcode/plugin_debugger/pldbgapi.bc
bitcode/plugin_debugger/plpgsql_debugger.bc
bitcode/plugin_debugger/plugin_debugger.bc
/root/pldebugger-1.5/plugin_debugger.bc
/root/pldebugger-1.5/plugin_debugger.c
/root/pldebugger-1.5/plugin_debugger.def
/root/pldebugger-1.5/plugin_debugger.o
/root/pldebugger-1.5/plugin_debugger.so
This item illustrates one of the ways to quickly search for files in the operating system.
The module file was installed in the directory:
/opt/tantor/db/17/lib/postgresql/ plugin_debugger.so
The name of the module file must be known in order to load the library.
9) Return to the unprivileged user terminal:
root@tantor:~/pldebugger-master# exit
logout
10) Check that the extension is available for installation in the database:
astra@tantor:~$ psql
postgres=# select * from pg_available_extensions where name like '% dbg %';
name | default_version | installed_version | comment
----------+-----------------+-------------------+-------------------------------------------
pldbgapi | 1.1 | | server-side support for debugging PL/pgSQL functions
(1 line )
11) Look at the value of the parameter:
postgres=# \dconfig shared_preload_libraries
List of configuration parameters
Parameter | Value
--------------------------+------------------------------------------------
shared_preload_libraries | pg_stat_statements,pg_store_plans,auto_explain
(1 line )
12) Add library :
postgres=# alter system set shared_preload_libraries = pg_stat_statements, pg_store_plans, auto_explain, plugin_debugger ;
ALTER SYSTEM
Apostrophes cannot be used after the equal sign, otherwise the command will add quotes, treating the string as a file name, and the instance will not start. An example of a command that will run, but the instance will not start unless the postgresql.auto.conf file is manually edited , because the ALTER SYSTEM command is not executed on a stopped instance:
alter system set shared_preload_libraries = 'pg_stat_statements, pg_store_plans, auto_explain, plugin_debugger';
postgres=# \q
postgres@tantor:~$ pg_ctl stop
waiting for server to shut down.... done
server stopped
postgres@tantor:~$ pg_ctl start
waiting for server to start....
IMPORTANT : no access To file " pg_stat_statements, pg_store_plans, auto_explain, plugin_debugger " : No such file or catalog
MESSAGE: DB system is off
stopped waiting
pg_ctl: could not start server
Examine the log output.
13) Restart instance :
astra@tantor:~$ sudo systemctl restart tantor-se-server-17
14) The debugger library has been loaded. Create an extension in the postgres database:
astra@tantor:~$ psql
postgres=# create extension pldbgapi;
CREATE EXTENSION
15) Create a function to test the debugger:
CREATE OR REPLACE FUNCTION bobdef()
RETURNS text
LANGUAGEplpgsql
SECURITY DEFINER
AS $function$
BEGIN
RAISE NOTICE 'search_path %', current_schemas(true);
RAISE NOTICE 'current_user %', current_user;
RAISE NOTICE 'session_user %', session_user;
RAISE NOTICE 'user %', user;
RETURN now();
END;
$function$
;
Part 2. Debugging a function in pgAdmin
1) Launch pgAdmin.
When prompted for a password, type tantor.
2) Expand Servers -> master -> Schemas (1) -> public -> Functions (..)
If there are no connections to the database, create one and name it master.
3) To debug the execution of a subroutine in another session, select the bobdef() function. Right-click and select Debugging -> Set Breakpoint
4) Will appear message "Waiting for another session to invoke target".
IN psql call function :
postgres=# select bobdef();
5) The pgAdmin window will hang and show the source code of the subroutine. The breakpoint is the first command of the subroutine.
In the window with the function text, you can click on the icon (second from the left) Step over - there will be step-by-step execution. In this case, you can see the output of the RAISE NOTICE commands in the psql window .
You can also set breakpoints. To set or remove them, click the mouse to the right of the line number. To the right of the number 6 in the picture you can see a red circle - you can click on this place, and the circle indicates a breakpoint.
6) Click the Step Over or Continue/Start icon until the function is completed.
7) To perform debugging with a subroutine call in a pgAdmin session, you can select Debugging -> Debug from the drop-down menu. In this case, you will not need to run the function in psql , it will be launched in pgAdmin and client_messages (the result of the RAISE NOTICE commands) will be displayed in the pgAdmin window .
Part 3. Debugging routines in DBeaver
1) Launch DBeaver. When you first launch the program, it will offer to create a Sample Database, you don't need to create it, it doesn't apply to postgres.
2) Select the PostgreSQL icon:
3) Create a database connection if not already created. Note that it is better to select the local Tantor 16 client directory by creating a client definition at /opt/tantor/db/16 :
4) Make sure the product version field contains a number:
5) DBeaver is written in java and will offer to download the jdbc driver:
6) Select the subroutine to debug and click on the "Source Code" window:
7) Select Help -> Install New Software from the menu. Select to install DBeaver Debug Extension:
8) Select Select All, the checkbox will be checked:
9) Select a point on the radio button:
10) In the window that appears, click Select All and the Trust Selected button:
If the utility hangs and the button does not click, kill the process. The utility can hang if you click anywhere in this window except Select All, and then Trust Selected.
11) The utility will prompt you to restart, restart it:
12) Check that after restarting, the window with the source code of the subroutine is open. If it is not open, then select the subroutine and click on the "Source Code" tab:
13) Click the green icon on the toolbar:
14) In the debug settings window that appears, you can set the parameters for calling the subroutine. Click "OK":
15) In the window that appears to select the debugger interface, click No:
16) By clicking at the beginning of the lines of executable code, you can set and remove breakpoints, they are displayed as blue circles. With breakpoints, you can continue executing the code by clicking on the icon with a green triangle:
All icons on the toolbar are standard for debuggers in graphical development environments (IDE): Step into (F5), Step over (F6), Terminate (Ctrl+F2), Resume (F8).
1) Run the commands:
drop table if exists t2;
create table t2(c1 text, c2 text);
insert into t2 (c1)
VALUES (repeat('a', 1024*1024*512));
update t2 set c2 = c1;
select * from t2;
When executing the select command, an error will appear :
ERROR: out of memory
DETAILS : Cannot enlarge string buffer containing 536870922 bytes by 536870912 more bytes.
When fetching into a string buffer, the value of field c1 was fetched, plus 10 bytes. To fetch the value of the second field c2, the buffer tried to increase by the size of field c2 .
2) Let's try with smaller fields:
drop table if exists t1;
create table t1(c1 text, c2 text, c3 text, c4 text);
insert into t1 (c1) VALUES (repeat('a', 1024*1024*256));
update t1 SET c2=c1;
update t1 SET c3=c1;
update t1 SET c4=c1;
select * from t1;
Will appear error :
ERROR: out of memory
DETAILS : Cannot enlarge string buffer containing 805306386 bytes by 268435456 more bytes.
When selecting into a string buffer, the values of fields c1, c2, c3 were selected . The buffer reached the size of three fields plus 18 bytes. When increasing the buffer size by the size of field c4, an error occurred that the 1 GB limit was exceeded.
3) Do it command :
postgres=# COPY t2 TO '/tmp/test';
ERROR: out of memory
DETAILS : Cannot enlarge string buffer containing 536870913 bytes by 536870912 more bytes.
The same error occurred.
4) Rows larger than 1 GB can be exported by individual columns. The text data type and other data types have a field size limit of 1 GB. Run the command that exports the contents of one column:
postgres=# COPY t2 (c1) TO '/tmp/test';
COPY 1
postgres=# \! ls -al /tmp/test
-rw-r--r-- 1 postgres postgres 536870913 /tmp/test
postgres=# \! rm /tmp/test
The column contents were successfully unloaded.
5) Perform :
drop table if exists t2;
create table t2 (c1 text);
insert into t2 (c1) VALUES (repeat(E'a\n', 357913941));
COPY t2 TO '/tmp/test';
Will appear error :
postgres=# COPY t2 TO '/tmp/test';
ERROR: out of memory
DETAILS : Cannot enlarge string buffer containing 1073741822 bytes by 1 more bytes.
The string buffer memory limit was exceeded by 1 byte.
The field size is one third of a gigabyte, rounded down.
When unloaded in text form, the field contents will look like this:
a\na\na\na\n and the field size will increase threefold to 107374182 3 bytes, which is 1 byte more than the maximum limit.
6) When using the binary format , the field can be unloaded:
postgres=# COPY t2 TO '/tmp/test' WITH BINARY;
COPY 1
postgres=# \! ls -al /tmp/test
-rw-r--r-- 1 postgres postgres 715827909 /tmp/test
postgres=# \! rm /tmp/test
7) See how much memory the server process allocates when processing a string. Run commands :
drop table if exists t2;
create table t2(c1 text, c2 text);
insert into t2 (c1) values (repeat('a', 1024*1024*1024-69));
During command execution insert , if you have time, you can see in the second terminal window how the volume of occupied and free memory has changed (by pressing the <up arrow> and <Enter> keys on the keyboard):
postgres@tantor:~$ free -b -w
total used free shared buffers cache available
Mem: 4109729792 633286656 2788950016 148430848 80027648 607465472 3033432064
Swap: 0 0 0
postgres@tantor:~$ free -b -w
total used free shared buffers cache available
Mem: 4109729792 1280106496 2164342784 148439040 80093184 585187328 2386747392
Swap: 0 0 0
postgres@tantor:~$ free -b -w
total used free shared buffers cache available
Mem: 4109729792 1514721280 1929728000 148439040 80093184 585187328 2152132608
Swap: 0 0 0
postgres@tantor:~$ free -b -w
total used free shared buffers cache available
Mem: 4109729792 1948651520 1495797760 148439040 80093184 585187328 1718202368
Swap: 0 0 0
postgres@tantor:~$ free -b -w
total used free shared buffers cache available
Mem: 4109729792 2772905984 671543296 148439040 80093184 585187328 893947904
Swap: 0 0 0
postgres@tantor:~$ free -b -w
total used free shared buffers cache available
Mem: 4109729792 656199680 2735239168 148439040 80093184 638197760 3010174976
Swap: 0 0 0
Memory is allocated dynamically.
Memory usage increased by ~2 GB (2125635584 bytes) . Free memory remaining is ~ 670 MB .
8) If the host (virtual machine) does not have enough physical memory to allocate the row processing buffer, the instance may crash. Run commands :
update t2 set c2 = c1;
select * from t2;
The server unexpectedly closed the connection
Most likely the server stopped working due to a failure.
before or during the execution of a request.
Connection to the server was lost. Reconnection attempt failed.
Connection to the server was lost. Reconnection attempt failed.
!?> \q
postgres@tantor:~$ psql
psql (17.5)
Type "help" to get help.
This error will occur when there is not enough physical memory. The server process tried to allocate ~ 4 GB of memory, but there was less than 2.7 GB of free memory. oom-kill (out of memory killer) killed the server process. However, oom-kill can kill arbitrary processes. The postgres process stopped all processes and started background processes.
During the dynamic memory allocation process, the operating system reduced the size of the operating system cache. If the operating system cache had many pages that had not been written to disk, the operating system would try to write them and become less "responsive."
postgres@tantor:~$ free -b -w
total used free shared buffers cache available
Mem: 4109729792 3190587392 145354752 148439040 80482304 693305344 474697728
Swap: 0 0 0
postgres@tantor:~$ free -b -w
total used free shared buffers cache available
Mem: 4109729792 3805593600 117968896 148439040 237568 185929728 21350400
Swap: 0 0 0
postgres@tantor:~$ free -b -w
total used free shared buffers cache available
Mem: 4109729792 629743616 3223060480 134189056 4390912 252534784 3134205952
Swap: 0 0 0
Messages in the operating system log:
postgres@tantor:~$ sudo dmesg
[79734.048885] oom-kill: constraint=CONSTRAINT_NONE,nodemask=(null),cpuset=/,mems_allowed=0-1,global_oom, task_memcg=/system.slice/tantor-se-server-17.service,task=postgres,pid=5041,uid=999
[79734.048904] Out of memory: Killed process 5041 (postgres) total-vm:4425648kB, anon-rss:3177400kB, file-rss:4kB, shmem-rss:34624kB, UID:999 pgtables:6444kB oom_score_adj:0
Сообщения в логе кластера:
postgres@tantor:~$ cat $PGDATA/current_logfiles
stderr log/postgresql-000000.log
postgres@tantor:~$ tail -n 15 $PGDATA/log/ postgresql-000000.log
[31030] LOG: server process (PID 31038) was terminated by signal 9: Killed
[31030] DETAIL: Failed process was running: select * from t2;
[31030] LOG: terminating any other active server processes
[31030] LOG: all server processes terminated; reinitializing
[31039] LOG: database system was interrupted; last known up at 19:58:59 MSK
[31042] FATAL: the database system is in recovery mode
Failed.
[31039] LOG: database system was not properly shut down; automatic recovery in progress
[31039] LOG: redo starts at 116/CE344C0
[31039] LOG: invalid record length at 116/DF34798: expected at least 26, got 0
[31039] LOG: redo done at 116/DF34770 system usage: CPU: user: 0.02 s, system: 0.12 s, elapsed: 0.15 s
[31040] LOG: checkpoint starting: end-of-recovery immediate wait
[31040] LOG: checkpoint complete: wrote 2105 buffers (12.8%); 0 WAL file(s) added, 0 removed, 0 recycled; write=0.025 s, sync=0.003 s, total=0.031 s; sync files=25, longest=0.001 s, average=0.001 s; distance=17408 kB, estimate=17408 kB; lsn=116/DF34798, redo lsn=116/DF34798
[31030] LOG: database system is ready to accept connections
oom-kill sent signal 9 ( SIGKILL ) to the server process that tried to allocate a lot of memory when executing select * from t2 , but oom-kill can send signal 9 ( SIGKILL ) to other processes as well.
postgres process stops all processes and starts the processes again , as if the instance were started.
9) Delete tables :
postgres=# drop table t1;
DROP TABLE
postgres=# drop table t2;
DROP TABLE
in the PGDATA and tablespace directories that are not used by the cluster. Such files may appear as a result of an unexpected termination of the process that created the file. For example, when a table is created, rows are created in the system catalog tables and files are created in the file system. If the process crashes, then when the instance is restarted, there will be no rows in the system catalog tables if the transaction has not yet committed. However, the files usually remain in the file system. Postgres instances do not often terminate incorrectly ( SEGKILL, SIGSEGV signals ), so the problem is not very relevant in terms of the space occupied by files "orphaned" as a result of the disappearance of the process that created them. For example, when there is not enough memory, oom-kill sends a SEGKILL signal . Let's install an extension that will check if there are such files in the cluster.
1) Выполните команды по установке расширения:
astra@tantor:~/pg_orphaned-master$ su - root
Password: root
root@tantor:~# wget https://github.com/bdrouvot/pg_orphaned/archive/refs/heads/master.zip
HTTP request sent, awaiting response... 302 Found
Location: https://codeload.github.com/bdrouvot/pg_orphaned/zip/refs/heads/master [following]
https://codeload.github.com/bdrouvot/pg_orphaned/zip/refs/heads/master
HTTP request sent, awaiting response... 200 OK
Length: unspecified [application/zip]
Saving to: 'master.zip'
master.zip [ <=> ] 13.79K --.-KB/s in 0.04s
(308 KB/s) - 'master.zip' saved [14119]
root@tantor:~# unzip master.zip
Archive: master.zip
5038f7ed2579cfbdce1ccb4fbac311267b66779a
creating: pg_orphaned-master/
inflating: pg_orphaned-master/LICENSE
inflating: pg_orphaned-master/Makefile
inflating: pg_orphaned-master/README.md
inflating: pg_orphaned-master/pg_orphaned--1.0.sql
inflating: pg_orphaned-master/pg_orphaned.c
inflating: pg_orphaned-master/pg_orphaned.control
root@tantor:~# cd pg_orphaned-master
root@tantor:~/pg_orphaned-master# export PATH=/opt/tantor/db/17/bin:$PATH
root@tantor:~/pg_orphaned-master# export USE_PGXS=1
root@tantor:~/pg_orphaned-master# make
gcc -Wall -Wmissing-prototypes -Wpointer-arith -Wdeclaration-after-statement -Werror=vla -Wendif-labels -Wmissing-format-attribute -Wimplicit-fallthrough=3 -Wcast-function-type -Wshadow=compatible-local -Wformat-security -fno-strict-aliasing -fwrapv -fexcess-precision=standard -Wno-format-truncation -Wno-stringop-truncation -O2 -pipe -Wno-missing-braces -fPIC -fvisibility=hidden -I. -I./ -I/opt/tantor/db/17/include/postgresql/server -I/opt/tantor/db/17/include/postgresql/internal -D_GNU_SOURCE -I/usr/include/libxml2 -c -o pg_orphaned.o pg_orphaned.c
gcc -Wall -Wmissing-prototypes -Wpointer-arith -Wdeclaration-after-statement -Werror=vla -Wendif-labels -Wmissing-format-attribute -Wimplicit-fallthrough=3 -Wcast-function-type -Wshadow=compatible-local -Wformat-security -fno-strict-aliasing -fwrapv -fexcess-precision=standard -Wno-format-truncation -Wno-stringop-truncation -O2 -pipe -Wno-missing-braces -fPIC -fvisibility=hidden -shared -o pg_orphaned.so pg_orphaned.o -L/opt/tantor/db/17/lib -L/usr/lib/llvm-11/lib -Wl,--as-needed -Wl,-rpath,'/opt/tantor/db/17/lib',--enable-new-dtags -lm -fvisibility=hidden
/usr/bin/clang-11 -Wno-ignored-attributes -fno-strict-aliasing -fwrapv -Wno-unused-command-line-argument -O2 -I. -I./ -I/opt/tantor/db/17/include/postgresql/server -I/opt/tantor/db/17/include/postgresql/internal -D_GNU_SOURCE -I/usr/include/libxml2 -flto=thin -emit-llvm -c -o pg_orphaned.bc pg_orphaned.c
root@tantor:~/pg_orphaned-master# make install
/usr/bin/mkdir -p '/opt/tantor/db/17/lib/postgresql'
/usr/bin/mkdir -p '/opt/tantor/db/17/share/postgresql/extension'
/usr/bin/mkdir -p '/opt/tantor/db/17/share/postgresql/extension'
/usr/bin/install -c -m 755 pg_orphaned.so '/opt/tantor/db/17/lib/postgresql/pg_orphaned.so'
/usr/bin/install -c -m 644 .//pg_orphaned.control '/opt/tantor/db/17/share/postgresql/extension/'
/usr/bin/install -c -m 644 .//pg_orphaned--1.0.sql '/opt/tantor/db/17/share/postgresql/extension/'
/usr/bin/mkdir -p '/opt/tantor/db/17/lib/postgresql/bitcode/pg_orphaned'
/usr/bin/mkdir -p '/opt/tantor/db/17/lib/postgresql/bitcode'/pg_orphaned/
/usr/bin/install -c -m 644 pg_orphaned.bc '/opt/tantor/db/17/lib/postgresql/bitcode'/pg_orphaned/./
cd '/opt/tantor/db/17/lib/postgresql/bitcode' && /usr/lib/llvm-11/bin/llvm-lto -thinlto -thinlto-action=thinlink -o pg_orphaned.index.bc pg_orphaned/pg_orphaned.bc
root@tantor:/ pg_orphaned-master # exit
logout
astra@tantor:~$ psql
psql (17.5)
Type "help" to get help.
postgres=# CREATE EXTENSION pg_orphaned;
CREATE EXTENSION
2) Look at the list of functions that the extension has created:
postgres=# \df *orphane*
Schema | Name | Result data type |
--------+--------------------------+------------------+------------------------
public | pg_list_orphaned | SETOF record | older_than interval DEFAULT
public | pg_list_orphaned_moved | SETOF record | OUT dbname text, OUT path t
public | pg_move_back_orphaned | integer |
public | pg_move_orphaned | integer | older_than interval DEFAULT
public | pg_remove_moved_orphaned | void |
(5 rows)
3) Check if there are orphaned data files in the tablespace directories:
postgres=# select * from pg_list_orphaned('1 second');
dbname | path | name | size | mod_time | relfilenode | release | older
--------+------+------+------+----------+-------------+----------+---------
(0 rows)
4) Get the PID of the server process :
postgres=# select pg_backend_pid();
pg_backend_pid
----------------
10555
(1 row)
5) В окне psql дайте команды:
postgres=*# drop table if exists t2;
DROP TABLE
postgres=# begin;
BEGIN
postgres=*# create table t2 (c1 text, c2 text);
CREATE TABLE
postgres=*# insert into t2 (c1) values (repeat('a', 1024*1024*1024-69));
5) Launch a second terminal window and prepare a command to execute, and send signal 11 server process :
astra@tantor:~$ sudo kill -11 10555
6) The process has stopped, the instance has rebooted. Since the session was idle, the psql utility did not receive a notification that the server process no longer exists. Run any command :
postgres= * # \d t2
server closed the connection unexpectedly
This probably means the server terminated abnormally
before or while processing the request.
The connection to the server was lost. Attempting reset: Succeeded.
psql utility reported that the connection was closed.
A server process crash due to a segmentation fault was simulated.
postgres process stopped all processes and restarted the instance.
В логе кластера появятся сообщения:
LOG: server process (PID 10555) was terminated by signal 11: Segmentation fault
DETAIL: Failed process was running: insert into t2 (c1) values (repeat('a', 1024*1024*1024-69));
LOG: terminating any other active server processes
FATAL: the database system is in recovery mode
LOG: all server processes terminated; reinitializing
LOG: database system was interrupted; last known up at
LOG: database system was not properly shut down; automatic recovery in progress
LOG: redo starts at 0/1BCC9070
LOG: invalid record length at 0/1BCC91D0: expected at least 26, got 0
LOG: redo done at 0/1BCC9138 system usage: CPU: user: 0.00 s, system: 0.00 s, elapsed: 0.00 s
LOG: checkpoint starting: end-of-recovery immediate wait
LOG: checkpoint complete: wrote 3 buffers (0.0%); 0 WAL file(s) added, 0 removed, 0 recycled; write=0.001 s, sync=0.001 s, total=0.004 s; sync files=2, longest=0.001 s, average=0.001 s; distance=0 kB, estimate=0 kB; lsn=0/1BCC91D0, redo lsn=0/1BCC91D0
LOG: database system is ready to accept connections
The table creation transaction was uncommitted and rolled back, but the file creation commands were not rolled back - working with files in the file system is non-transactional.
7) Restart psql or create a new connection:
postgres=# \q
postgres@tantor:~$ psql
psql (17.5)
Type "help" for help.
8) Check if any orphaned files have appeared:
postgres=# select * from pg_list_orphaned('1 second');
dbname | path | name | size | mod_time | relfilenode | release | older
----------+--------+-----------+-----------+-------------+--------------+-----------+---------+-------
postgres | base/5 | 49307 | 155648 | 09:12:58+03 | 49307 | 0 | t
postgres | base/5 | 49303 | 8192 | 09:12:53+03 | 49303 | 0 | t
postgres | base/5 | 49306 | 12615680 | 09:12:58+03 | 49306 | 0 | t
postgres | base/5 | 49306_fsm | 24576 | 09:12:52+03 | 49306 | 0 | t
(4 rows)
Files have appeared and are taking up disk space .
Note: If the server process had disappeared during the execution of the last INSERT command , the errors would have been:
server closed the connection unexpectedly
This probably means the server terminated abnormally
before or while processing the request.
The connection to the server was lost. Attempting reset: Failed.
The connection to the server was lost. Attempting reset: Failed.
!?> \q
postgres@tantor:~$ psql
psql (17.5)
Type "help" for help.
postgres=# select * from pg_list_orphaned('1 second');
dbname | path | name | size | mod_time | relfilenode | reloid | older
----------+--------+-------+------+----------+-------------+--------+------
postgres | base/5 | 41113 | 0 | | 41113 | 0 | t
postgres | base/5 | 41117 | 8192 | | 41117 | 0 | t
postgres | base/5 | 41116 | 0 | | 41116 | 0 | t
(3 rows)
9) Delete orphaned files functions extensions :
postgres=# select * from pg_move_orphaned('1 second');
pg_move_orphaned
------------------
4
(1 row)
postgres=# select * from pg_remove_moved_orphaned();
pg_remove_moved_orphaned
--------------------------
(1 row)
postgres=# select * from pg_list_orphaned('1 second');
dbname | path | name | size | mod_time | relfilenode | reloid | older
--------+------+------+------+----------+-------------+--------+-------
(0 rows)
postgres=# drop table if exists t2;
NOTICE: table "t2" does not exist, skipping
DROP TABLE
The table is missing because the transaction that created it was not committed. The server process created row versions in the pages of the system catalog tables. The log records about the creation of row versions could have been written to the WAL files, after which the pages with these records could have been saved to disk, or they could not have been saved. Depending on this, after the instance is restarted, the pages may or may not contain row version records. In any case, these row versions belong to an uncommitted transaction and are not visible in sessions. Such row versions will be cleaned up in the standard way: fast cleanup or autovacuum.
Part 1. Configuring the minio backup storage server
S3 (Simple Storage Service) protocol is used by companies that provide large-scale data storage services. The application that services the storage can be installed on the enterprise network. In this practice, the minio application is used .
1) Check if the minio app is installed :
postgres@tantor:~$ sudo apt-get install minio
Reading package lists... Done
Building dependency tree
Reading state information... Done
minio is already the newest version (20240321231343.0.0).
0 upgraded, 0 newly installed, 0 to remove and 0 not upgraded.
Attachment established.
2) Look at the contents of the minio configuration file :
postgres@tantor:~$ cat /etc/default/minio
MINIO_ROOT_USER= minioadmin
MINIO_ROOT_PASSWORD= minioadmin
MINIO_VOLUMES=" /var/local/minio/disk1 "
MINIO_SERVER_URL= http://localhost: 9000
After installing the application, this file and directory are created manually. It specifies the directory in which backups will be created, the name and password of the privileged user, and the port for the web shell for managing the application.
3) Launch service mini :
postgres@tantor:~$ sudo systemctl enable --now minio
Created symlink /etc/systemd/system/multi-user.target.wants/minio.service → /lib/systemd/system/minio.service.
4) Launch your browser and open the address http://127.0.0.1:9000
Enter the name minioadmin and password minioadmin
Click the Login button and save the password in your browser.
5) Create a bucket (a logical container for classifying backups). Click the Create Bucket link or select Buckets from the menu on the left.
bucket1 in the Bucket Name field . Click the Create Bucket button. The bucket will be created.
Create buckets and name them so that it is easy to identify the database cluster that will be backed up. You must create a separate bucket for each cluster. WAL-G supports backup offloading - backup from a physical replica. You do not need to create separate buckets for physical replicas.
6) This point is optional. It can be omitted, it is not required for WAL-G. The point illustrates the configuration of the client utility, which is not used by WAL-G. The point may be interesting because it allows access to the minio test cloud storage at https://play.min.io .
postgres@tantor:~$ cat << EOF > s3.config
access-key = miniadmin
secret-key = miniadmin
s3-host = localhost
s3-port = 9000
s3-bucket = bucket1
s3-secure = off
EOF
postgres@tantor:~$ sudo chmod 755 /usr/local/bin/mccli
postgres@tantor:~$ /usr/local/bin/mccli alias set local http://127.0.0.1:9000
mccli: Configuration written to `/var/lib/postgresql/.mccli/config.json`. Please update your access credentials.
mccli: Successfully created `/var/lib/postgresql/.mccli/share`.
mccli: Initialized share uploads `/var/lib/postgresql/.mccli/share/uploads.json` file.
mccli: Initialized share downloads `/var/lib/postgresql/.mccli/share/downloads.json` file.
Enter Access Key: minioadmin
Enter Secret Key: minioadmin
Added `local` successfully.
postgres@tantor:~$ cat .mccli/config.json
{
"version": "10",
"aliases": {
"gcs": {
"url": "https://storage.googleapis.com",
"accessKey": "YOUR-ACCESS-KEY-HERE",
"secretKey": "YOUR-SECRET-KEY-HERE",
"api": "S3v2",
"path": "dns"
},
"local": {
"url": "http://127.0.0.1:9000",
"accessKey": "minioadmin",
"secretKey": "minioadmin",
"api": "s3v4",
"path": "auto"
},
"play": {
"url": "https://play.min.io",
"accessKey": "Q3AM3UQ867SPQQA43P2F",
"secretKey": "zuf+tfteSlswRu7BJ86wekitnifILbZam1KYY3TG",
"api": "S3v4",
"path": "auto"
},
"s3": {
"url": "https://s3.amazonaws.com",
"accessKey": "YOUR-ACCESS-KEY-HERE",
"secretKey": "YOUR-SECRET-KEY-HERE",
"api": "S3v4",
"path": "dns"
}
}
You can open a new tab in your browser and go to https://play.min.io
Enter the name Q3AM3UQ867SPQQA43P2F and password zuf+tfteSlswRu7BJ86wekitnifILbZam1KYY3TG from the file
On this site you can see an example of the minio server part working .
Part 2. Installing WAL-G
1) Open a new terminal and run the command:
astra@tantor:~$ sudo dpkg -i wal-g-tantor-all_2.0.1-1astra1.7-1_amd64.deb
Selecting previously unselected package wal-g-tantor-all.
(The database currently reads 211859 files and directories.)
Preparing to unpack wal-g-tantor-all_2.0.1-1astra1.7-1_amd64.deb
Unpacking wal-g-tantor-all (2.0.1-1astra1.7-1)
The wal-g-tantor-all package (2.0.1-1astra1.7-1) is being configured
The package contains a single file /opt/tantor/usr/bin/wal-g
2) Check version WAL-G:
astra@tantor:~$ wal-g --version
wal-g version v2.0.1 b7d53dd7 2024.01.12_16:25:53 PostgreSQL
3) Look at the name of the WAL-G parameter file and its location:
postgres@tantor:~$ wal-g | grep config
--config string config file (default is $HOME/.walg.json )
--turbo Ignore all kinds of throttling defined in config
The default location of the settings file is $HOME /.walg.json .
4) Create a WAL-G parameter file in the home directory of the postgres operating system user:
postgres@tantor:~$ cat > .walg.json << EOF
{
"AWS_ENDPOINT": "http://127.0.0.1:9000",
"WALG_S3_PREFIX": "s3://bucket1",
"AWS_ACCESS_KEY_ID": "minioadmin",
"AWS_SECRET_ACCESS_KEY": "minioadmin",
"AWS_S3_FORCE_PATH_STYLE": "true",
"WALG_COMPRESSION_METHOD": "brotli",
"WALG_DELTA_MAX_STEPS": "5",
"PGDATA": "/var/lib/postgresql/tantor-se-17/data",
"PGHOST": "/var/run/postgresql"
}
EOF
5) Check that the command line utility wal-g can connect to the server via the S3 protocol . To do this, check the list of backups:
postgres@tantor:~$ wal-g backup-list
INFO: 2035/06/25 15:51:48.707457 No backups found
If the basket does not exist, an error will be returned. Example errors :
ERROR: 2035/06/25 15:43:19.396870 failed to list s3 folder: 'basebackups_005/': NoSuchBucket: The specified bucket does not exist
status code: 404, request id: 17DF031B83CC101C, host id: dd9025bab4ad464b049177c95eb6ebf374d3b3fd1af9251148b658df7ac2e3e8
6) See what WAL segments the cluster has:
postgres@tantor:~$ ls $PGDATA/pg_wal
0000000100000000000000019 archive_status
7) Let's see which command transfers WAL segments.
the WAL segment file name as a parameter :
postgres@tantor:~$ wal-g wal-push $PGDATA/pg_wal/ 0000000100000000000000019
INFO: 2035/06/25 FILE PATH: 0000000100000000000000019.br
8) The utility does not delete what is backed up. Check that the original file has not been deleted:
postgres@tantor:~$ ls $PGDATA/pg_wal
0000000100000000000000019 archive_status walg_data
IN directories magazines was created subdirectory walg_data/walg_archive_status
9) Run the command:
postgres@tantor:~$ wal-g backup-list
INFO: 2035/06/25 16:01:30.875297 No backups found
No cluster backups were found because we haven't made any yet.
10) Run the commands:
postgres@tantor:~$ wal-g wal-show
INFO: 2035/06/25 No backups found in storage.
+-----+------------+-----------------+---------------------------+---------------------------+---------------+----------------+--------+---------------+
| TLI | PARENT TLI | SWITCHPOINT LSN | START SEGMENT | END SEGMENT | SEGMENT RANGE | SEGMENTS COUNT | STATUS | BACKUPS COUNT |
+-----+------------+-----------------+---------------------------+---------------------------+---------------+----------------+--------+---------------+
| 1 | 0 | 0/0 | 000000010000000000000019 | 000000010000000000000019 | 1 | 1 | OK | 0 |
+-----+------------+-----------------+--------------------------+--------------------------+---------------+----------------+--------+---------------+
postgres@tantor:~$ wal-g wal-verify timeline
WARNING: 2035/06/25 16:03:17.728025 It seems your archive_mode is not enabled. This will cause inconsistent backup. Please consider configuring WAL archiving.
INFO: 2035/06/25 16:03:17.750944 000000010000000000000019
INFO: 2035/06/25 16:03:17.762117 Building check runner: timeline
INFO: 2035/06/25 16:03:17.762253 Running the check: timeline
[wal-verify] timeline check status: OK
[wal-verify] timeline check details:
Highest timeline found in storage: 1
Current cluster timeline: 1
postgres@tantor:~$ wal-g wal-verify integrity
WARNING: 2035/06/25 16:03:43.575246 It seems your archive_mode is not enabled. This will cause inconsistent backup. Please consider configuring WAL archiving.
INFO: 2035/06/25 16:03:43.579362 Current WAL segment: 000000010000000000000019
INFO: 2035/06/25 16:03:43.586333 Building check runner: integrity
WARNING: 2035/06/25 16:03:43.604241 Failed to detect earliest backup WAL segment no: 'No backups found',will scan until the 0000000X0000000000000001 segment.
INFO: 2035/06/25 16:03:43.604378 Running the check: integrity
[wal-verify] integrity check status: WARNING
[wal-verify] integrity check details:
+-----+--------------------------+--------------------------+----------------+-------------------+
| TLI | START | END | SEGMENTS COUNT | STATUS |
+-----+--------------------------+--------------------------+----------------+-------------------+
| 1 | 000000010000000000000001 | 000000010000000000000008 | 8 | MISSING_LOST |
| 1 | 000000010000000000000009 | 000000010000000000000018 | 16 | MISSING_UPLOADING |
+-----+--------------------------+--------------------------+----------------+-------------------+
Part 3: Configuring a Cluster for Log Archiving
1) Run psql and set the configuration parameters:
postgres@tantor:~$ psql
psql (17.5)
Type "help" for help.
postgres=# alter system set archive_command = '/opt/tantor/usr/bin/wal-g wal-push " %p " >> $PGDATA/log/archive_command.log 2>&1';
ALTER SYSTEM
postgres=# alter system set restore_command = '/opt/tantor/usr/bin/wal-g wal-fetch "%f" "%p" >> $PGDATA/log/restore_command.log 2>&1';
ALTER SYSTEM
postgres=# alter system set archive_mode=on;
ALTER SYSTEM
archive_command parameter sets the command to be executed after switching to the next WAL segment. The command must complete successfully (return status "0"), otherwise the segment will be considered unarchived and will not be able to be deleted. %p - a variable that is initialized with the name and path to the WAL segment to which the write has been completed and which should be archived. Utility messages that it outputs to stdout and stderr are sent to the file .
restore_command parameter specifies which command will be executed by the startup process , which restores the cluster after the instance is started and determines from the backup_label or pg_control file which WAL segment is needed to continue the restoration (will be rolled out next). This command should create a WAL file in the $PGDATA/pg_wal directory.
archive_mode parameter enables the parameter action archive_command .
This parameter also has the value always , which means that archive_command will be executed both during backup recovery and in physical replica mode.
wal-g utility uses a parameter file $HOME/.walg.json . If you need to have multiple parameter files, you can use the --config parameter . Example :
alter system set archive_command = '/opt/tantor/usr/bin/wal-g --config /var/lib/postgresql/.walg.json wal-push " %p " >> $PGDATA/log/archive_command.log 2>&1';
2) Restart the instance:
postgres@tantor:~$ pg_ctl stop
postgres@tantor:~$ sudo systemctl start tantor-se-server-17
3) Check that the archive_status subdirectory has appeared in the logs directory :
postgres@tantor:~$ ls -a $PGDATA/pg_wal/ archive_status
. .. 00000001000000000000001A.done
an empty file in the directory .
4) Check that the archive_command.log file has appeared, the path to which was specified in the archive_command parameter :
postgres@tantor:~$ cat $PGDATA/log/archive_command.log
INFO: 2035/06/25 16:34:37.373971 FILE PATH: 00000001000000000000001A.br
If the file does not appear and there are no typos, this may mean that the instance was not stopped, but was restarted with the restart option (the postgres process was not unloaded from memory).
5) Do it command :
postgres@tantor:~$ wal-g wal-verify integrity
INFO: 2035/06/25 16:43:29.235139 Current WAL segment: 00000001000000000000001B
INFO: 2035/06/25 16:43:29.244838 Building check runner: integrity
WARNING: 2035/06/25 16:43:29.266445 Failed to detect earliest backup WAL segment no: 'No backups found',will scan until the 0000000X0000000000000001 segment.
INFO: 2035/06/25 16:43:29.266730 Running the check: integrity
[wal-verify] integrity check status: WARNING
[wal-verify] integrity check details:
+-----+--------------------------+--------------------------+----------------+-------------------+
| TLI | START | END | SEGMENTS COUNT | STATUS |
+-----+--------------------------+--------------------------+----------------+-------------------+
| 1 | 000000010000000000000001 | 00000001000000000000000A | 10 | MISSING_LOST |
| 1 | 00000001000000000000000B | 000000010000000000000018 | 14 | MISSING_UPLOADING |
| 1 | 000000010000000000000019 | 00000001000000000000001A | 2 | FOUND |
+-----+--------------------------+--------------------------+----------------+-------------------+
The log files have been archived.
6) Back up the cluster directory. WAL-G runs on the host with the cluster, so you don't have to use the replication protocol, but copy the contents of the directory.
To do this, you need to pass the name of the cluster directory as a parameter:
postgres@tantor:~$ wal-g backup-push $PGDATA
INFO: 2035/06/25 16:45:29.484805 Couldn't find previous backup. Doing full backup.
INFO: 2035/06/25 16:45:29.514046 Calling pg_start_backup()
INFO: 2035/06/25 16:45:29.630427 Starting a new tar bundle
INFO: 2035/06/25 16:45:29.630574 Walking ...
INFO: 2035/06/25 16:45:29.632062 Starting part 1 ...
INFO: 2035/06/25 16:45:35.436669 Packing ...
INFO: 2035/06/25 16:45:35.439440 Finished writing part 1.
INFO: 2035/06/25 16:45:35.814169 Starting part 2 ...
INFO: 2035/06/25 16:45:35.814216 /global/pg_control
INFO: 2035/06/25 16:45:35.816267 Finished writing part 2.
INFO: 2035/06/25 16:45:35.816305 Calling pg_stop_backup()
INFO: 2035/06/25 16:45:35.864195 Starting part 3 ...
INFO: 2035/06/25 16:45:35.868956 backup_label
INFO: 2035/06/25 16:45:35.869596 tablespace_map
INFO: 2035/06/25 16:45:35.871637 Finished writing part 3.
INFO: 2035/06/25 16:45:35.989039 Wrote backup with name base_0000000100000000000000 1C
At the beginning of the reservation, when the function is called pg_start_backup() a checkpoint was performed in immediate force wait mode
postgres@tantor:~/tantor-se-17/data/log$ tail -n 2 postgresql-2024-07-04_163447.log
2024-07-04 16:45:29.581 MSK [2973] LOG: checkpoint starting: immediate force wait
2024-07-04 16:45:29.625 MSK [2973] LOG: checkpoint complete: wrote 0 buffers (0.0%); 0 WAL file(s) added, 0 removed, 0 recycled; write=0.001 s, sync=0.001 s, total=0.045 s; sync files=0, longest=0.000 s, average=0.000 s; distance=16383 kB, estimate=16383 kB; lsn=0/1C000070, redo lsn=0/1C000028
7) Проверьте, что созданный бэкап есть в списке:
postgres@tantor:~$ wal-g backup-list
name modified wal_segment_backup_start
base_00000001000000000000001C 2035-06-25T13:45:35Z 00000001000000000000001C
If you specify a random directory during backup, and not the cluster directory, an error will be returned:
postgres@tantor:~$ wal-g backup-push abcd
WARNING: 2035/06/25 16:54:15.130694 Data directory for postgres 'abcd' is not equal to backup-push argument '/var/lib/postgresql/tantor-se-17/data'
ERROR: 2035/06/25 16:54:15.131420 Data directory read from Postgres (abcd) is different than as parsed (/var/lib/postgresql/tantor-se-17/data).
panic: Data directory read from Postgres (abcd) is different than as parsed (/var/lib/postgresql/tantor-se-17/data).
It is not intuitively clear what "Postgres" and "parsed" mean, probably the directories are mixed up.
To view backups via the web interface, you need to click on the folder icon on the basket page, at the top right of the browser window:
8) A file appeared in the pg_wal directory :
postgres@tantor:~$ ls $PGDATA/pg_wal/
000000010000000000000001C.00000028.backup 000000010000000000000001E archive_status
00000001000000000000001D 00000001000000000000001F walg_data
postgres@tantor:~$ cat $PGDATA/pg_wal/*.backup
START WAL LOCATION: 0/1C000028 (file 00000001000000000000001C)
STOP WAL LOCATION: 0/1C000130 (file 00000001000000000000001C)
CHECKPOINT LOCATION: 0/1C000070
BACKUP METHOD: streamed
BACKUP FROM: primary
START TIME: 2035-06-25 16:45:29 MSK
LABEL: 2035-06-25 16:45:29.514037 +0300 MSK m=+0.118109848
START TIMELINE: 1
STOP TIME: 2035-06-25 16:45:35 MSK
STOP TIMELINE: 1
Часть 4. Восстановление из бэкапа, созданного WAL-G
There is a physical replica in the configuration. Check that the replication slot is in use:
postgres=# select * from pg_stat_replication\gx
-[ RECORD 1 ]----+------------------------------
pid | 2981
usesysid | 16384
usename | replicator
application_name | walreceiver
client_addr | ::1
client_hostname |
client_port | 41306
backend_start | 2035-06-25 16:34:47.297025+03
backend_xmin |
state | streaming
sent_lsn | 0/1D000198
write_lsn | 0/1D000198
flush_lsn | 0/1D000198
replay_lsn | 0/1D000198
write_lag |
flush_lag |
replay_lag |
sync_priority | 0
sync_state | async
reply_time | 2035-06-25 17:04:43.201876+03
postgres=# select * from pg_replication_slots \gx
-[ RECORD 1 ]-------+-----------
slot_name | pgstandby1
plugin |
slot_type | physical
datoid |
database |
temporary | f
active | t
active_pid | 2981
xmin |
catalog_xmin |
restart_lsn | 0/1D000198
confirmed_flush_lsn |
wal_status | reserved
safe_wal_size | 1090518632
two_phase | f
conflicting |
2) If the previous part of this practice was successfully completed, i.e. the logs were archived and the backup was made, then stop the cluster and delete the PGDATA directory :
postgres@tantor:~$ pg_ctl stop
waiting for server to shut down.... done
server stopped
postgres@tantor:~$ rm -rf $PGDATA/*
The command simulates a complete loss of the master ("disaster"). The command also deletes the current WAL segment that was not written to the archive. Transactions that are in this file will not be restored.
2) Run the command to restore the cluster directory from the backup:
postgres@tantor:~$ wal-g backup-fetch $PGDATA LATEST
INFO: 2035/06/25 17:09:21.604287 Selecting the latest backup...
INFO: 2035/06/25 17:09:21.608464 LATEST backup is: 'base_00000001000000000000001C'
INFO: 2035/06/25 17:09:21.648710 Finished extraction of part_003.tar.br
INFO: 2035/06/25 17:09:28.920711 Finished extraction of part_001.tar.br
INFO: 2035/06/25 17:09:28.926843 Finished extraction of pg_control.tar.br
INFO: 2035/06/25 17:09:28.927310
Backup extraction complete.
Directory restored .
3) Check the contents of the logs directory:
postgres@tantor:~$ ls $PGDATA/pg_wal
The directory is empty.
4) Look at the contents of the control file:
postgres@tantor:~$ pg_controldata
pg_control version number: 1300
Catalog version number: 202307071
Database system identifier: 7353194261070147214
Database cluster state: in production
pg_control last modified: Thu 25 Jun 35 04:45:29 PM MSK
Latest checkpoint location: 0/1C000070
Latest checkpoint's REDO location: 0/1C000028
Latest checkpoint's REDO WAL file: 00000001000000000000001C
Latest checkpoint's TimeLineID: 1
Latest checkpoint's PrevTimeLineID: 1
Latest checkpoint's full_page_writes: on
Latest checkpoint's NextXID: 764
Latest checkpoint's NextOID: 16529
Latest checkpoint's NextMultiXactId: 1
Latest checkpoint's NextMultiOffset: 0
Latest checkpoint's oldestXID: 723
Latest checkpoint's oldestXID's DB: 1
Latest checkpoint's oldestActiveXID: 764
Latest checkpoint's oldestMultiXid: 1
Latest checkpoint's oldestMulti's DB: 1
Latest checkpoint's oldestCommitTsXid:0
Latest checkpoint's newestCommitTsXid:0
Time of latest checkpoint: Thu 25 Jun 35 04:45:29 PM MSK
Fake LSN counter for unlogged rels: 0/3E8
Minimum recovery ending location: 0/0
Min recovery ending loc's timeline: 0
Backup start location: 0/0
Backup end location: 0/0
End-of-backup record required: no
wal_level setting: replica
wal_log_hints setting: off
max_connections setting: 100
max_worker_processes setting: 8
max_wal_senders setting: 10
max_prepared_xacts setting: 0
max_locks_per_xact setting: 64
track_commit_timestamp setting: off
Maximum data alignment: 8
Database block size: 8192
Blocks per segment of large relation: 131072
WAL block size: 8192
Bytes per WAL segment: 16777216
Maximum length of identifiers: 64
Maximum columns in an index: 32
Maximum size of a TOAST chunk: 1996
Size of a large-object chunk: 2048
Date/time type storage: 64-bit integers
Float8 argument passing: by value
Data page checksum version: 0
Mock authentication nonce: 5c6cff5b22f9ce01ca3ad035abc27d15de5499782456494a5dbc7016b5fdc3a9
Control file - image the one that existed on moment reservations .
On This indicate lines :
Database cluster state: in production
pg_control last modified: Thu 25 Jun 35 04:45:29 PM MSK
5) Instead of the control file, backup_label will be used.
See that it is present and not empty:
postgres@tantor:~$ cat $PGDATA/backup_label
START WAL LOCATION: 0/1C000028 (file 00000001000000000000001C)
CHECKPOINT LOCATION: 0/1C000070
BACKUP METHOD: streaming
BACKUP FROM: primary
START TIME: 2035-06-25 16:45:29 MSK
LABEL: 2035-06-25 16:45:29.514037 +0300 MSK m=+0.118109848
START TIMELINE: 1
6) Try running the instance:
postgres@tantor:~$ pg_ctl start
waiting for server to start....
2024-07-04 17:16:12.130 MSK[3368] MESSAGE: Passing protocol output to protocol collection process
2024-07-04 17:16:12.130 MSK [3368] HINT: From now on, logs will be output to the "log" directory.
stopped waiting
pg_ctl: could not start server
Examine the log output.
The instance failed to start, there are no logs to synchronize the cluster files, because in the pg_wal directory there is not a single log file.
7) Create a file that will indicate that you are restoring from a backup:
postgres@tantor:~$ touch $PGDATA/recovery.signal
8) Run the instance:
postgres@tantor:~$ pg_ctl start
waiting for server to start....
2024-07-04 17:21:25.081 MSK [3445] MESSAGE: Passing protocol output to protocol collection process
2024-07-04 17:21:25.081 MSK [3445] HINT: From now on, logs will be output to the "log" directory.
. done
server started
The cluster has been restored and the instance is running. The last redo log applied is the one that was archived. An incomplete restore was performed.
The redo logs that were not archived were not applied, and any transactions that might have been in them were lost.
9) View the contents of the logs directory:
postgres@tantor:~$ ls -a $PGDATA/pg_wal
. 0000000 2 000000000000001E 0000000 2 00000000000000020 archive_status walg_data
.. 0000000 2 000000000000001F 0000000 2 .history .wal-g
The directory is not empty. A new timeline was created.
Among other things, a file appeared 000000 2 .history and empty directory .wal-g/prefetch/running
10) Verify that the replication slots that existed at the beginning of this part of the practice have been removed:
postgres@tantor:~$ psql
psql (17.5)
Type "help" for help.
postgres=# select * from pg_stat_replication\gx
(0 rows)
postgres=# select * from pg_replication_slots \gx
(0 rows)
Reason: incomplete recovery.
Part 5. Using WAL-G with a file system
WAL-G, in addition to using the S3 protocol, can backup and restore from a directory in the file system. The directory does not necessarily have to be on the local disk, you can mount any file system, for example, NFS.
1) Create a WAL-G parameter file:
postgres@tantor:~$ cat > /var/lib/postgresql/.walgf.json <<EOF
{
" WALG_FILE_PREFIX ": "/var/lib/postgresql/tantor-se-17",
"WALG_COMPRESSION_METHOD": "brotli",
"WALG_ DELTA _MAX_STEPS": "5",
"PGHOST": "/var/run/postgresql/.s.PGSQL.5432",
"PGDATA": "/var/lib/postgresql/tantor-se-server-15/main/$(cat /etc/hostname)"
}
EOF
The backup will be performed in the directory pointed to by the WALG_FILE_PREFIX key.
2) Create a backup by running the command:
postgres@tantor:~$ wal-g --config /var/lib/postgresql/.walgf.json backup-push $PGDATA
INFO: 2035/06/25 18:38:13.859671 Couldn't find previous backup. Doing full backup.
INFO: 2035/06/25 18:38:13.884199 Calling pg_start_backup()
INFO: 2035/06/25 18:38:13.937985 Starting a new tar bundle
INFO: 2035/06/25 18:38:13.938445 Walking ...
INFO: 2035/06/25 18:38:13.939263 Starting part 1 ...
INFO: 2035/06/25 18:38:16.984992 Packing ...
INFO: 2035/06/25 18:38:16.987214 Finished writing part 1.
INFO: 2035/06/25 18:38:16..987498 Starting part 2 ...
INFO: 2035/06/25 18:38:16.987877 /global/pg_control
INFO: 2035/06/25 18:38:16.988634 Finished writing part 2.
INFO: 2035/06/25 18:38:16.988737 Calling pg_stop_backup()
INFO: 2035/06/25 18:38:17.021268 Starting part 3 ...
INFO: 2035/06/25 18:38:17.022452 backup_label
INFO: 2035/06/25 18:38:17.022772 tablespace_map
INFO: 2035/06/25 18:38:17.023600 Finished writing part 3.
INFO: 2035/06/25 18:38:17.039974 Wrote backup with name base_00000002000000000000001F
3) Посмотрите, какие директории и файлы были созданы:
postgres@tantor:~$ ls -a /var/lib/postgresql/tantor-se-17
. .. basebackups_005 data
postgres@tantor:~$ ls -a /var/lib/postgresql/tantor-se-17/basebackups_005
. base_00000002000000000000001F
.. base_00000002000000000000001F_backup_stop_sentinel.json
postgres@tantor:~$ wal-g --config /var/lib/postgresql/.walgf.json backup-push $PGDATA
INFO: 2035/06/25 18:49:13.386080 LATEST backup is: 'base_00000002000000000000001F'
INFO: 2035/06/25 18:49:13.386934 Delta backup from base_00000002000000000000001F with LSN 0/1F000028.
INFO: 2035/06/25 18:49:13.430095 Calling pg_start_backup()
INFO: 2035/06/25 18:49:13.492602 Delta backup enabled
INFO: 2035/06/25 18:49:13.492820 Starting a new tar bundle
INFO: 2035/06/25 18:49:13.493022 Walking ...
INFO: 2035/06/25 18:49:13.493596 Starting part 1 ...
INFO: 2035/06/25 18:49:13.536216 Packing ...
INFO: 2035/06/25 18:49:13.541442 Finished writing part 1.
INFO: 2035/06/25 18:49:13.541661 Starting part 2 ...
INFO: 2035/06/25 18:49:13.541839 /global/pg_control
INFO: 2035/06/25 18:49:13.543270 Finished writing part 2.
INFO: 2035/06/25 18:49:13.543529 Calling pg_stop_backup()
INFO: 2035/06/25 18:49:13.590353 Starting part 3 ...
INFO: 2035/06/25 18:49:13.590899 backup_label
INFO: 2035/06/25 18:49:13.591465 tablespace_map
INFO: 2035/06/25 18:49:13.592343 Finished writing part 3.
INFO: 2035/06/25 18:49:13.598641 Wrote backup with name base_000000020000000000000021_D_00000002000000000000001F
postgres@tantor:~$ ls -a /var/lib/postgresql/tantor-se-17/basebackups_005
.
..
base_00000002000000000000001F
base_00000002000000000000001F_backup_stop_sentinel.json
base_000000020000000000000021_D_00000002000000000000001F
base_0000000200000000000000021_ D _000000020000000000000001F
_backup_stop_sentinel.json
Part 6. Stopping log archiving
1) Run the commands:
postgres@tantor:~ $ rm -rf /var/lib/postgresql/tantor-se-17/basebackups_005
postgres@tantor:~ $ psql -c " alter system set archive_mode = off; "
ALTER SYSTEM
postgres@tantor:~ $ pg_ctl stop
waiting for server to shut down.... done
server stopped
postgres@tantor:~ $ sudo systemctl start tantor-se-server-17
postgres@tantor:~$ sudo systemctl stop tantor-se-server-17-replica
Setting the archive_mode parameter to off disables the backup of WAL segments.